Chapter 01
Capture
We dive into camera technology so that you can start your workflow off right, covering topics like cameras, codecs, and color spaces.
9 minute read

The filmmaking process begins long before the cameras start rolling, but that is where our journey starts, as we chart the factors and decisions that you will need to make throughout the post-production process.
How to choose your capture codec
One of the first decisions to make is what codec to use, since most cameras offer many different options for how to record your video.

It’s vital to consider your complete workflow at this point, because the camera and the codec that you choose now will have major implications for your entire workflow. In order to make your final decision about the camera and codec, you’ll need to return to this section after you’ve read the rest of this guide, but we’ll give you a good overview here.
Generally speaking, you should aim for the highest-quality codec that your camera (or your budget) can capture. When we say “highest quality”, we mean that you want to capture as much information as possible—so you want less compression, higher bit rate, higher bit depth, and less chroma subsampling (click on the box above for more explanations). The more information you have when you capture, the more flexibility you will have later, especially in color-correction and VFX.
[Check out the Codec Comparison to see for yourself how different codecs impact image quality.]

Factor 1: Cost
The first consideration for many is cost. Generally speaking, the more expensive the camera, the better the available codecs are, but there are some exceptions. There are some “sweet spot” cameras that offer excellent codecs at a reasonable price. Panasonic’s GH series (especially in the early days when the GH2 was hacked) are known for offering better codecs than the other cameras in their price range. (Panasonic’s GH5 can record internal 4:2:2 10-bit recording at 4K for under US$2,000).

Blackmagic Design (along with the Magic Lantern hack for Canon DSLRs) brought raw recording options to lower-budget cameras a few years ago. These cameras are the exceptions, however.
Factor 2: Storage
The second factor to consider is storage space. High-quality codecs tend to be higher bit-rate, which means that the files are larger. You need to be prepared to store and back up all of those files as you’re shooting. You may also have to upgrade your memory cards in order to be able to record the high-bitrate data.
If you’re shooting solo, you may choose a lower-quality codec because it allows you to change memory cards less often and focus on the story instead.
Factor 3: Finishing
Another factor to consider is how much color-correction and VFX (collectively referred to as finishing) you plan to do. If you’re going to be doing very minimal color-correction and no VFX, then you can probably get away with lower bit-depth, chroma subsampling, and macro blocking that come with lower-quality capture codecs.
EFILM Senior Colorist Mitch Paulson in finishing a session.

It’s mainly in color-correction and VFX that you’ll see the benefits of higher-quality codecs.
Factor 4: Editing Hardware
The last factor to consider is your editing hardware, because most capture codecs are not well suited to editing without a high-performance computer. H.264 and some raw files formats require a powerful CPU and/or GPU to edit smoothly. Very-high-bitrate codecs may require high-speed hard drives or shared storage. Unless you happen to be shooting with an edit-friendly codec, you may have to transcode your files to another codec for a smooth editing process, and that can take time. For most people, transcoding the footage isn’t a huge issue because it can be done overnight or on a spare computer.
If you’re working with very tight turn-around times, however, you may choose a codec that will allow you to start editing immediately after a shoot, even if that means a higher cost or a sacrifice in image quality.
Log Recording
Once you’ve chosen your codec, you’re also going to need to decide whether to record in log or not.
Recording your video in log has the significant benefit of allowing you to retain more color information than “standard” (non-log) video, especially in the highlights and the shadows.
Colorists love log footage because it gives them a lot more room to make changes in the color grade. If you record log footage with a high-quality codec (the codec you choose is important), you will have many of the benefits of working with raw footage (e.g. greater latitude and flexibility in color correction; greater retention of details in highs and lows; etc.), but without the requirement of extra processing power.
Nearly every camera maker has their own flavor of log, but they all do essentially the same thing.
The most obvious downside of recording log is that the image that comes out of the camera looks extremely low-contrast and desaturated. This makes it very hard to judge the images, which can be a pain, especially if you have a client peering over your shoulder at the monitor. Most people aren’t used to viewing log images, and so the images won’t look right to them.

In order to preview your footage accurately, you will need to add a lot of contrast and saturation. One common way to do that is by applying a Look Up Table, or LUT. A LUT is essentially a color correction preset. You’ll choose a particular LUT that’s designed to match your particular type of log and make it look like “normal” footage. If you’ve used Instagram filters, a LUT is the same concept, but much more precise.

So, recording in log still adds some complexity to the workflow. You have to find the right LUT for your footage, and you also need to manage your LUTs throughout the whole post-production process.
In spite of that annoyance, the image-quality benefits of log recording are significant, and it’s now very common. We will assume that you’re recording in log for the rest of this guide. If you’re not, don’t worry. Your workflow will just be slightly simpler because you won’t need to add any preview LUTs.
Color Spaces
In discussing log images, we’ve just touched the topic of color spaces, which is a fundamental technical concept that underlies all image data and processing.
A color space is a way to describe colors using electronic data. Color is really an attribute of light waves, and light is analog, which means there is an infinite number of subtle shades of color. You can’t capture that infinite range of colors in a digital computer, however. Computers need to work with concrete numbers, and so a color space is a method for translating light into numbers.
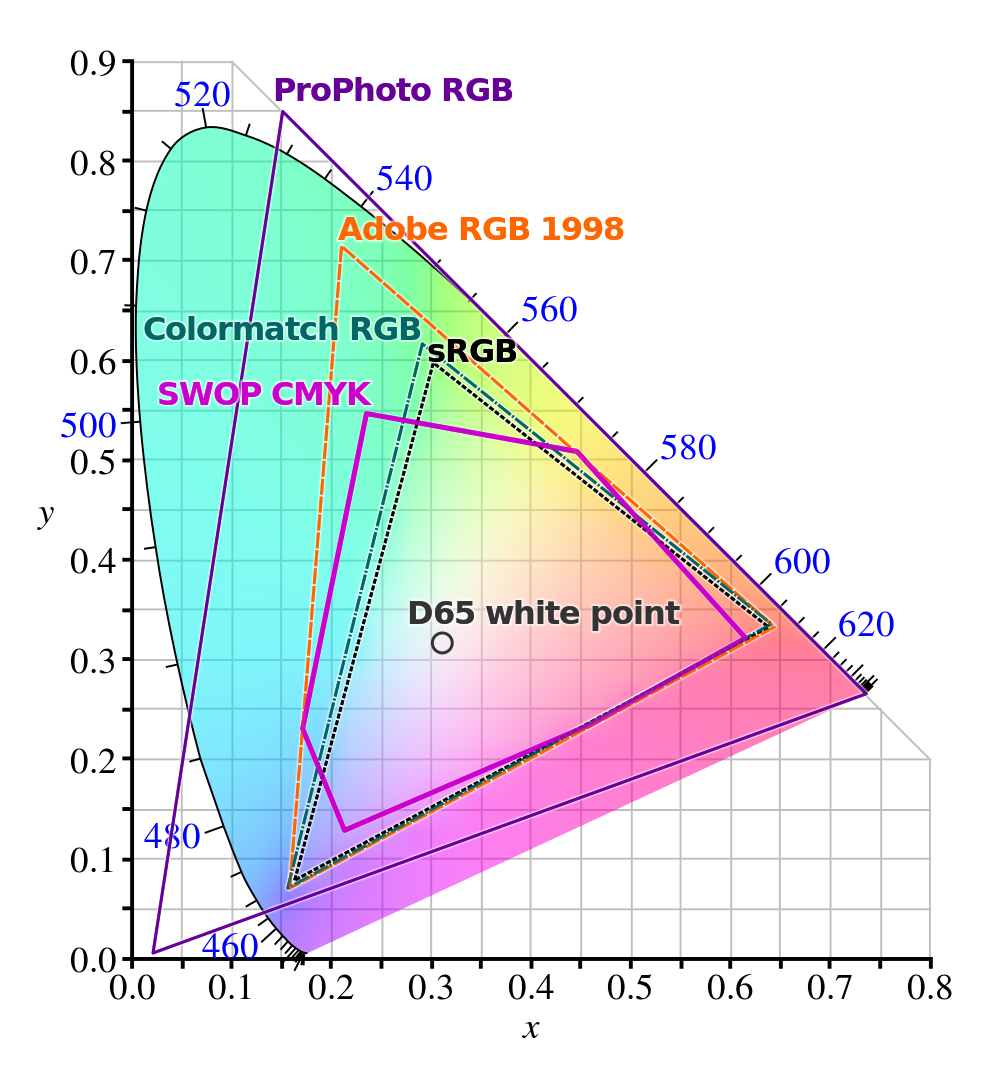
You can translate light into numbers in many different ways, and so there are many different types of color spaces, some of which have been around for decades, and some of which are brand new. Each of them is well-suited for a particular case, but none of them is best for every situation. Some are good at capturing, and some are good at displaying on monitors, while others are good at displaying on projectors.
Every camera, when it records data, has to record it into some kind of color space (unless it’s raw video, in which case you’re able to choose your color space later). You can always convert from one color space into another, but you have to be careful, or you may lose some information.
Some color spaces can hold a broader range of colors than others, and so if you convert from a bigger color space to a smaller color space, your software may have to chop off some of the edges to make it fit. Unless you do it properly, that can have a disastrous effect on your images.
The balance you have to consider when choosing a color space is the same balance that we’ve discussed when talking about bit depth and codecs. Generally speaking, if you record more information, you will need more storage space, you will need more computer power to process that data, and you will need to spend more time managing and tweaking your workflow to ensure that your color space is preserved.
Thus, high end workflows tend to capture into very large color spaces and preserve them carefully throughout the entire process, especially if the end result may be projected in a theater. Lower-end workflows (especially on projects that will only be viewed on computer screens) tend to go with simpler, smaller color spaces in order to save time and money.
Contributed by Graeme Nattress, Red.
ACES
The Academy Color Encoding System (“ACES”) refers to a format and also a process that goes along with it, which makes it easier to work with deep color spaces in high-end workflows. Working with deep color spaces and high dynamic range (HDR) images can be extremely complicated because there are so many different formats and tools and workflows, many of which are not compatible with each other. ACES aims to solve that problem by creating a single, standardized workflow that can work for everyone who really cares about preserving all of their image data through the entire image pipeline.

If you are producing videos that are only going to end up on the web, then chances are that ACES is unnecessary for you. If you are producing a feature film to be shown in theaters, or if you are investing a lot of money into a project that may live on for years to come (and may be shown on as-yet-unknown technology), then ACES may be well worth your while.
Contributed by the team at Mixing Light.
Raw Video
Recording raw is becoming much more common with many of the high-end cameras (and some of the low-end ones) providing raw recording.
Raw footage has many of the same benefits of log, but taken another step further. Whereas log footage gives you lots of extra dynamic range compared to standard video, raw footage gives you a bit more.
Contributed by the team at Red.
Both log video and raw video come in many different flavors, however, so it’s not always easy to compare them directly. It’s possible to have very highly-compressed raw footage, which may look worse than log footage with a high-quality codec. If you’re looking to get the absolute best color that you possibly can out of your sensor, however, your best bet is to shoot raw with low or no compression.

Apple ProRes Raw image from Frame.io’s Apple FCP X integration promo film.
Raw footage also has the extra bonus that, if the footage was accidentally recorded with an extreme color cast (much too yellow, or much too blue), that can be easily corrected. Log footage does not have as much of an ability to correct for color mistakes. Those mistakes are rare, however.
In spite of the image-quality benefits of raw, there are two major downsides: larger file sizes and extra processing requirements.
With a few exceptions, raw video is almost always much larger than non-raw video. That means more memory cards, more hard drives, and more time spent copying files. Depending on the type of raw we’re talking about, you could have 5 times as much data as a non-raw codec.

Raw video also takes significantly more processing power in order to view, edit, or transcode. When you’re transcoding your dailies (in the next section), you’re going to need beefier hardware or else a lot more patience.
Contributed by Reuben Evans, Executive Producer, Faithlife TV.
Because the decisions about the camera, codec, and color space affect so many stages of post-production, it’s very important to have everyone on board with those decisions. The Director of Photography, the DIT (digital imaging technician), the colorist, and the VFX houses should all be bought in.
Continue readingfor free
Unlock all 100,000 words of the Frame.io Workflow Guide and learn how the pros do workflow.

Chapter 02
Prep
A lot has to happen between the time when the director yells “cut” and the editors begin their work. Syncing, backups, checksums, and more.
8 minute read

Whichever camera and settings you choose, the result of all your hard work from the shoot is going to be a memory card or SSD full of files. Probably many of them.
The very first thing you should do as soon as a card has been removed from the camera is back it up. In multiple places. At the end of the day, all of the results of your entire team’s efforts are contained in a few very fragile pieces of metal and plastic.
Because those files are so precious, the DIT or camera operator will use special software to run the backups, rather than using the standard file copy functions. This software uses a checksum, which is like a digital fingerprint, to make sure that the files on the backup hard drives are exactly the same as the files on the memory cards.

Image © Logra Studios Photography from the set of “The Suitcase”. Dir. Abi Damaris Corbin
Later, you will very likely convert these files into different formats, but you should always keep the original camera files carefully backed up. These files are also sometimes called the “camera negative” (a reference to the days of physical film cameras).
Dailies
Dailies (also referred to as “rushes”) is the collective term for all of the footage that was shot on a given day. At the end of the day (and sometimes also in the middle of the day), the DIT preps the dailies and sends them off to the producers to view, and to the editors to begin creating assembly edits.
The DIT can’t simply copy the files from the memory card to a hard drive and hand it off, however. Several important tasks must happen first.
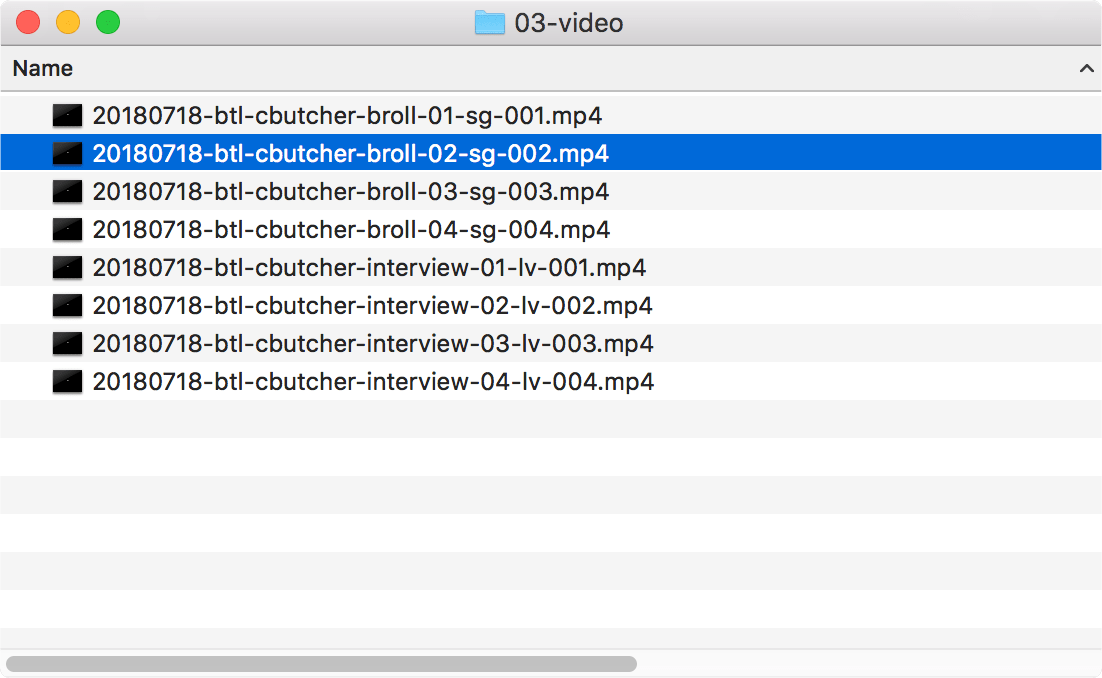
The footage must be organized
Producing a feature film will involve tens of thousands of individual audio and video files, created over many weeks, and it’s extremely important that all of those files are organized properly. The cameras do not do this automatically!
A carefully-maintained folder structure system helps keep each file in exactly the right place, and the files themselves will often be renamed so that, even if they get moved out of the correct folder, it will be clear where they belong.

Sound must be synced
In order for the producers and editors to properly review dailies, the DIT or dailies team must carefully sync the audio and video together.
Even though all digital cameras are capable of recording sound and video together in the same file, it’s still very common for the film’s sound to be recorded separately. This is called dual-system sound.
If you’re going for the highest possible sound quality, then you’ll get a better recording if you use a dedicated sound recorder. The sound recording capabilities of most cameras, even professional cinema cameras, can’t match a high-end sound recorder.

And then, just logistically, it often makes sense for the sound to be recorded separately. The sound recordist is going to be carefully monitoring and tweaking the sound levels during recording, and you don’t normally want an extra person huddled over the camera pressing buttons while the camera is rolling.
There are some situations (a sit-down interview, for instance), where separate sound recording is probably not necessary. In that scenario, it’s unlikely that the volume of the sound will have huge changes, so the sound recordist doesn’t need to be tweaking dials while the camera is rolling. And if you’re using professional mics and a professional camera, you may be perfectly happy with the audio quality. It’s all relative.

Interview with Emmy-award-winning Imaginary Forces Creative Director Karin Fong.
Metadata must be handled
Metadata is data about a video file that goes along with the file, separately from the video and audio itself. This data can be extremely valuable for the rest of the post-production process. Some metadata (e.g. shutter speed, lens information, date, time, timecode, etc.) is captured by the camera itself. That lens information is very valuable if you are doing any CGI, for instance.
Contributed by Philip Hodgetts, Intelligent Assistance.
Some metadata is recorded separately (often by a script supervisor), and might include the shot, scene, take information, the actors who appear in the shot, and the director’s comments about that shot. If the editors (who usually were not on set) know which takes the director really liked, that will help them build an edit that the director will be happy with.
Script Supervisor on the set of “The Suitcase” with iPad app for logging scene and metadata. Image © Logra Studio Photography. Dir. Abi Damaris Corbin
Keeping track of all of that data is a surprisingly complex task, especially since different software handles metadata differently.

Contributed by Philip Hodgetts, Intelligent Assistance.
The footage may need to be transcoded
The files that come straight out of the camera are usually not well-suited for editing. Depending on the camera and codec, they may even be impossible to play back on a normal computer. So, before anybody views the dailies, they often must be transcoded.
Transcoding is the process of converting files from one codec into another, and the DIT may even have to transcode the files into multiple formats—one for the producers/director to view, and another for the editors to use.
The editors may request a specific codec. Avid’s DNxHR and Apple’s ProRes are very common for editorial. In our workflow analysis of the 2018 Oscar nominees, we found that the DNx 115 codec was extremely popular, in spite of its age. If the editors are using Final Cut Pro X, however, they may request a ProRes codec. While DNxHR codecs are more common among feature films, ProRes is more common in broadcast TV.
[Check out the Codec Comparison tool to see how different codecs impact image quality and playback performance.]
Unfortunately, the files that editors like to use aren’t as convenient for producers to review, partly because of their file size and partly because they may require special software to be installed. The DIT will probably also generate a separate set of dailies for producers to review in the H.264 codec, which are easy to play back on any computer.
If you’re using a tool like Frame.io to collaborate online, then it’s not necessary to generate separate dailies for the producers/editors, since Frame.io generates them automatically. Cloud-based tools are becoming more and more popular for dailies review because they make it easy for the team to collaborate from different locations, with the footage available from a web browser or mobile app.

Executive Producer at Ingenuity Studios reviewing VFX shots in Frame.io from the movie “Get Out.”
LUTs must be applied
In the section on log recording, we learned that most video is captured in a very low-contrast, low-saturation format that isn’t very nice to look at. In order to preview these files properly, we must add saturation and contrast (also known as gamma) back in.
The most common way to do that is by applying a LUT to the footage, which automatically converts the footage into a more natural-looking image. These “technical LUTs” are designed specifically to match the camera’s sensor and settings.
Contributed by Mazze Anderhold, Assimilate.
In addition, the Director of Photography may have prepared a creative LUT, which adds a creative “look” to the footage. The DP may even have a different creative LUT for each scene. In most cases, both the technical and creative LUTs will be applied to the dailies so that the producers and editors can see an image that is as close to the DP’s vision as possible.
Including these LUTs into the editor’s dailies as well as the producers’ dailies will save the editors a lot of time and headaches. While any editing software can apply a LUT to footage, it requires some extra organizational overhead, and it may slow down the editing machine a bit as well.
Later on, when the colorist is grading the footage, he or she will want to see the LUTs that the DP prepared. The colorist will be using the original camera files, not these transcoded dailies, but they will want to rebuild the look and feel of the footage as the DP saw it. Even if the colorist doesn’t use those LUTs directly in the grading process, those LUTs provide a valuable reference for what the DP was thinking, and so it’s important that all of the LUTs are passed through the pipeline.
On a smaller project, the DIT or a DIT’s assistant may do most of this prep work. On feature films, it’s common for all of the dailies work to be done by a separate post house, which then sends the files off to the editorial team. Depending on how complex the workflow is, how much footage is shot, and how large the files are, the process of creating dailies can take many hours, and so the dailies are sometimes more like yester-dailies.
Files must be delivered to the editors and reviewers
On most projects, the dailies have to go out to two different groups: the editorial team, and the reviewers (producer, director, client). Sending files to the editorial team is a fairly straightforward process. If the editorial team is nearby, it may be simplest to send a courier with a hard drive. If the editorial team is not nearby, files are often sent via a cloud service like Frame.io.

The duo editorial team on the indie hit “Searching” review producer and director comments in Frame.io.
Before digital cameras, all of the producers and the director would meet together in a theater to watch the dailies projected, since that was the only way to do it. That still does happen with digital dailies, but it’s now much more common for the reviewers to watch the dailies separately online, using a platform like Frame.io which allows them to leave comments directly on the video from their laptop or smartphone.
The in-person scenario can allow for good discussions among the reviewers, but in many productions, the editorial team may not be present, and so those comments may not make their way into the editorial process. If the reviewers give feedback via Frame.io, all of their comments and ideas are attached to the clips themselves with timecode. That information can then be easily imported directly into the editing software for the editorial team to use when cutting the film.
In the feature film and television world, it is very common (and in most cases a mandatory aspect of the job) for the lead editor to be in working sessions with key reviewers (e.g. the director, DP, producer, etc.). Despite the power of remote editing processes available through a platform like Frame.io, in these larger production experiences, the in-person interaction is unavoidable.

But even in these scenarios, a remote workflow process is valuable for sharing dailies with studio execs, investors, or other third party stakeholders who might not sit in on early review sessions.
Continue readingfor free
Unlock all 100,000 words of the Frame.io Workflow Guide and learn how the pros do workflow.

Chapter 03
Edit
Whether it takes a team of twenty or a solo artist, the editorial process is balance of artistry and technical details.
16 minute read

As soon as the dailies arrive on a hard drive (or over the internet), the assistant editors do their own preparation, known as ingest. After ensuring that all of the files have arrived as expected and that the sound and metadata are properly synced, the first step is to copy the dailies to their central shared storage.
Shared Storage
Unless the editorial team is just one person, you will need storage that can be shared by multiple editors. The assistants and the lead editor will be working in tandem throughout the project, and they all need access to the same files.
Contributed by Lisa McNamara, Freelance writer and editor.
While it’s possible for each member of the editorial team to keep their own copy on their own external hard drive, it’s a nightmare to keep everyone’s changes in sync.
Shared storage solves this problem by allowing everyone on the team to connect to a single data server which holds all of their files in one place. The simplest shared storage, a box the size of a small desktop computer with 4 hard drives inside it, might cost only $400. On the high end, a large post house may have dozens of rack-mounted servers that cost hundreds of thousands of dollars.

Jellyfish shared storage rack array. Image courtesy of LumaForge.
The primary factors are speed (how fast can you copy files in and out?), simultaneous connections (how many people can access the files at once?), storage size (how many GB or TB can you store?), and reliability (what happens if a hard drive crashes?).
Contributed by Mike McCarthy, Tech with Mike First.
Contributed by Isaac Terronez, Producer, video editor, and technologist.
Contributed by LumaForge.
Contributed by Isaac Terronez, Producer, video editor, and technologist.
Offline Editing
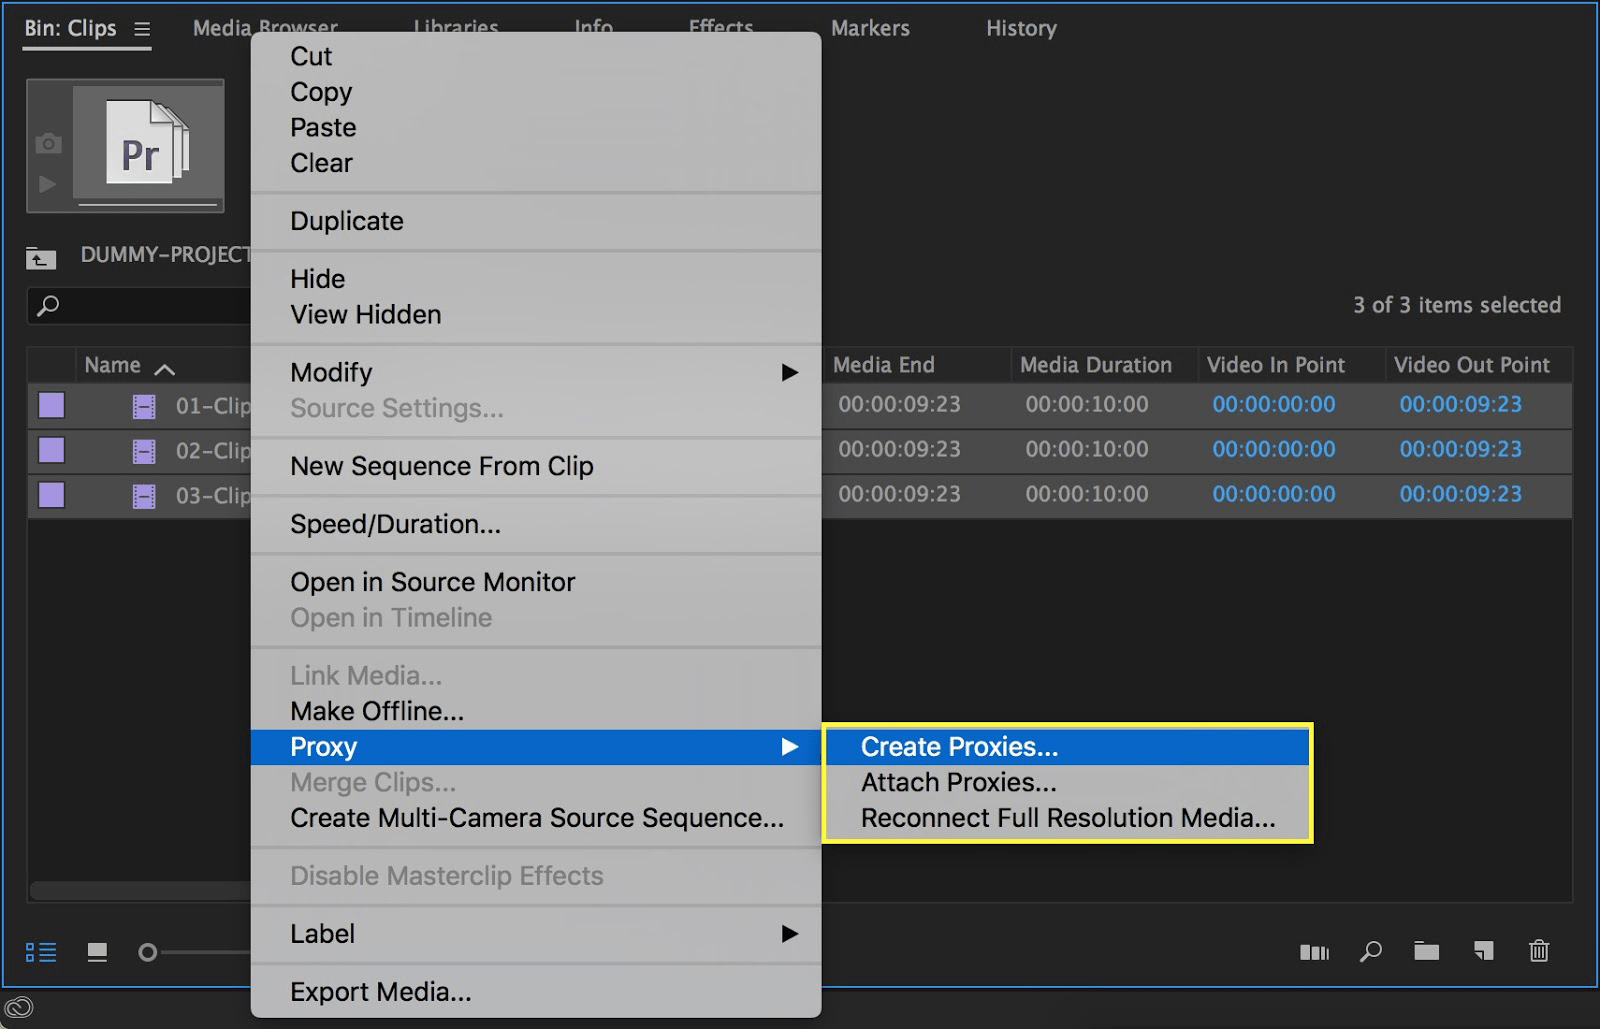
We mentioned briefly above that the files that come directly out of the camera aren’t well suited to editing, so it’s very common to convert those files into a more edit-friendly codec before the editing process starts. This process of working off of a separate set of files is called an offline edit, and the files generated specifically for the offline edit are called proxy files (or proxies).
While the proxy files are great for editing, you shouldn’t do more than basic color-correction with proxy files. If you are going to do all of your color-correction inside of your editing software, then it’s best to re-link back to your camera files because your proxy files more than likely have lower color quality.
The good news is that most editing software today can switch between the camera files and the proxy files in just a couple clicks, so you can even go back and forth if you need to.
We’ve written detailed guides for proxy workflows in each of the major NLEs:
These three guides contributed by Sofi Marshall, Freelance Editor.
Contributed by Seth Goldin, Tech, post-production, and workflow at Freethink Media.
Later on (usually during the conform), the proxies will be discarded and the project will be linked back to the original camera files before being sent to color correction or final delivery. Once the project is reconnected to the original camera files, it is back “online.”
Why edit offline?
While it’s almost always possible to import the camera files directly into the NLE and begin editing, it’s seldom a good idea. Depending on what kind of camera and settings you used, it’s very likely that the codec from your camera is not well suited to editing video. If you are using a highly-compressed codec, if you are using a high-bitrate codec, or if you are recording in a log format, then an offline edit will probably allow you to work faster, on cheaper hardware.
The offline editing process has so many benefits for the editors that it’s nearly universal on feature films and TV shows. In our workflow analysis of the 2018 Oscar Nominees, we found that every single film used an offline workflow. And it’s very common even on smaller projects as well. There are only a few cases where an offline edit isn’t a good idea.
- 1When you have an extremely fast turnaround time. In those cases, it may not be acceptable to wait for proxy files to be generated, and so it can be faster to edit directly on the camera files.
- 2When the files that you capture happen to be well-suited to editing. This is rare, though.
- 3When you’re going to be doing the editing and the color grading on a single computer.
Contributed by Seth Goldin, Tech, post-production, and workflow at Freethink Media.
All-Online Editing
On a large project like a feature film or TV show, for the most part, the various roles in post-production are kept fairly separate. The editors just edit. The colorist just colors. The sound mixer just mixes sound. On smaller projects, however, the roles are much more fluid, and it’s common for a single person to do the jobs of colorist, editor, sound mixer, etc.
In that case, it’s more common to skip the offline edit because you lose some of the benefits. The biggest benefit of the offline workflow is that it allows you to edit smoothly on cheaper hardware. Among 2018’s Oscar nominees, Darkest Hour and The Shape of Water both used old style Mac Pro towers that were far behind the latest technology.
With an offline edit, the editors are able to work with much cheaper computers (or even laptops), and then they can hand off the project to the colorist whose high-horsepower machine can handle the full resolution and quality of the original camera files.

“Baby Driver” lead editor Paul Machliss editing on-set. Image courtesy Paul Machliss.
If the entire process (edit, color, sound, VFX) is happening on a single machine, however, then that machine must be powerful enough to work with the original camera footage. So, if you already have high-performance storage and high-performance computing, then you probably won’t see as much of a speed boost when switching to proxies. Of course, it’s very easy to find out.
There is also a kind of hybrid All-Online approach that we call a Mezzanine workflow. It provides some of the advantages of online editing and also removes the need to relink back to the original camera files. This workflow is becoming less common, however.
Project Organization (Logging)
Once the assistants have copied the new set of dailies to the central shared storage, they will begin organizing them in the NLE (editing software) according to the system that the lead editor prefers.
Although the media files for a film tend to be very large, the project files created by the NLE are usually quite small. The project file contains pointers to all of the media files, but it does not hold those media files themselves—they are stored separately. The media files for a 30-second advertisement might be in the hundreds of gigabytes, while the project file might be only 5 megabytes.
(Note: if you’re a Final Cut Pro X user, you have the option to ingest media directly into the Library, which is Final Cut Pro’s version of a “project file.” In those circumstance, the Library will balloon to the size of the content you import, in addition to the various files it creates. This workflow is uncommon, though).
In the simplest scenario, the file structure inside the NLE will exactly match the structure of the files as they are stored in the shared storage. That simplicity can be nice, but on the other hand it may require moving a lot of files around on the data server.
…the keyword or bin structure within the NLE.
Alternatively, it’s common to leave the files in exactly the same folder structure in which they arrived but organize them differently inside the NLE.
Contributed by Josh Short, Edit Video Faster.
If the editor wants to make heavy use of metadata in the editing process, the assistants will also tag and categorize the new clips to help with the editing process later.
Earlier, we mentioned the metadata that is created during the shoot (camera and lens information, director’s notes, etc.), but some editors use more detailed metadata to organize their edit.
A traditional hierarchical project organization may begin with the major sections of the film (acts), and then within each act will be a folder for each sequence, and then all of the shots in the sequence, and finally all of the takes of that shot.
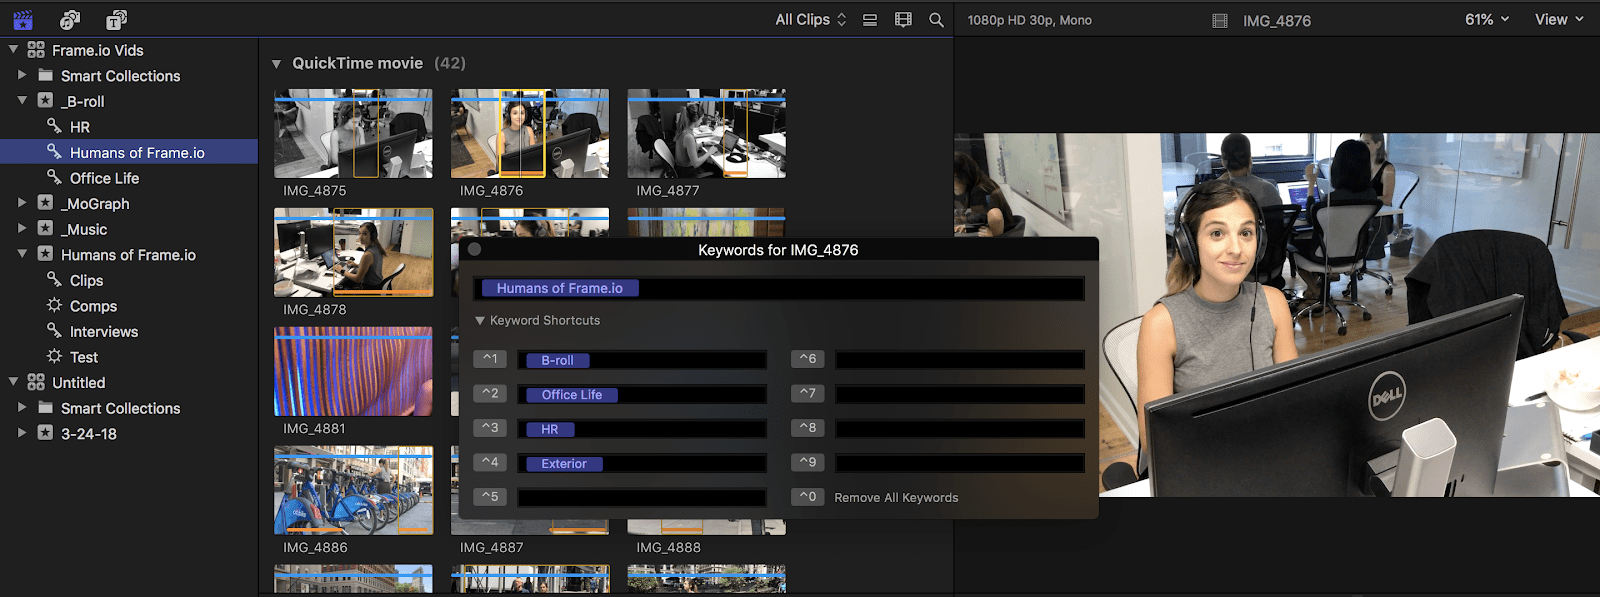
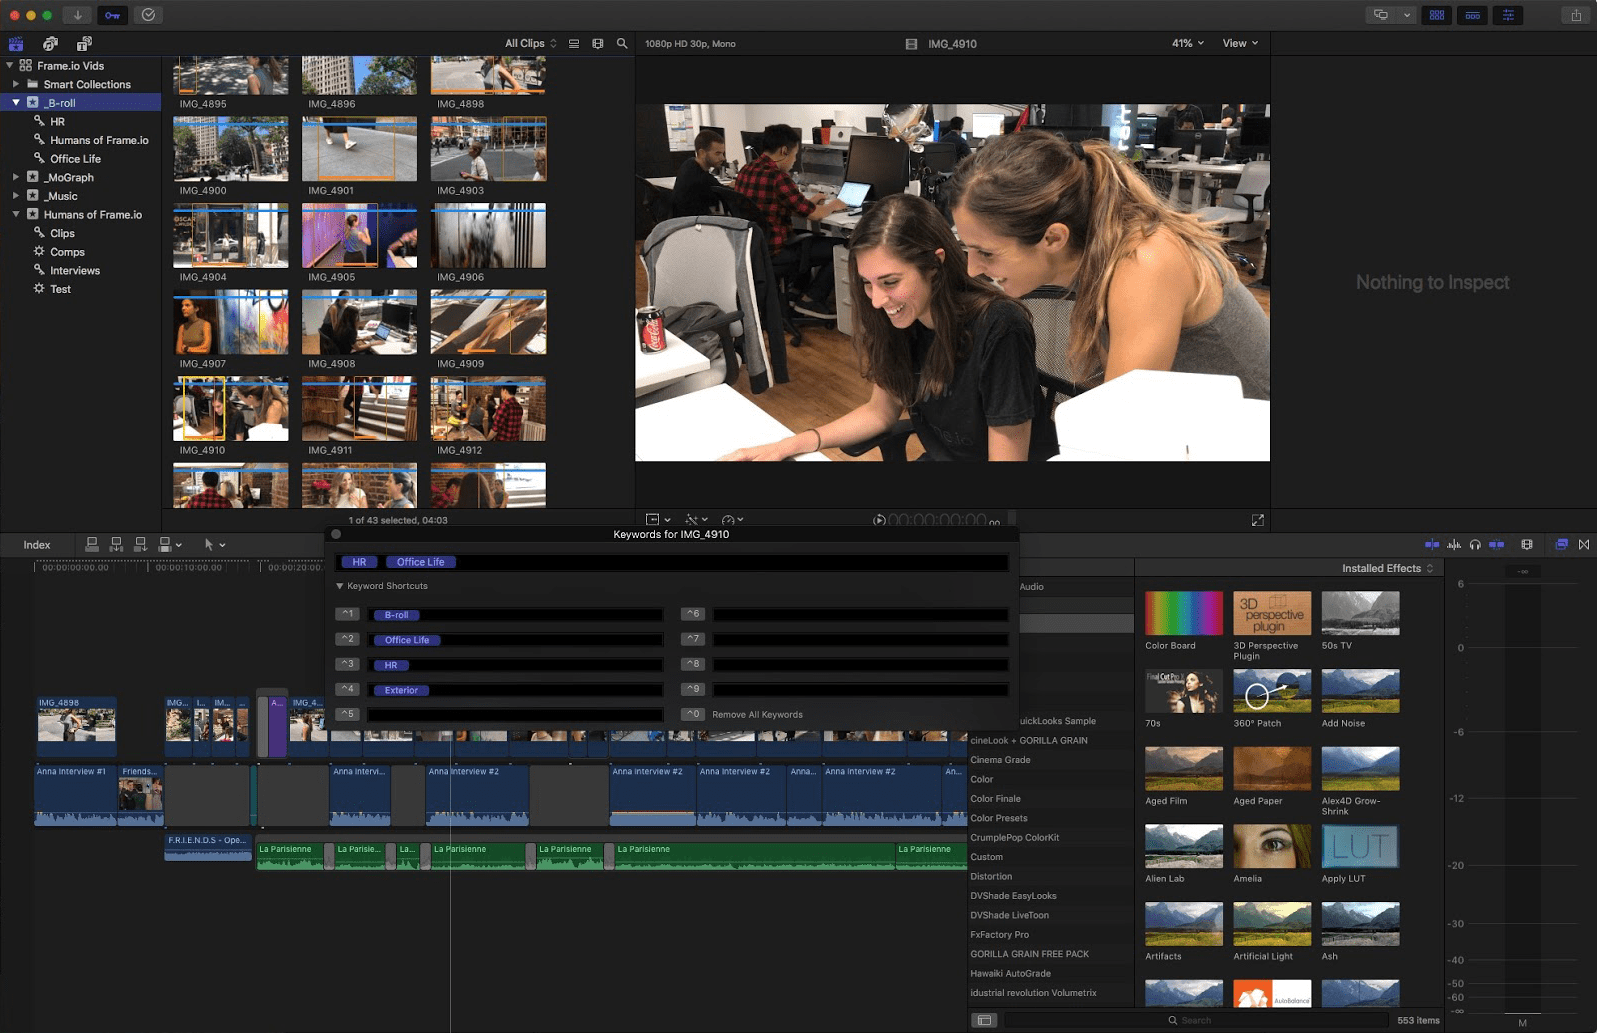
With Final Cut Pro X, Apple created a new approach to editing in the last decade that uses a different paradigm for organizing footage. In addition to thinking about the footage hierarchically, the editor also thinks in terms of the attributes of each clip. Using attributes (or “tags”), the editor can instantly view all of the close-ups of a particular character in one screen, without having to go through all of the different folders.
This approach can be extremely powerful especially for projects that don’t have a strictly planned-out linear script, like an ad or a music video.
In the years since FCP X was released, the other NLEs have all added some sort of tool for metadata organization, though none is as sophisticated as FCP X.
Contributed by Isaac Terronez, Producer, video editor, and technologist.
LUTs in the edit
Hopefully, at this point the basic color grade has been “baked into” the images by the DIT or Dailies team, which means that no extra color information needs to be included in the edit stage. If the dailies have arrived in a log format, then the assistant editors will need to manage the LUTs or CDLs and make sure that they are properly applied to all media, so that the editor can properly judge each shot.
Some NLEs prefer to apply the LUTs at the clip level, while others prefer to apply them at the timeline level. Either is usually possible, but it’s important to choose one approach.
Stringouts
Once the clips are organized and/or tagged, the assistants often build stringouts for each scene, where every single take from the scene is laid out on a single timeline.
Then, the editor will begin working by watching straight through each take and making notes, often by placing markers directly on the timeline or by moving their favorite takes to a separate track.

These long sequences serve as another form of organization. If the editor wants to find a particular close-up of Bob from Scene 14, they can look in the Scene 14 bin, or they can look through the stringout sequence.
Contributed by Charles Haine, Filmmaker, writer, host and professor.
Collaborative Editing
While all of the popular NLEs have some sort of workflow that allows editors to work together on a single project, none of them actually allows multiple editors to make changes to the same timeline simultaneously (as Google Docs does for word documents, for instance). That scenario would probably not work very well anyway, since an edit to the beginning of the film would “ripple” down, causing issues to anyone working on later parts of the film.
Instead, a distributed editorial workflow requires different editors to “check out” or “lock” a sequence or set of files. When that section of the project is locked, the other editors may be able to view it, but are unable to edit it. When that sequence or folder is unlocked again, it’s available for someone else to lock.
So, it’s possible to have multiple people working on the same project at the same time, but not the same part of that project. Each NLE handles this process differently, some more smoothly than others, but there is a workflow for each of them.
Contributed by Charles Haine, Filmmaker, writer, host and professor.
Contributed by Charles Haine, Filmmaker, writer, host and professor.
Stages of the editing process
The number of stages and amount of time spent will also vary widely based on the type of film. A short film’s editorial process may only take a week or two, while a feature film may take 5 or 6 months to edit. On a documentary film, the editorial process often runs in parallel with production, since the story is built primarily in the edit. Some documentaries have literally taken years to edit as the filmmakers patiently and meticulously gather interviews when time (and budget) permit.
Many feature films, even blockbusters, will begin their post-production during the shoot as well, with the lead editor on-set putting clips together, or back at base, cutting completed scenes.

“Mission: Impossible—Fallout” lead editor Eddie Hamilton began putting together scenes for director Chris McQuarrie during the production phase.
The process is still fairly standardized among different types of projects, though some phases will be much condensed.
Contributed by Reuben Evans, Faithlife TV.
Review and feedback
For decades, the only way for the editor to receive feedback was for the director or producers to come directly into the edit suite, and that is still common on feature films and broadcast TV workflows. Many edit and color correction suites include couches, kitchens, and large TVs which allow the client or producer to view a work-in-progress comfortably.
The greatest advantage of this setup is that it allows the reviewer to interact directly with the editor as he or she works, giving comments and suggestions that the editor may be able to implement on the spot. That setup can also be a downside, however, as many editors find it frustrating to work with a reviewer literally standing over their shoulder, especially if the reviewer does not have a deep understanding of the editing process.
Online feedback as an alternative is growing rapidly, as increasing internet speeds have made it easy to upload new drafts of work-in-progress edits. In the past, most video collaboration involved uploading a video to a storage site or video sharing site, then a back-and-forth barrage of emails would ensue among all the collaborators. This process makes it difficult for the editor to manage and process all the feedback, especially if there is a large number of collaborators on the team.

More and more productions of all sizes (from blockbuster films and TV shows to wedding videos) are using services like Frame.io to centralize all their creators, collaborators, and audience. From one platform, video creators can share content and receive organized feedback from collaborators, all in one location.
As soon as a draft is ready for review, the timeline is rendered and compressed, the file is uploaded, and the reviewers are notified automatically. Each reviewer (director, client, producer, etc) reviews the work-in-progress directly from a web browser or smartphone and sends timestamped comments back to the reviewer. Those comments can be downloaded into the NLE as markers so that the editor can respond with new changes.

Frame.io Panel inside Adobe Premiere Pro
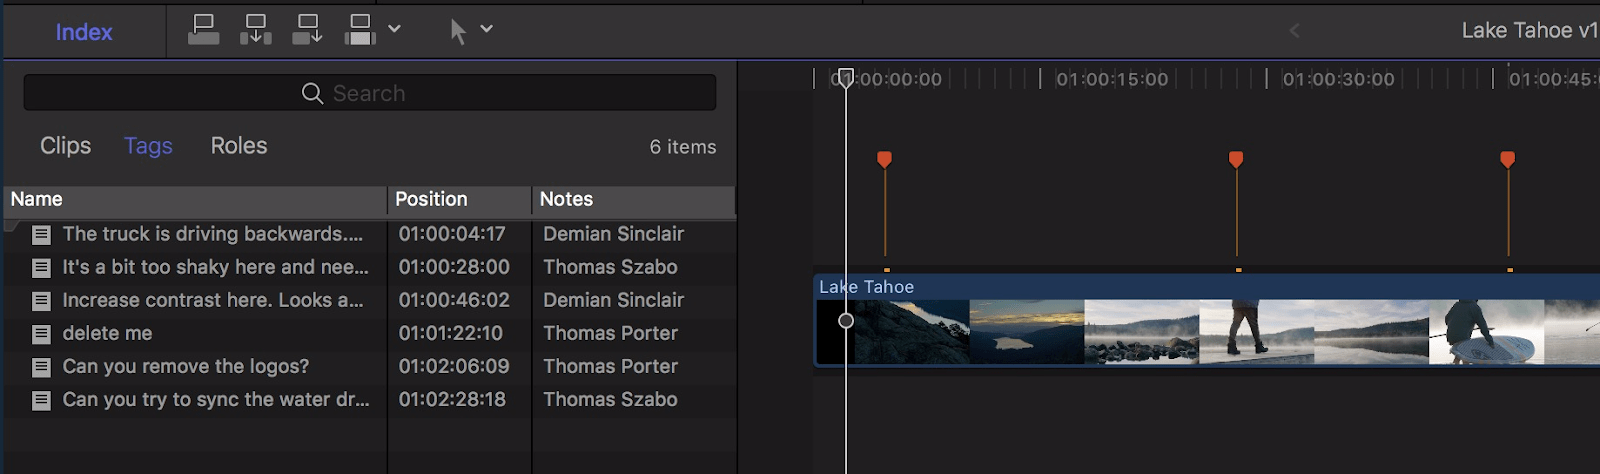
Comments from Frame.io can be dropped into FCP X as Compound Clips.
The major advantage of online review and approval tools like Frame.io is that they allow both distributed and asynchronous feedback.
Distributed feedback online
As video production becomes more and more global, the ability to provide feedback from anywhere in the world becomes more valuable. While a traditional review process requires all of the stakeholders to be in the same room at the same time, an online review process can happen from anywhere.
Asynchronous feedback online
With asynchronous feedback, different reviewers can leave their comments at different times, which is often even more important than distributed feedback. Many teams use Frame.io for review and feedback even though the editors and reviewers are in the same building. It would be easy to walk into the edit suite and give verbal comments, but asynchronicity allows each reviewer to give feedback when it’s most convenient for them, instead of having to schedule a meeting.
Another benefit of asynchronous feedback is that the length of the review cycle becomes shorter. Instead of waiting for a time when several different people are available to schedule a meeting and review a new draft, the editor can send off a message as soon as the draft is done, and then each reviewer sends feedback as soon as they’re available.
In a traditional workflow, if schedules are tight, the editor may have two separate in-person meetings, one with the director and another with the producer, who may give conflicting feedback. Asynchronous feedback allows each reviewer to respond to and discuss each other’s comments.
Contributed by Isaac Terronez, Producer, video editor, and technologist.
Distributed/remote editing workflows
While it is now quite common for directors, producers, and clients to give feedback remotely, it’s less common for the editorial team itself to be distributed across multiple locations.
It’s commonplace across all genres of filmmaking for the different phases of post-production to happen in multiple locations. The edit may be in LA, the color correction in New York, and the VFX in Toronto. That is just as likely for a 30-second advertisement as for a 2-hour feature film.
Handing off a locked edit to the colorist is much simpler than working actively in tandem with another editor, however. The editors and assistants need access to all of the footage, whereas the colorist only needs access to the clips used in the final project. It’s pretty easy to transfer 2 hours of footage to the colorist over the internet, but it’s much harder to transfer 400 hours of footage to another editor.
On a smaller project, it may be quite feasible to send the media files to another editor over the internet. On a larger project with terabytes of footage, it’s usually easier to just mail a hard drive.
The second challenge of remote editing is that everyone has to stay in sync. The assistants need to be able to see what the editor has been working on, and vice versa.
Fortunately, the project files, which hold all of the work done by the editor and assistants, are usually very small, and so it’s easy to send them back and forth or to use a web service to keep them constantly updated. All of the work done by the editorial team is contained in these small project files, so once everyone has access to the media files, there’s no need to transfer them again.
The core idea of how multiple editors work together remotely is the same as how they work together in the same location: one editor “locks” a sequence or a folder, and the other editors work on other sections until the first editor has finished and unlocks the sequence.

“Searching” editors Nick Johnson and Will Merrick.
The major difference is that, when an editorial team is working together in the same office, they work off of a single set of shared files. This makes it simple to designate which files are locked and which are unlocked.
With a remote workflow, however, each editor must maintain their own set of files and keep them in sync at all times. It’s vital for all users to maintain an active internet connection to keep their files in sync whenever they are working so that they know what is locked and what is unlocked. Otherwise, two different editors may begin working on the same sequence at the same time. Both editors will “lock” the sequence, but since they are not connected, that information is not communicated. Once sync is restored, there will be a conflict, and one editor’s work must be discarded.
On most feature films and TV shows, this type of distributed workflow is rare. It’s still the case that the editor and the assistants work out of the same location (though often in separate rooms). New media companies and video marketing teams are expanding their video production capacities rapidly, however, and it’s much more common for those teams to be distributed across multiple locations.
Editing Hardware
As we mentioned above, if you are using an offline workflow, then the editor’s computer usually doesn’t have to be extremely powerful. The colorist and the VFX artist often require very carefully-tuned powerful custom machines in order to handle the enormous task of processing hundreds of millions of pixels every second for high resolution images, but the editor will probably be fine with a mid-to-high-tier standard computer.
It’s quite possible to edit a film on a laptop, but a professional edit suite will allow the editor to work much more efficiently and comfortably, and so an edit suite usually requires several high-quality screens, professional speakers, a comfortable chair, and some high-performance storage.
Contributed by Isaac Terronez, Producer, video editor, and technologist.
Share storage is of course one of the most important pieces of hardware for the editorial team, as we mentioned above.
Editing Software
The NLE (non-linear editor) is the primary tool of the editor, and each of the main NLEs provides all of the functions needed to complete an edit, whether you are cutting a full-length film or a music video.

The core idea of what an NLE provides is very simple: organizing clips, creating timelines, and then cutting and moving clips around in the timeline. Each NLE adds dozens of specialized tools which make those processes quicker, easier, and more manageable. Those tasks sound simple, but when you have hundreds of hours of footage and thousands of clips on your timeline, you really need those specialized tools.
Each of the core NLEs also offers a suite of tools to accomplish the other main branches of post-production: color correction, sound editing and mixing, VFX, and delivery. On high-end projects, each of those tasks is handed off to a different expert who uses dedicated software. With lower-end projects or fast-turnaround projects, however, the tools that are built into the NLE may get the job done.
Contributed by Mike Martzdorff, Editor, Warner Bros.
There are also dozens of tools and utilities that exist alongside the NLE, which can simplify particular tasks or add more advanced features in a particular area.
Every NLE provides color-correction features, for instance, but not at the same level as purpose-built color tools. So it’s common to add extra color-correction plugins which may offer more advanced or more intuitive options. Or, if you’re using Frame.io for remote feedback, you may add the Frame.io plugin to bring review and collaboration tools into the NLE.
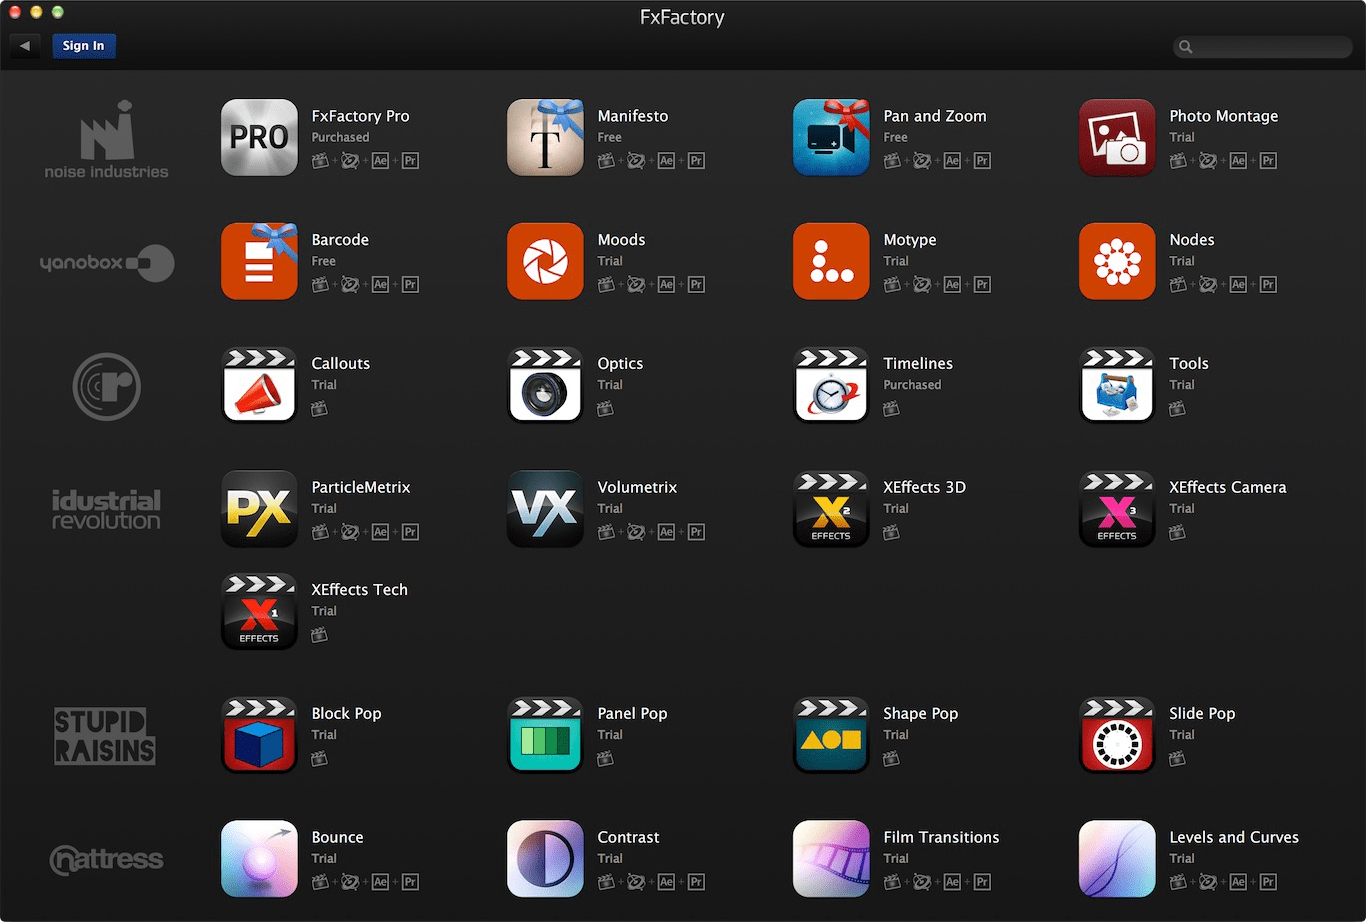
Plugins like FxFactory by Noise Industries provides an entire ecosystem of third-party plugins for post-production software from Apple, Adobe, and Blackmagic’s Davinci Resolve.
Contributed by Charles Haine, Filmmaker, writer, host and professor.
The assistant editors, who have to do a lot of checking, verifying, and organizing, will often use some other tools to help themselves stay organized and to allow them to send data between different applications.
Continue readingfor free
Unlock all 100,000 words of the Frame.io Workflow Guide and learn how the pros do workflow.

Chapter 04
Conform
The conform translates the film from the language of the editor to that of the color and sound teams. The tiniest details make or break this stage.
7 minute read

As soon as the edit has been locked, it’s time for the conform. The conform is the process of transforming the project from a format that the editors use to the format that the sound, color, and finishing teams can use in their software.
The conform is when any organizational mistakes will show up, especially metadata errors, which can cause serious headaches, so make sure to keep track of that metadata!
A conform is necessary for a mid-tier or high-end project that will be sent out to another company or team for color and sound work. As we said above, it is the process of preparing the film to be sent to other teams/software. So, if you are doing all your work in a single tool or connected suite of tools, you can skip this entire section (apart from the relinking stage).
If you do need to send your project from your NLE to another piece of software, however, you have a series of steps to follow.
- 1Export a reference video
- 2Relink back to the original camera files
- 3Simplify the timeline drastically
- 4Export the timeline into a new format
- 5Import into the finishing tool and check for errors
It’s unusual for one person to perform all of these steps, and the order may vary slightly depending on who is doing the conform. In some cases, the editorial team may do most of the conform, but it’s more common for most of the work to be done by the colorist or finishing artist who is receiving the project.
Export a Reference Video
The first step in the conform is to export a reference video of the entire project as it was in its locked state. That is important because we’re about to do a whole bunch of moving, swapping, and exchanging files. The reference video provides a check later on to make sure that everything was transferred properly.
Relink back to the original camera files
Most people these days use an offline editing workflow (and the ones that don’t, probably should), which means that they were editing off of lower-resolution proxy files.
Those proxy files are great for editing, but they’re very low quality compared to the original camera files, and the colorist and VFX teams need access to all of the data that was originally captured. Even if you’re doing all of your color and VFX work inside your NLE, you’re still going to relink back to those camera files before you export.
Depending on what tool you’re using and how all of your files were named and stored, the process of relinking could be as simple as clicking one button. Or, it could be many long hours of manually comparing files, one at a time. If you’re consistent with your file naming, however, it can almost always be automated.
These three guides contributed by Sofi Marshall, Freelance Editor.
Contributed by Seth Goldin, Tech, post-production, and workflow at Freethink Media.
If your sound was recorded separately from your video, you also have to relink your audio back to the original files from your audio recordist. When you created proxy files for the editors to use, the camera files and the audio files were merged. Each clip in the finished timeline thus has to be matched to two different original source files—one from the camera, and one from the sound recorder.
Simplify the timeline
Most interchange formats unfortunately can’t handle much complexity in the timeline, and so we need to simplify the timeline down to the most basic setup—a series of clips, one after another—before we export.
Nearly all editors edit with a multi-track timeline, or else FCP X’s magnetic timeline. In either case, it’s common to have a dozen or more different layers of video. Imagine that the different video clips were stacked on top of each other. Whichever one is on top is the one that will be seen.
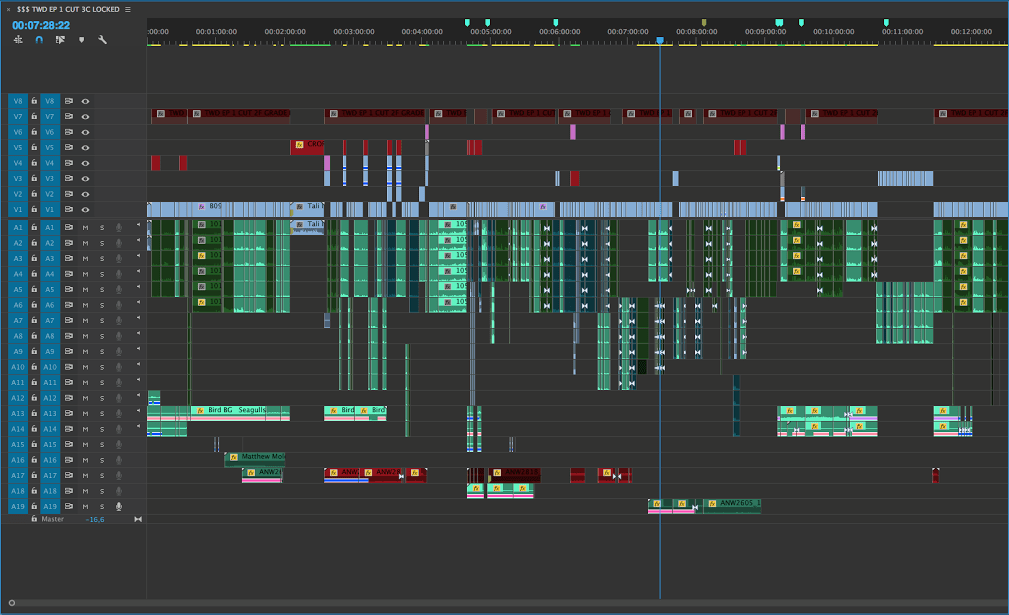
In order to prep for the conform, the film must be collapsed down to a single track.

We also have to remove most (if not all) of the effects and transitions on our clips, since those effects and transitions will probably not translate to the software used for color and finishing. The finishing artist will have to recreate each one in the new software. This is another reason why it was important to export out a reference video, because the finishing artist will refer closely to that video file in order to recreate all of the effects and transitions that the editors used.
Export the timeline into a new format
You would think that, by this point, we would have a universal format that everyone could use to exchange edit timelines between different software tools, but alas, one does not exist. There are several different competing ways to export a timeline from the NLE, but none of them is perfect.
EDL
An EDL, or Edit Decision List, is the oldest and simplest format used for exchanging timelines. The advantage of the EDL is that pretty much every piece of software can read and write EDLs. The downside is that the EDL format is extremely simplified. It cannot hold two video tracks, for instance, and most editors rely on at least half a dozen if not more tracks when editing.
XML
XML is a much more flexible format, and so it’s possible to include much more data in an XML file than in an EDL file, but this actually creates another potential issue. Because XML is so flexible, it’s possible for different tools to create XML files in different ways. An XML exported from one piece of software is not guaranteed to work in another. Some companies have created their own specifications in order to standardize how the XML is written (Apple’s fcpxml, for instance), but they haven’t been adopted universally. Some independent 3rd-party developers have created tools that help to translate projects between different tools, and some of them work quite well, but it’s always a bit of a messy business.
AAF
The AAF format is similar to the XML format, but there is a governing body that helps to standardize how information is stored in the file. In spite of that, however, not all AAFs are cross-compatible with different systems. AAFs can contain both video and audio information, but they are especially common when sending projects to the sound department.
Both with XMLs and AAFs, it’s necessary to research and test the workflow before you begin post-production to ensure that the project can be accurately transferred between the tools you are using.
Full Video Export
Another common way to send a film to the color and finishing departments is to export the entire film as a single video file. That file is sent to the colorist, who then has to cut it back up into the individual clips in order to color them. Color correction tools usually have the ability to auto-detect where cuts are and split the film up automatically. Those tools aren’t perfect, however, and so it’s still necessary to check the film closely and compare it to the reference video.
If you are using this method to send the film to another team, it’s essential that you relink to the camera files before this step, otherwise you’ll be sending a low-quality file.
Also, it’s very important that you understand the codec, color space, and bit depth of the source material to ensure that no color information is lost during this export. All of the specifications of the exported video must be equal to or better than the source footage.
Premiere Pro has a useful tool called Smart Render that can come in handy at this stage, if you are using one of the compatible codecs. Instead of rendering and exporting the clips on the timeline, it copies the data straight from the source files into the export file, keeping the color information untouched.
If the camera files are in a raw format, then this method is not a good idea, since you’ll prevent the colorist from having access to the raw information. Once you’ve exported a raw file, you have lost some of the information inside it.
Import into the finishing tool and check for errors
Once you’ve transferred the project to the colorist or finishing artist, they will import the project into their software. Depending on the type of workflow, the relinking process might happen at this stage, instead of earlier in the process.
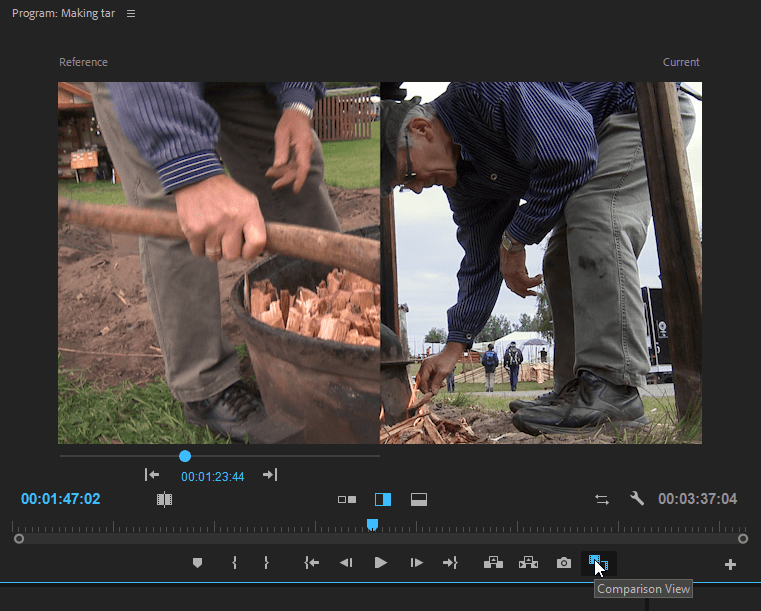
Then the artist will also import the reference video that we made at the beginning of the conform, and place it on top of the video track with a blend mode set to Difference. The Difference blend mode will calculate the difference between the top track (the reference video) and the bottom track (the conformed video). Any pixels that are identical between the two tracks will appear black, while any pixels that are different will appear in color.
The artist then watches the entire film through to confirm that nothing has gone wrong. It’s unlikely that the film will be entirely black, because there will be many minor differences between the reference video and the conformed version. The conformed version will have no color correction, and no temporary effects that the editorial team added. The difference mode will highlight any serious issues, like the film being out of sync, or missing or incorrect clips being inserted.
In spite of how careful everyone is to prevent these issues, it’s rare that everything just works the first time.
Contributed by Matt Schneider, Director of Technology, Technicolor New York.
Continue readingfor free
Unlock all 100,000 words of the Frame.io Workflow Guide and learn how the pros do workflow.

Chapter 05
VFX
We all know that VFX creates new worlds, but it can also save a huge amount of time and money in this world (when done properly).
12 minute read

When you hear visual effects (VFX), you probably first think of monsters and spaceships. You’re not wrong, but as the tools have gotten cheaper and easier to use, VFX have become ubiquitous in motion pictures. Even a simple drama or corporate video project frequently makes use of VFX to fix small errors or save the production time and money.
Invisible Effects
The vast majority of VFX that appear in modern films are “invisible effects,” which means that (ideally) the audience has no idea they’re watching something that’s either been digitally altered or is completely synthetic.
Perhaps you have a scene in which a house catches fire. You could build a dummy shell of a house and actually set it on fire, or you could save a production time and money by adding computer-generated (CG) fire.
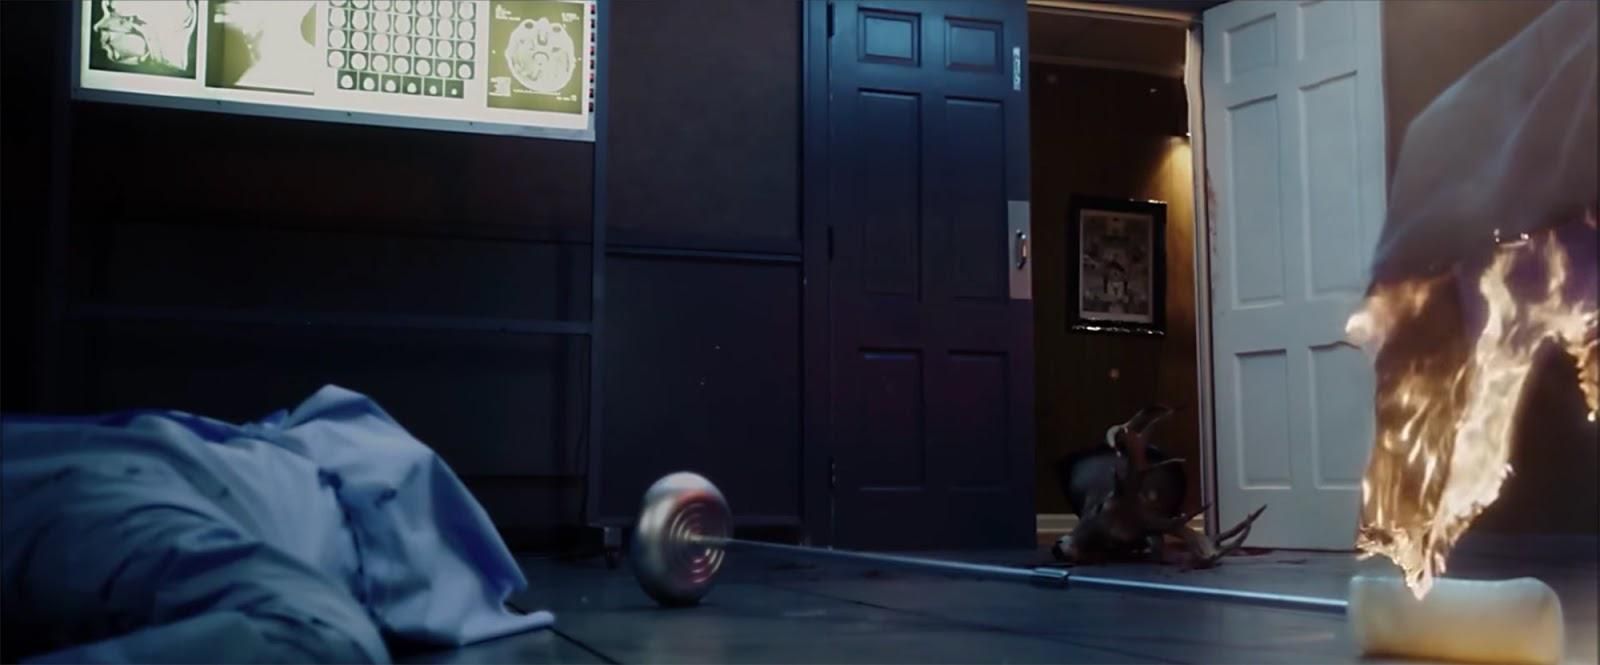
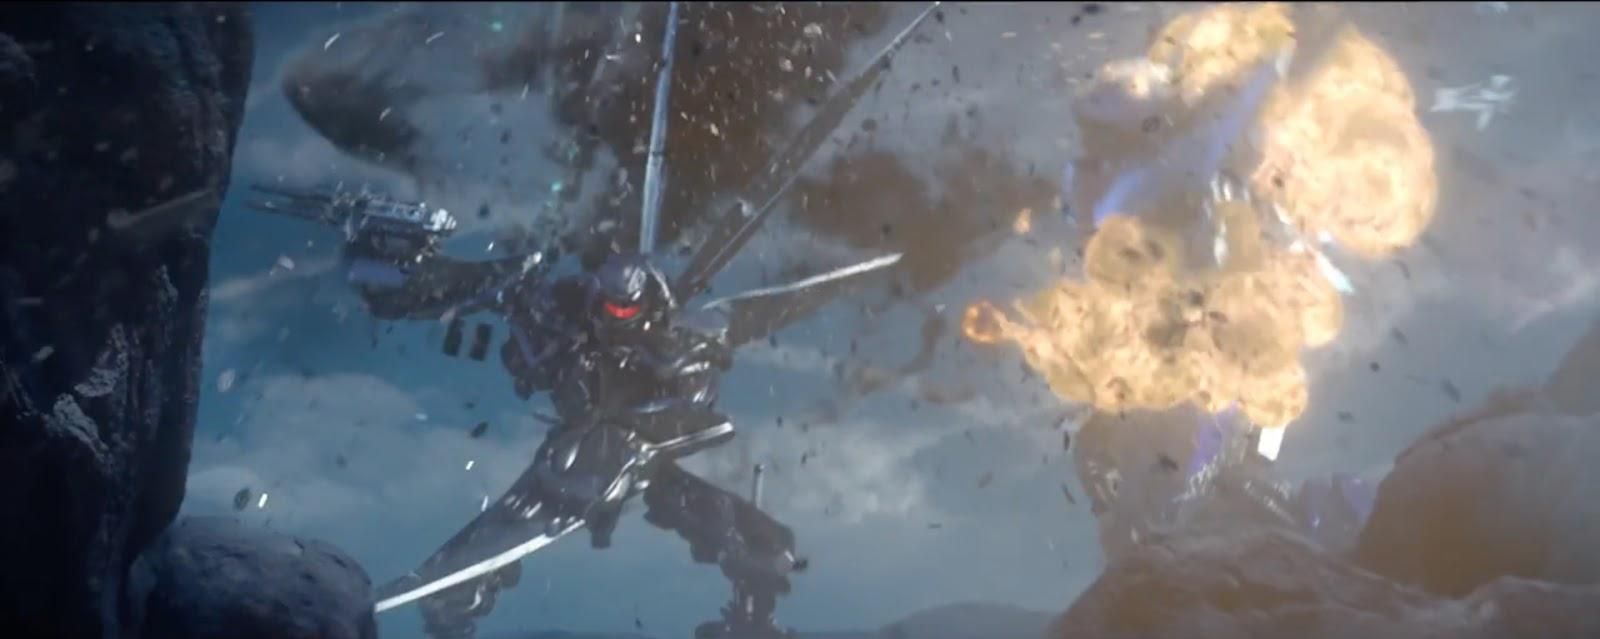
The fire in “Get Out” was computer-generated.
Or perhaps you recorded a killer CEO interview for your latest marketing video, but didn’t realize that the CEO was wearing a shirt with the Ralph Lauren Polo symbol. Since you’re probably not excited about contacting Ralph Lauren’s PR team, you’re going to need to use VFX to remove it.
Or maybe you’re shooting a period piece and want to remove modern “tells” such as signage or streetlights. Or you have an actor who has two perfectly functional legs but is supposed to look like a double amputee.
Suffice it to say, since digital visual effects applications are now widely available, it’s more likely than not that any feature film (or high-end commercial or mainstream TV show) will use them to fix something that the viewer will never suspect as being inauthentic.
Here’s a fun question: What was the last Best Picture winner that didn’t use VFX? Hint: it was more than 20 years ago.
Planning For VFX
The initial stage of VFX begins in pre-production. Major VFX require planning and coordination between production and post-production crews, so that every technical requirement of the shot is planned for and properly executed.
On a smaller project, the VFX Editor is the liaison between the Editorial and VFX teams. To fill this role you must have an understanding of both worlds and be able to keep meticulous track of each shot.
On a VFX-intensive film, there may be thousands of effects shots distributed among numerous vendors. In such cases, a post-production supervisor (who may also have one or more assistants or coordinators working with them) functions as the liaison between the editorial team and all the VFX vendors. It’s an important job, requiring fluency in the language of visual effects, superior attention to detail, and a cool head to deal with both logistical and creative detours.
Editorial and VFX
If you’re editing a project that incorporates VFX, you’ll need to use some form of placeholder during the offline. If the project you’re working on is adding visual effects to a live action plate, the plate itself will act as the placeholder. Or, if the foreground element is, for example, a live actor performing over green screen, the performance acts as the placeholder.
If, however, you’re editing a piece with completely computer-generated shots or sequences, you’ll need to create a placeholder.
- Text-o-matic – The most basic type of placeholder, they’re simply title cards with shot descriptions. “VFX – Spaceship flies by camera,” for example.
- Storyboards – typically hand-drawn still images showing the framing and intended action of certain shorts that provide the editor with a pre-timed space in which to drop the completed (or work-in-progress) VFX and assist in choosing the best surrounding live action shots.
- Animatics – A group of storyboards laid out on a timeline to give a sense of pace and timing. Helpful in lengthier sequences, they allow the editor to work with music or voice-over to help create the flow of the sequence(s) prior to commencing computer animation.
- Pre-visualization (or Previz) – Wireframe or rough 3D animations that function as stand-ins for sequences designed to display motion and timing; they’re especially important for action sequences.

Storyboard by agency Critical Mass in collaboration with the production company Coat of Arms on Google brand video.
Handing off to VFX

“John Wick 2” editor Evan Schiff working with animatics.
In the case of shots or sequences that combine live action with synthetic elements, the editorial team is responsible for selecting the takes that will be supplied to the VFX house before they can begin work. Usually, someone from the editorial team (probably an assistant editor or VFX editor) will create a rough temporary version of the shot in the NLE. This allows the editor to make sure that the performance works in the scene before sending the shot off, or that the background is the best one in which to integrate the effects. You really don’t want to have the VFX team start on a shot only to realize that it might have worked better had you chosen a different take.
Once the editor is confident of the shot’s placement in the sequence, the VFX editor (or an assistant editor) will prep several files.
First, the VFX editor will identify the original camera file(s) that corresponds to the shot to be worked on because the VFX team needs the full resolution elements to ensure the highest quality. In the most complex visual effects scenarios, there may be multiple backgrounds, foreground elements, mechanical rigs over which characters will be placed, or lighting passes on the background. The VFX house will need the high-resolution assets for everything that is to be incorporated into the shot and will use some sort of asset management tracking to ensure that all the elements are accounted for—it’s not unusual for VFX shots to incorporate dozens of elements.
You can either supply the entire original source file (which may be much longer than the section that’s actually used in the sequence), or you can export a smaller sub-clip. If you send a sub-clip, make sure that you include handles and use a proper Mezzanine codec. It’s also handy to send a copy of the rough cut sequence so the VFX vendor understands the context into which the shots they’re working on will fit.
As always, proper file naming and metadata management are vital to this process, so that everyone can keep track of everything that’s been sent off and where exactly in the sequence they belong. The VFX editor (and/or the post-production supervisor/coordinator) and the VFX house will each use detailed lists and spreadsheets (or some sort of off-the-shelf or custom project management software) to track the status of each shot throughout the process.
When a VFX shot is completed and signed off on, the VFX house will render out the finished version of the shot to a high-quality Mezzanine codec or to an uncompressed format and send it back to the editorial team.
The VFX editor will then create a proxy with the same codec that’s being used for the rest of editorial and drop it back into the sequence to make sure that it works as planned.
The file sent from the VFX team is treated like a new camera original file and should be backed up and stored along with the rest of the camera files so that it can be easily found when it’s time to link the sequence back to them (aka conform).
The VFX Process
Compositing
Compositing is the task of combining multiple images together so that they appear to be part of the same shot. While technically it’s the final step in the VFX pipeline, it’s also the most fundamental.

Image © Disney. All rights reserved.
Compositing is a precise endeavor because the two elements (or, with a complex shot, the dozens of elements) were created separately. In order to convince the audience that Iron Man and Pepper were both actually in the room at the same time, the compositor may have to spend hours finessing details such as lighting, focus, shadows, reflections, and atmospherics in order to make the various elements look as though they all inhabit the same space. The human eye is surprisingly good at spotting the deception, particularly in instances where we know what a human (or animal or airplane) looks like in real life, in its real environment. A poorly executed composite can easily result in the viewer feeling pulled out of the action or the story.
Mattes
In essence, a holdout matte is just what it sounds like—a cutout of a foreground object that allows you to isolate it from its background and place it over a new background.
In order to composite multiple foreground (or mid-ground) elements over a background in compositing, you need a matte for each element. There are many ways to create a matte. Usually, if you are adding a CG element to a live-action shot, the VFX software can generate a matte automatically. If you need to cut out a piece of a live-action shot, you can cut them out by hand (aka rotoscoping) or use a green screen or blue screen (aka keying).
Contributed by Isaac Terronez, Producer, video editor, and technologist.
Keying
Keying is based on shooting a foreground subject against a color that is easily isolated and removed digitally, thus creating a holdout matte for the foreground image that allows it to be placed over a different background.
Achieving a usable key requires several carefully executed steps, which begin on set.


Ingenuity Studios VFX reel. All rights reserved.
It’s also important to light the green screen evenly across the entire surface, so there are no shadows or hot spots. And you will want to make sure there’s adequate separation between the green screen and the actor or object, so that green “spill” doesn’t bounce onto it. A poorly-lit green screen will yield an incomplete key resulting in a faulty matte that will likely need to be fixed by hand later—which defeats the purpose of using the green screen in the first place.
It’s also vital that nothing else in your scene, especially nothing that your actors are wearing, is the same color as the screen. If your actor is wearing a green shirt in front of green screen, their shirt will disappear along with the background. The reason why bright green and blue are used is because those colors almost never appear in skin tones, so you don’t have to worry about parts of your actors vanishing (unless they have colored hair!). It’s also worth noting that depending on the quality of the software you’re using to key out the background, very fine details can disappear, too (such as wisps of hair or feathers, which you may want to keep in mind while casting or costuming).
Whatever keying software you use, you’ll select the color you wish to key out from the shot. This may require some refinement, as the exact hue of the background will vary depending on lighting and shadows. Once you isolate the color range, remove it, and if you’ve shot and lit your scene correctly, your matte is complete, ready to be composited together with your background image. In many cases, however, mattes may need some fine tuning in order to neither “clamp” the image (giving it a hard-edged and slightly unnatural appearance when placed over the new background), nor to leave the image with too much of a green border, which can result in visible matte lines in the final composite.
Contributed by Isaac Terronez, Producer, video editor, and technologist.
Rotoscoping
What happens if your matte isn’t perfect just by virtue of keying? Rotoscoping (or roto) is the frame-by-frame process of tracing an object as it moves through a shot to create a matte so that it can be combined with other images. This is usually done manually or semi-manually, and can be extremely time-consuming. But it is, in many cases, the only solution.
In order to rotoscope an object, the artist must trace its outline perfectly, by hand, and then adjust the tracing for every single frame. Since most films are captured at 24 frames per second, one minute of rotoscoped footage may require the artist to adjust the tracing for 1,440 individual frames.
Some advanced tools can take a single rotoscoped frame, examine the footage, and adjust the rotoscope automatically to fit the character’s movement, but even the best tracking tools often fail. In the best case, the artist only needs to make adjustments every several frames, but it’s quite common for an artist to have to touch every single frame.
Rotoscoping is also used as an animation technique, in which the animator draws over a live-action character’s movements frame by frame to create the look of moving art.
CG (or CGI)
Computer Graphics or Computer Generated Imaging encompasses any kind of images that are generated by a computer instead of by a camera. These are often fantastical creatures or objects, but they can also be perfectly normal things used in invisible effects. If your character is doing something extremely dangerous, for instance, you may actually use a completely CGI version of the character, called a “digital double.”

Ingenuity Studios VFX reel. All rights reserved.
The basic process for producing a 3D character or object starts with modeling, which involves creating a detailed rigid 3D sculpture which will subsequently be “skinned” or painted. Rigging involves taking that model and assigning it controls and points that will enable it to move according to the animator’s needs. Once the model is rigged, the animator takes over, and creates its movements. After that, textures and shaders (that simulate such things as fur or hair) are applied. Lighting the CG character comes next, so that it looks as though it fits into its environment and believably interacts with the other objects, characters, or backgrounds. Finally, the CG is rendered, producing the final element and matte so that the compositor can do the fine-tuning to integrate all of the elements into the final shot.
Does all of that sound simple? It isn’t. Creating a believable CG character or scene that looks like it was photographed is a huge challenge involving numerous complex tasks that may require anywhere from several to several hundred skilled artists to complete.
In the case of the burning house that we mentioned earlier, it could be possible to create that shot with or without CG. You could shoot video of fire against a black background and then composite it into a shot of the house. In that case, you’re combining two live-action shots, so there is no CG involved. On the other hand, you could simulate the fire using computer-generated flames. Simulating natural elements like fire and water take some know-how and finesse (even with the amazing off-the-shelf software nowadays that generates natural phenomena), but the advantage is that you may be able to place them more precisely—and no one is harmed in the process.
Contributed by Isaac Terronez, Producer, video editor, and technologist.
Motion Tracking
Motion tracking (also called Match Moving) allows you to insert an element (either CG or live-action) into a moving live-action shot. In our earlier example, we used CG to make it look like a house was on fire. If the camera is locked off, you simply need to position the fire elements in the right spot and composite. But if the camera is moving, the fire elements will need to be tracked to the house to match the house’s position throughout the camera move.
Motion tracking involves translating the camera’s movement in the live action scene and assigning that same movement to a virtual camera in the tracking software so that the element to be inserted matches the speed, angle, and scale of the background plate.
This technique is commonly used for screen replacement within scenes. You might see a TV or computer screen with plus signs or circles in the corners, and alternating color quadrants dotting the background, to aid in the collection of tracking data on the set. The visual effects crew will generally take measurements throughout the camera move either using digital surveying equipment or LIDAR (laser imaging detection and ranging). In the most complicated instances (for example, “The Equalizer 2” hurricane sequence), they needed to rebuild the whole town in the computer so they could hold out the actors and buildings throughout the camera moves and composite them back into the sequence along with all the CG atmospheric elements that were behind and in front of them.
Once the data has been collected and fed into the software, the software can track the changing position and size of the reference points over the course of the move. With that data, the screen can be replaced in post, freeing up the production crew from worries about reflections, light issues, or image flicker that are common when recording screens.
Because small, high-quality cameras and motorized gimbal technology have made it easier than ever to move the camera, motion tracking has become increasingly common in VFX shots.
Continue readingfor free
Unlock all 100,000 words of the Frame.io Workflow Guide and learn how the pros do workflow.

Chapter 06
Color
The colorist puts the final polish on the film, using specialized tools to shift the audience’s mood from moment to moment.
8 minute read

Once editorial and VFX have done their jobs, it’s time to move on to one of the most important stages in the visual portion of the workflow: color correction.
Color correction is the process of adjusting and enhancing the visual characteristics of a film, including exposure, contrast, and color balance. Of course, various types of preliminary color work are done at earlier stages of the production, but color correction applies a finalized look that reflects the Director of Photography’s artistic vision. This process is critical to both the technical and creative aspects of a film, as it ties together everything presented on screen into a cohesive and beautiful image.
[Note: The terminology surrounding this stage of post-production can be confusing. The term “color correction” traditionally referred to a specific step in film development, but it’s become common to use it to refer to the entire process of reworking the visual elements of video, as we do here.]
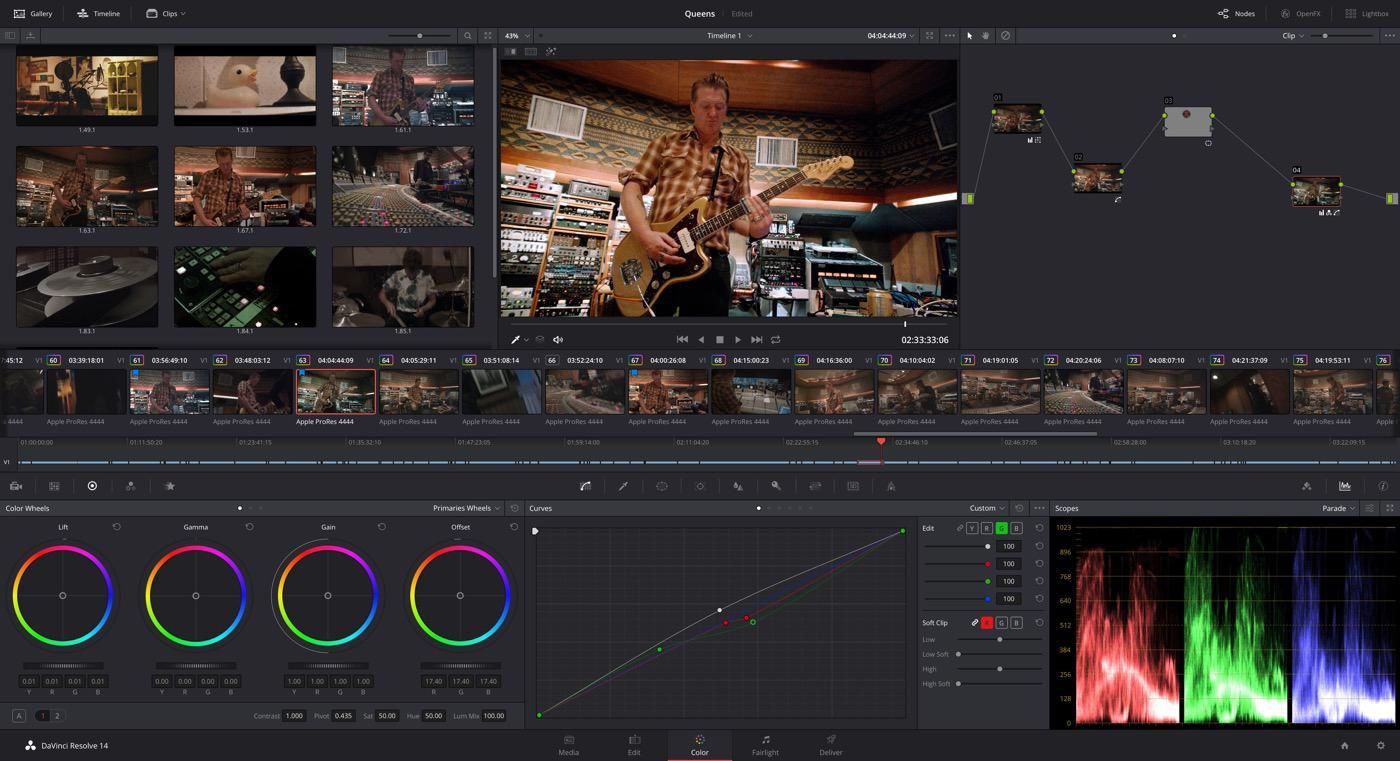
The Tools of Color Correction

Like every part of post-production, color correction requires a number of specialized tools. In the film days, color correction involved vats of chemicals that developed footage with certain visual properties, but the complexities of digital video have greatly expanded the capabilities and responsibilities of colorists.
Digital color correction tools give you control over all of an image’s properties, down to the pixel level. This precision opens up a vast array of creative possibilities. For example, you can alter the appearance of an actor’s skin, replace an undesired color with an entirely new one, or even “relight” a scene after it has been captured. Knowing the basic components of these tools and what they can do is vital to understanding the artistic potential of color correction as a whole, and the impact it can have on your project.
Creating Visual Continuity
The first step of the color correction process is to make sure that all of the shots in a single sequence work together visually. This is often also called shot matching. In an ideal world, a DP would work out everything on set so that all the footage from a scene matched perfectly. Unfortunately, reality is rarely so kind. Even if you use the same cameras, lenses, and lighting for every scene, it is usually impossible to have a completely uniform color in all your footage.
A colorist will start by balancing the visual attributes of a film, shot by shot, to create a seamless baseline of color. This eliminates many of the visual differences between takes, locations, and cameras, and ultimately serves to maintain a story’s continuity.
Nailing down this baseline is the first priority of color work. It might be less exciting, but it will save a lot of time and frustration later on.
Crafting The Look
Once the baseline of color correction is complete, the second task of a colorist is to craft the artistic look of the film (sometimes people use the term “Color Grading” to refer specifically to this stage). This is the process of using color to convey a certain atmosphere or emotion in your story. How exactly the film is colored will vary depending on the genre, subject matter, and style, but it will fundamentally influence the viewing experience.
Good color correction pushes a story’s tone and captures a certain emotional reaction from viewers. Even subtle changes can have a big impact. For example, changing the lighting on a character’s face can alter how viewers perceive them. Likewise, recoloring the sky in a scene can shift the tone of an environment to lighten the mood, or to make it heavier. However you color your film, taking the time to be thoughtful and deliberate can make your story all the more captivating to audiences.
Contributed by Charles Haine, Filmmaker, writer, host and professor.
But for the same reasons that good color correction can enhance your story, bad color correction can radically degrade it. It is critical that your production team makes creative decisions about color early and communicates those decisions as the film moves down the pipeline.
The Color Correction Process
As mentioned earlier, the DP will craft LUTs and CDLs during test shooting. These files assign an initial look to the footage, which gives each team a general idea of what the DP intended for color, brightness, and contrast. But they only serve as a rough blueprint for the color correction process. The colorist will build a brand new set of looks for the original camera files. This ensures the artistic intent of the DP is achieved, while also addressing the technical considerations of each shot individually.

Apple ProRes Raw footage.


Color correction is usually handled by a specialist team. After picture lock and conform, EDLs, XMLs, or AAFs of the final edited sequence are sent to the colorist, along with the original camera files. Once the film is shot-matched and given its artistic look (with final approval by the DP), the sequence is prepped for the last steps of post-production.
[Note: Though color correction is usually the final step in a feature film’s workflow before delivery, it is sometimes necessary to be a bit flexible. Because VFX work can often extend very close to the project deadline, color correction may take place gradually as individual shots are finalized and handed off to the coloring team. It all depends on the schedule.]
Of course, not all projects require the precision and cost of a dedicated color correction team. If this is the case for your project, your editorial team might be able to handle the coloring process inside their NLE. This decreases workflow complexity since they will not have to pass on the sequence after conform. Even if they use another program to color correct the footage, like Resolve, these will only be internal handoffs on the same machine/network, rather than to an external color team which is probably in a completely different facility.
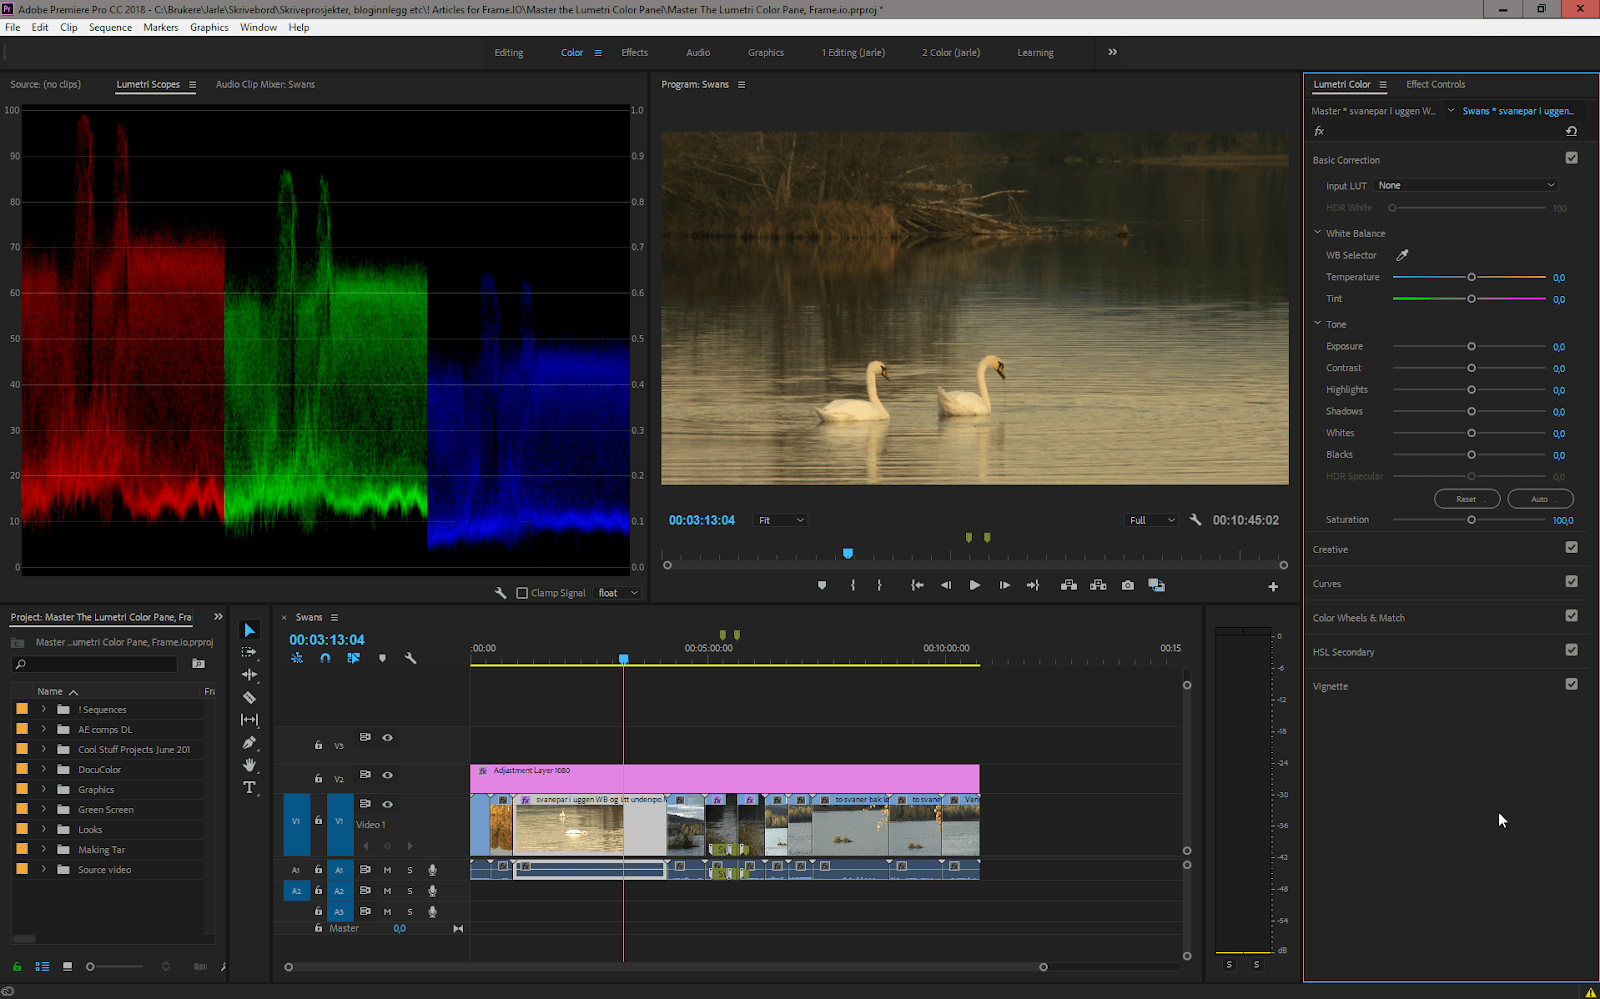
As with everything in the post-production process, you will need to balance resources. Top of the line color correction brings a level of precision that is difficult to match, but it is expensive both in money and time. Alternatively, NLE-based color correction is much faster and cheaper but lacks the finesse of dedicated color hardware and software.
A professional colorist will also come with an extensive hardware setup that allows greater precision and speed when performing the corrections and also high-accuracy monitoring.
All of the colorist’s tools can be used with a keyboard and mouse, but a dedicated control surface allows the colorist to use both hands to control multiple values simultaneously, jump quickly between tools, and do all of that without taking their eyes off of the image, which is very important.

Contributed by Denver Riddle, President at Color Grading Central.
Whichever path you choose for your project, the color correction process will play a tremendous role in shaping your film, technically and artistically. For best results, you should plan your options for color correction based on the scale of the project, the complexity of your distribution channels, and the creative requirements of the story.
Online/Finishing
The online edit, or “finishing” is usually the final step before the film is exported out into its final format as a single video file. Once the colorist has finished matching shots and crafting the look of each scene, the project moves on to the finishing artist (sometimes called a finishing editor or online editor).
Up until this point, the film has been in the hands of a series of specialists who focus entirely on one task. The editor crafts the story. The colorist builds the look. The VFX house handles big, complex shots, but smaller things are left in the edit.
The finishing artist is a generalist who can do a little bit of everything—edit, color, and VFX. The finishing artist is an image-quality fanatic who ensures that everything looks perfect before it is sent off to the theater or the airwaves.
VFX
While any complex VFX shots are usually sent off to a VFX house, smaller effects may be left for the online editor.
If the editors decide to combine two performances in the same take, they will probably be able to do a pretty-good job in their NLE, but the finishing artist will recreate that shot with their more advanced tools. The same goes for other simple VFX tasks like removing a sign from a wall, or replacing a sky.
If the editors have used any complex cross-fades or speed-ramps, the online editor will also recreate those.
Titles
Unless an external company was hired to produce the titles, the online editor often handles that part of the workflow. It’s common for the editorial team to work with the director to place the titles and time them properly, but the editorial team usually doesn’t put the full polish on them.
While all NLEs can create titles, they don’t have the level of nuance that a finishing tool provides. Editorial teams also often work with a lower-resolution version of the film, and so it would be pointless for them to spend hours perfecting the titles if they can’t view them at their full resolution.
Last-minute changes
Because the online editor is the last person to touch the project, they are often asked to handle last-minute changes to the color, or even to the edit.
If the client or the producers decide at the last minute that they’ve changed their mind about the color in one shot, it may be too late or too expensive to send the film back to the colorist. In that case, they’ll ask the online editor to make the change.
Or, perhaps the VFX house just delivered a new version of an animation, and it needs to go in and replace the old version in the edit.
Finishing Tools
Because the finishing artist needs to be able to do a bit of everything, a finishing tool must provide a full set of color, editing, VFX, and animation tools.
On the lower end, and even on some high-end films, After Effects is common for finishing because of its low price tag but broad feature set. Davinci Resolve is another affordable option which, with the addition of Fusion, is now a capable finishing tool as well as color grading application.
On the higher end, Avid Symphony, Autodesk Flame/Lustre, and Assimilate Scratch are all common finishing options. These options are more expensive than After Effects and Resolve, but they are superior in capabilities.
In some cases, especially on smaller projects, the finishing artist and the colorist may be the same person. And on very small projects, the finishing artist, colorist, and editor may all be the same person! Even in those cases, however, it’s still common to separate the different processes. The editor will edit using an offline codec in an NLE and then conform and transfer the project to another tool for the color and finishing work, so the film will progress in stages.
Continue readingfor free
Unlock all 100,000 words of the Frame.io Workflow Guide and learn how the pros do workflow.

Chapter 07
Sound
Sound is the invisible half of the film. The sound team will record new effects, polish what’s already there, and mix it all together.
14 minute read

This Chapter was contributed by the awesome team at Defacto Sound.
Specialized audio post-production work adds a of lot polish to a project. This part of the workflow can heighten the excitement, intimacy, immersion, and atmosphere of the story. It also ensures the content meets the technical specs of whatever platform it will be delivered on, while sounding its best in any given playback environment. In order to transform the initial materials to the final, polished mix, we need to follow a series of steps:
Materials Needed for Post Sound
Most projects require an OMF/AAF, a quicktime export of the video, and a list of required specs and deliverables. A sound report from the production audio is nice to have if there are multiple mic choices, but not always essential.
What’s an OMF/AAF?
OMF and AAF files are special formats used for transferring projects between different editing programs. They allow post audio facilities to import audio clips from the timeline of your video editing software. It maintains the clips’ relative positioning and fades, along with a few other features, like: panning, volume automation, and sometimes audio processing. Essentially, it is a snapshot of the project in your editing software that can be imported into Digital Audio Workstations (DAWs) like Pro Tools.
OMF vs AAF
Both file types accomplish a similar task – exporting a timeline from one piece of software so it can be imported into another. AAF is a newer format that contains some additional metadata over OMFs (like track names), but not all video software can export AAFs. Regardless, both are completely acceptable ways to transfer materials to post audio.
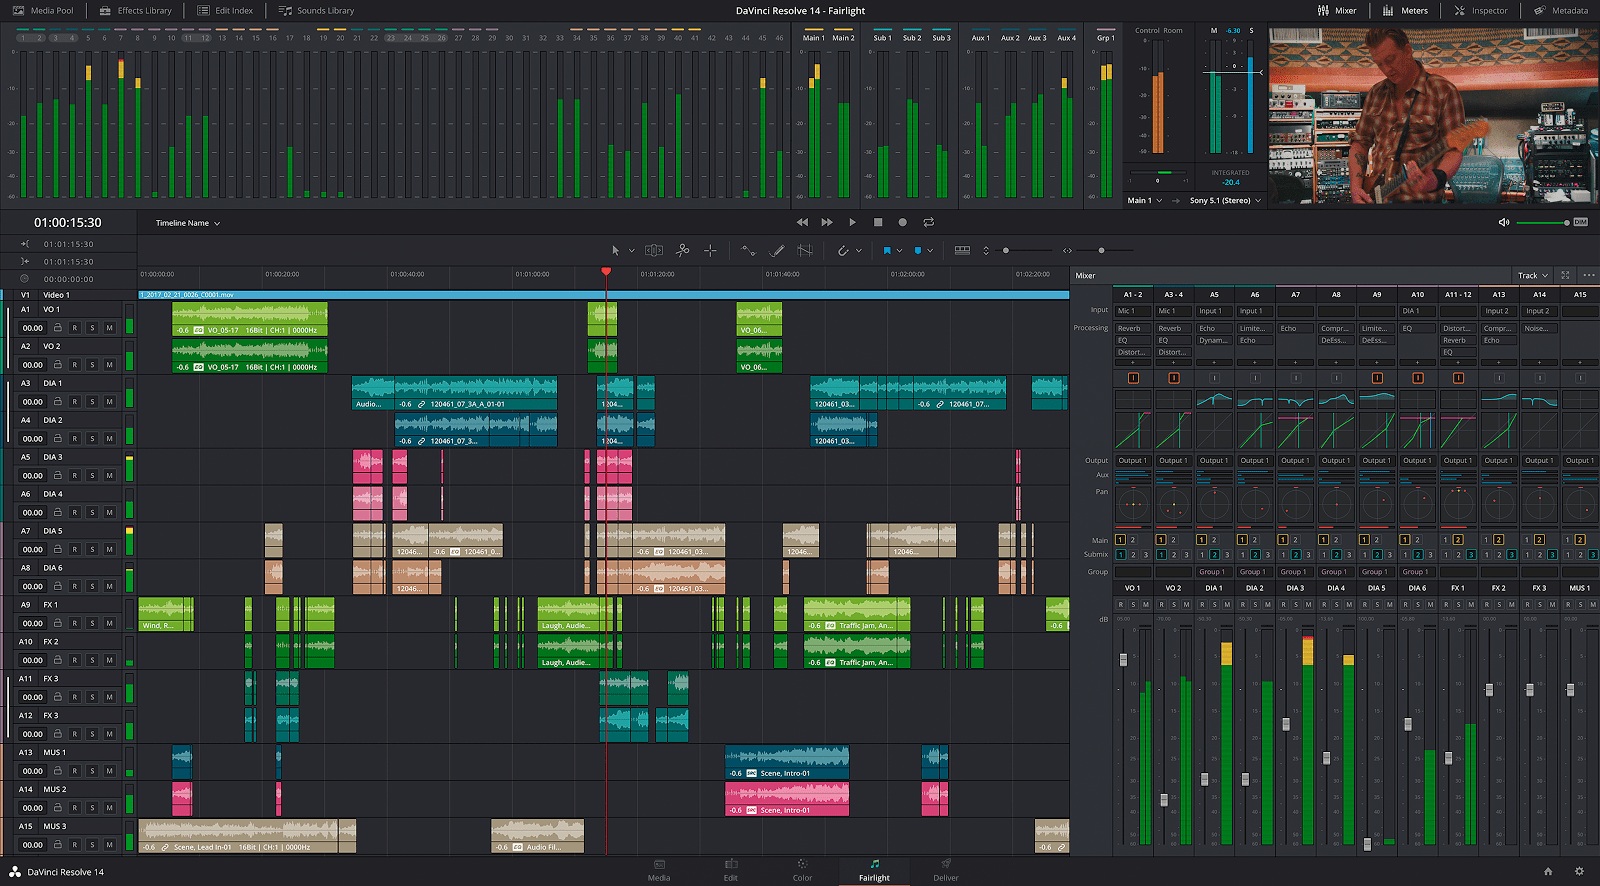
Export Settings
Exporting OMFs/AAFs is different for every program. Below are program-specific guides for some of the most widely used editing software.
Video Export
Here is a list of preferred video codecs for Pro Tools 11 and higher (as outlined from the Avid Knowledge Base):
- DNxHD (Preferred)
- Apple ProRes 422 (including HQ, LT and Proxy)
- DV25
- DV50
- H.264 (Performance may vary)
720p and 1080p resolution should be sufficient for an audio post facility. This allows the operator to save processing power for audio. 1080p still provides enough detail for your sound designer, and the smaller files will speed up exporting and uploading / downloading.
“Spec” Requirements
Every project has its own special requirements. Here’s a list of relevant info to pass along to post audio to ensure the final mix meets those requirements:
- How the content will be distributed (broadcast television, web, film festivals, specialized installation, etc.)
- What formats are needed for the mix (Stereo, 5.1 Surround, 7.1 Surround, Dolby Atmos, etc.)
- Any other relevant audio specifications (in the case of broadcast television, these specs will usually be contained in a guide from whichever network the spot/episode will be airing on)
Post Audio Workflow
Basic Step by Step Process
- 1Track Management
- 2Dialog Edit
- 3Music Edit (if needed)
- 4Rough Mix (variable)
- 5Sound Design/Sound Effects Edit
- 6Final Mix
- 7Review and Revisions
- 8Deliverables
Track Management
The first step is organizing the audio clips from the AAF/OMF in a digital audio workstation. It’s important for each audio clip to be organized on a track with similar audio clips before the post audio process can continue (dialogue with dialogue, sound effects with sound effects, etc.)
To make this process as quick and smooth as possible, the tracks in the editing software should be labelled and organized before the AAF/OMF is created. It is preferable to send a larger number of well organized tracks, instead of combining different kinds of clips together on a smaller number of tracks.
Categories to organize audio tracks into:
- VO (Voice Over)
- Dialog
- Production Effects (anything recorded from set other than principal dialog)
- Sound Effects (separate from Production Effects, anything that was added in post)
- Music
If you have a mixture of mono and stereo files in your edit, it’s helpful to keep these organized as well. For instance, all mono sound effects should be placed together on tracks above your stereo sound effects.

A special note about dialog tracks – it is best to keep all of the different microphone channels from production vertically grouped together. That way, your dialog editor can easily choose the best microphone for each scene. A good minimal track layout includes a boom microphone and a lavalier microphone. An expanded track layout would include Mix Left, Mix Right, Boom, Lav 1, Lav 2, etc.
Dialog Edit
The dialog edit is an often-overlooked but extremely important step of the post audio process. When it’s done right, the dialog track should sound completely natural and unedited.
The Dialog edit is usually the first task after track management because it provides a crucial anchor in many projects. Here’s a quick overview the process:
- Find the cleanest room tone possible from each mic in the scene.
- Use this room tone to bridge dialog bites together and add air for longer fade ins/outs (especially important if the room tone is particularly noisy or loud).
- Smooth out any chopped words or breaths.
- Smooth out any “frankenbites” (Sometimes a word or sentence must be created if rerecording isn’t an option. This is never ideal but is sometimes necessary).
The dialog edit has just as much to do with listening to the space in between the words as it does the words themselves. Ideally, the audience shouldn’t be able to perceive any sudden changes in room tone or cadence. A poor dialog edit makes the post production process negatively visible to the viewer, through awkward jumps in the dialog’s tone or cadence.
The ultimate goal of the dialog edit is to produce a seamless, natural sounding dialog track. Dialog recordings are often chopped up, spliced together, and spread out during the picture edit. This happens both for editorial and creative reasons. The dialog edit aims to smooth out those chopped up bites to make the edits “invisible” to the listener, and give the impression that what you hear is what was actually said.
Music Edit
The music edit is the process of smoothing out how each song or music cue will fade in, fade out, and transition. If music is specially composed for the project however, this step may simply be a check-up.
It is important to remember that picture is oftentimes more malleable than music. Music has a multitude of factors that make even a small edit noticable if not done correctly. Tempo, rhythm, instrument decay, and sustain are just a few factors that can throw off the pacing and groove of the music and the project as a whole.

Smoothing out music in the edit by dipping beneath dialog.
It is often better to make slight alterations to picture when lining up a music track with visual cues, rather than try to make a forced music edit work during post audio. Picture editors will often create a temporary music edit. So, many of these potential problems will be solved before audio post. In any case, keep the lines of communication open so your audio editor can collaborate if need be.
Rough Mix
Once the dialog and music is edited, it’s common to do a rough mix of these elements along with any production audio or sound effects added by the picture editor. This step can help the sound designer see and hear the project as the editor did, albeit a much cleaner version. This also helps to make informed story-driven sound design decisions.
Sound Design
Sound design constitutes any elements post audio adds to enhance the soundtrack beyond the music and production audio. Sound design can be broken down into a few categories:
- Hard Effects – Sounds that are typically not recorded to picture (explosions, car engines, doors slamming)
- Foley – Sounds of the characters and the objects they touch (footsteps, cloth movement, prop effects)
- Backgrounds – Environmental ambiences (nature sounds, cityscapes, office murmurs)
- Emotional Effects* – Abstract effects out of the reality of the scene used to enhance emotional impact
*Emotional effects are the hardest to explain and are often easily confused with music. Many music compositions incorporate these types of effects as well (cymbal swells, eerie drones, etc). Non-literal sounds is another way of thinking about these effects. Trailer style booms and whooshes are some typical examples. Any sound effects that don’t fit into the reality of the scene, but rather are used for emotional impact, would fit into this category.
Final Mix
The final mix is where all the ingredients (dialog, voice over, music, and sound effects) are put together into a polished soundtrack. This is a complicated and delicate process, but some basic elements are as follows:
- Balancing the different elements of the soundtrack with each other (both through volume and the high/low frequency content of the elements)
- Establishing dynamic peaks and valleys in the mix (this can add excitement and reinforce a project’s pacing)
- Spreading elements throughout the stereo (or surround) field through panning (in the case of post production audio, this can also mean tracking objects on screen)
Mixing Formats
There are various formats a final mix can take, depending on the ultimate delivery needs. Stereo and 5.1 are some of the most common today but, VR (Virtual Reality) and AR (Augmented Reality) formats are on the rise.
Below is a quick breakdown of some key differences between popular formats:
Mono – (a single audio channel) This format is mainly used for stems like voice over or dialog. Some public networks still require a mono mix for broadcast, and it is a good idea to make sure your mix is mono-compatible for playback on phones, smart home speakers, and other mobile devices.
Stereo Mix – (2 audio channels) A left and a right speaker. The most common format outside of a theater environment. The vast majority of web and broadcast content is in the stereo format. All mixing facilities are set up to work in stereo.
5.1 Mix – (6 audio channels) Left, Center, Right, Left Surround (Ls), Right Surround (Rs), and Low Frequency Effects (LFE). The “5” in 5.1 represents the Left, Center, Right, Ls, and Rs channels. The “.1” represents the discrete low frequency effects channel. The 5.1 format is commonly used at film festivals, in broadcast television, and for many online streaming services. Most post audio mixing facilities are set up to work in 5.1. This format has been around for some time, but is highly immersive and remains one of the most popular surround formats.
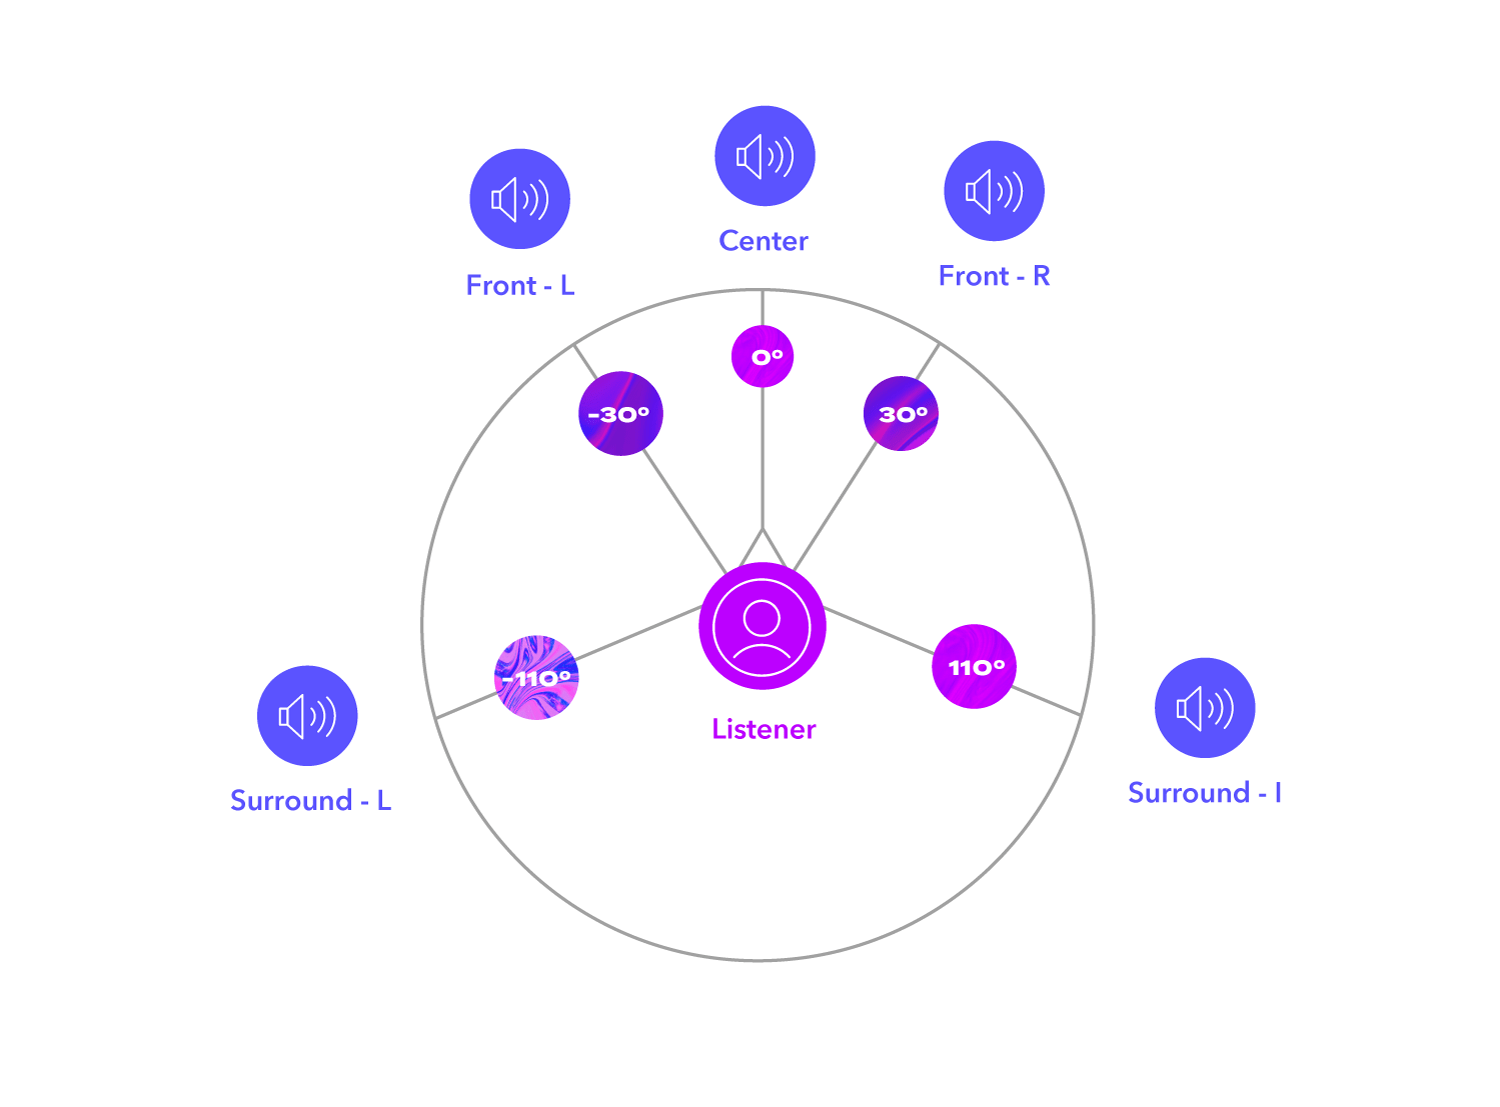
An example layout of a 5.1 audio mix.
7.1 Mix – (8 audio channels) Left, Center, Right, Left Side (Ls), Right Side (Rs), Left Rear (Lr), Right Rear (Rr), and Low Frequency Effects (LFE). This format is used in most modern cinemas. Many, but not all, mixing facilities are set up to work in 7.1. This format shares many characteristics with the 5.1 format, but 7.1 provides more separation in the surround speakers around and behind the audience.
VR – (played back on headphones) This is a new and developing field. Essentially, a virtual reality mix represents a full sphere of sound. VR video players have special decoders that tailor the audio experience depending on where the viewer is looking. For example, if a dog is barking to the right of the viewer’s perspective, the sound will come from the right side of the sound field. If the viewer turns to face the dog, the sound will come from the center of the sound field. It is similar to the way audio works in video games.
There are many ways to create virtual reality content. Some methods use a spherical video along with a 4 channel audio track, and some methods use special programming and are developed inside a game engine. Major VR platforms include Facebook, Youtube, Oculus, and Vive.
Dolby Atmos / DTS:X -These are next generation spatial mixing formats where sounds are treated as distinct moving objects throughout a 3D space, rather than just panning between preset speakers. This allows for more consistent playback on different speaker arrays from 2 to 64 channels. Currently, these formats are most commonly used in big-budget, wide release films, and require a specialized cinema (or home theater) setup to properly playback. Mixing facilities require specialised systems to work in Dolby Atmos, so be sure to confirm a facility’s capabilities if this format is needed for your project.
Which format should I choose? – Not all projects require the maximum possible number of speakers. Stereo is generally the default format. Many films also sound great in stereo, especially if they are primarily intended for internet playback. If you plan to present in a theater (like at a film festival or via major streaming service) expanding to 5.1 may help. Talk to your audio facility about your needs.
Review and Revisions
Many studios offer in-house reviews, but online reviewing methods are increasingly being used. Frame.io is a great online tool for reviewing an audio mix remotely. It allows the filmmaker to drop in notes at specific points in the timeline, streamlining communication with the mixing house.

Deliverables
Depending on the nature of the project, a variety of deliverables will be needed from the post audio team. The most important deliverable is, of course, the finished mix (possibly in multiple formats, as needed for the project). Stems/splits are also commonly required. These are isolated elements of the mix (dialogue, voice over, music, sound effects) that can be helpful for reversioning.
It is important for the filmmaker to communicate any unique needs. Post audio can streamline their workflow for each project if they know exactly what deliverables/formats are required before work begins.
Audio Specifications (aka Specs)
Specs are guidelines to ensure consistency in loudness across multiple programs, as well as to prevent undesired audio issues (clipping, digital pops, etc). This idea applies to broadcast television as well as to online streaming, although the technical specs are different for each one.

It is important to understand what environment your project will be playing in and what specs that environment may require. If ignored, a project may fail quality control in preparation for broadcast and be unable to air until addressed. This scenario is primarily applicable to broadcast television, where government regulations specify acceptable loudness levels (these specifications vary from country to country). Individual networks may also have unique spec requirements that post audio should be made aware of.
Even outside regulated environments like broadcast TV, there are spec recommendations for a variety of listening environments that can help ensure comfortable and consistent volume levels for listeners.

Measuring Loudness
There are numerous loudness tools/plugins available that measure all aspects of a completed audio mix. The two most scrutinized measurements of any audio mix are the average loudness for the entire program, and the level the loudest sound.
Quick definitions for common measurements/tools used:
LUFS/LKFS – This is a standardized unit of measurement of perceived loudness. It is used for finding the average loudness of an entire audio mix; this is referred to as Integrated LUFS/LKFS. LUFS and LKFS used to operate with slight differences, but today they are used synonymously.
True peak – The measurement of the loudest moment of the mix.
True peak Limiter – A specialized tool/plugin that allows the user to set a loudness ceiling that the audio cannot exceed. True Peak Limiters are sometimes confused with “Brick Wall” limiters. In short, True Peak Limiters are much more precise.
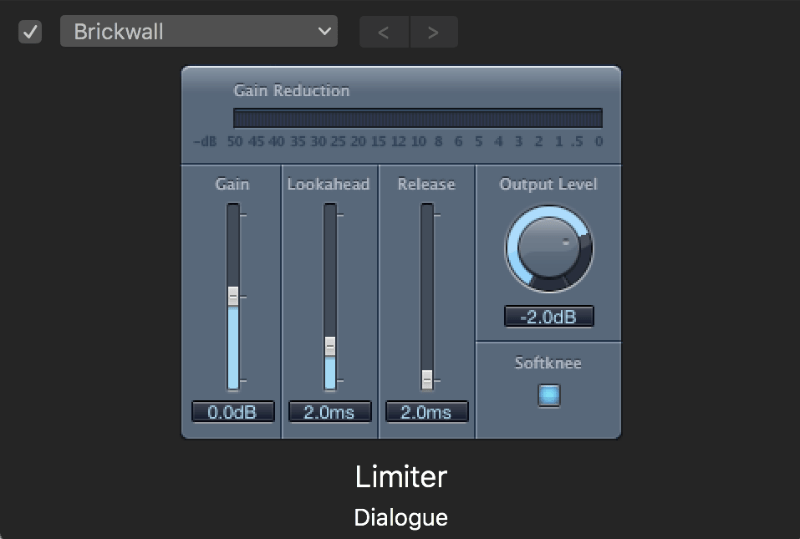
Loudness Recommendations
Below are some general recommendations for a variety of common listening environments. As mentioned earlier, if your project is playing in an environment that may have unique and strict loudness guidelines, make sure you are aware of them and communicate this with your post audio team.
Web – A common target for web mixes are Integrated LUFS/LKFS of -16db (+1/-1db) and True peak of -1db. There are no strict regulations on web mixes, but these recommendations should yield a product that is consistent with other web content, while still leaving room for a dynamic and engaging mix.
Broadcast – Television is arguably the strictest environment regarding loudness. In the US, typical measurements are -24db (+1/-1db) Integrated LUFS/LKFS and -10db True Peak (some networks provide a bit more wiggle room, but these recommendations should cover all the bases). Different countries have different regulations, so be sure to check what measurements are appropriate for your project.
Some networks also require specific splits or versions of the final mix. You can usually find a network’s audio technical specifications online, or by requesting that information from the network directly.
Film – There is no standard or regulated loudness standards for films. Films are ideally mixed in precisely calibrated rooms that allow for loudness to be mixed by ear. In other words, you are free to use the full dynamic range that digital audio can offer, as long as the film is mixed by an engineer with an accurate frame of reference. It is also wise to keep in mind the venue your film will be played in. For instance, many film festivals have a surround system. In these cases, it’s important to know what format that festival requires/accepts (Stereo, 5.1, 7.1, etc).
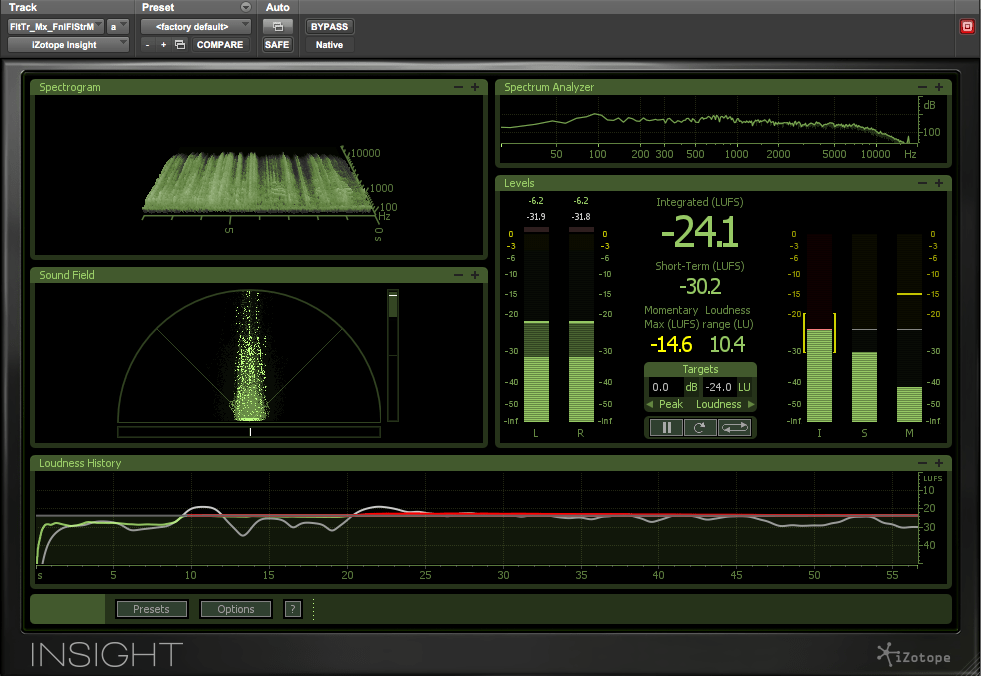
One final note. It is common to request multiple final mixes on films. If your film is to be shown at a film festival with 5.1 surround sound as well as online, you may want to request a separate mix for each. In addition, while film festivals may offer 5.1 surround, they rarely require it. Your film may work better in a stereo format. It all depends on the sonic needs of your project (for wide theatrical releases however, a surround format is usually universally required).
In short, different environments have different optimal formats and loudness settings. Communicating your needs will help post audio provide the best possible mixes.
VR – There are currently no standards for loudness in VR, but the Web loudness levels mentioned above are a decent starting point. There is a variety of virtual reality formats, each with its own unique spec requirements. It is important to read up on these for whichever format you are using. Youtube VR and Facebook 360 are some of the most popular VR formats (spec requirements for both of these can be found online).
Stems/Splits and how to use them
Stems and Splits are interchangeable terminology. They both refer to individual elements of a final mix that have been split out into their own files (voice over, dialogue, music, sound effects, etc). Stems/splits are helpful for processes like language versioning or future repurposing of content. For example, by using an MDE split (explained below), editors can easily swap out an English voice over for a Spanish voice over without recreating the whole mix. It is important to specify exactly what stems/splits are needed with post audio so they can best provide the needed deliverables.
The following is a list of common deliverables to request from post audio:
- 1Dipped Music – Contains any volume automation added to it during the mix. Dipped music represents the music exactly as it is in the full mix.
- 2Undipped Music – Does not contain any volume automation added during the mix. This can be helpful if you need to remix the project later due to major changes, or if the project needs to be repurposed elsewhere or into a language that requires more or less time to say the same thing.
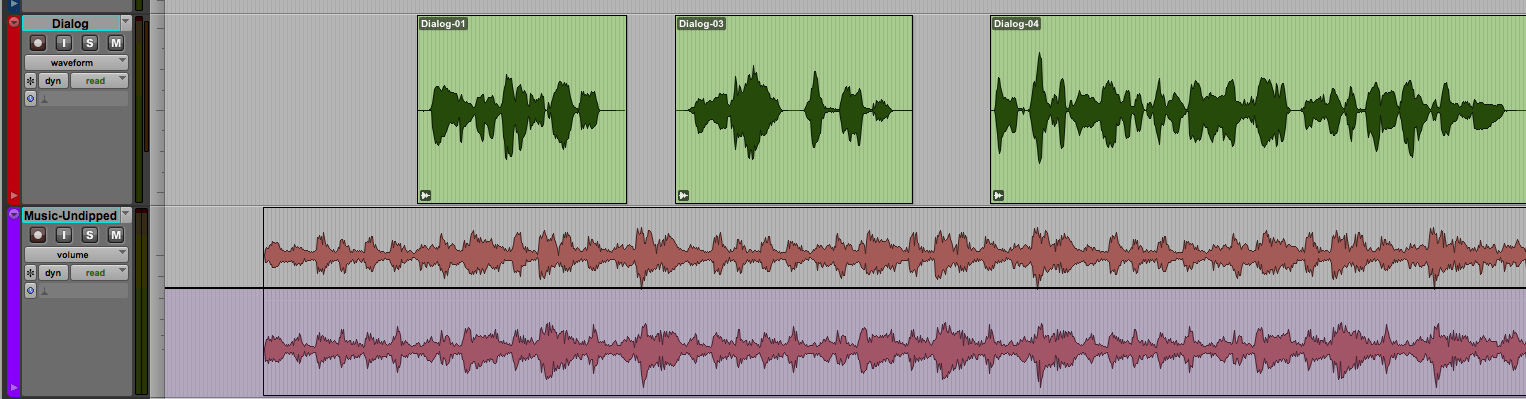
An undipped music stem like this allows for international versions of the edit to be adjusted based on the difference in dialog length for any given language.
Continue readingfor free
Unlock all 100,000 words of the Frame.io Workflow Guide and learn how the pros do workflow.

Chapter 08
Delivery
At the final step in the process, each piece of media is packaged together and optimized for each medium: web, broadcast, theatrical, mobile…
13 minute read

This section was contributed by Michael Kammes, Creative Technologist.
File based media delivery has become the industry standard over the past ten years. Tape deliveries have become antiquated and typically only requested for redundancy or for use by legacy systems.
Often, you’ll find file delivery specifications in a “deliverables” document. Strict adherence to the deliverables document is essential to ensuring your media is accurately played back and viewed in the way in which it was intended. Failure to adhere to the specifications defined within a deliverables document may lead to picture artifacts, sound hiccups, or failure to play all together.
Advanced delivery specifications may also include incorporating strict naming conventions of the media files, specific audio channel mapping, the embedding of metadata, and wrapping of various media files into “wrappers”. Lastly, the way that you transfer files from one location to another can take the form of traditional FTP, web-based transfer services, P2P (peer-to-peer) applications, or dedicated accelerated transfer utilities.
End point determines the format
Each video endpoint requires your media to be encoded in such a way that their data center can process the media effectively. As a general rule, the more consumer in nature the end point is, the more flexibility there is in the deliverables.
As a reminder, all professional outlets will have a deliverables document or webpage to reference – ALWAYS ask for this prior to creating deliverables.
Social Media
Social media websites, such as YouTube, Vimeo, and Facebook, can handle SD and HD resolutions, and in some cases, 2K, 4K and above. Each platform may differ in aspect ratio, and typically prefer compressed media, such as those media files generated by the cameras found in many mobile devices. These sites encourage smaller file sizes for faster uploading. However, many of these sites will accept a broad range of less compressed formats, albeit not advertised. It is also not uncommon for social media sites to perform a subsequent re-transcode of your uploaded file to ensure it will play back from their servers appropriately.
Broadcast
Broadcast outlets, such as NBC, CBS, ABC, FOX, PBS, and others have strict guidelines for delivery. This is mainly due to the fact that these are the media files that the Network Operations Center (NOC) will play when on-air (they won’t be re-compressing it first). As the media playback systems for broadcast centers are purpose built, the flexibility for variations in media formats is drastically reduced. In addition, broadcast outlets routinely run submitted media files through Quality Control (QC) applications to verify conformity to the defined specifications.
Feature Films (mainly Netflix)
Non-broadcast professional video outlets, such as Netflix and Hulu, have defined their own standards for media delivery. As they are not beholden to traditional broadcast infrastructure and legacy set-top boxes, they can request higher fidelity media. This media is often very large, as VOD outlets will create compressed streaming versions for consumption by viewers on a wide variety of devices. The increased quality of these submitted files also allow for future manipulation and usage as newer formats gain consumer adoption (HDR, UHD/4K, etc.).
Creating the files
What type of video?
The key to a good looking end deliverable is to create your final deliverable(s) from the highest quality master file. Re-compressing media files that have already had a round of compression will yield a worse looking media file. Much like making a photocopy of a photocopy, generational loss can occur with each subsequent re-compression, so it is important to start with the highest quality file available. The highest quality file, from which all other versions will be generated from, is often called a “mezzanine” file.
The easiest way to create a mezzanine file is to export from the NLE project itself. This means either exporting from within the NLE or, exporting through a software application that understands a project file, such as Adobe Media Encoder with Adobe Premiere projects. Accessing the original media when creating a deliverable means you are generating a mezzanine file from the highest quality files available – the source footage.
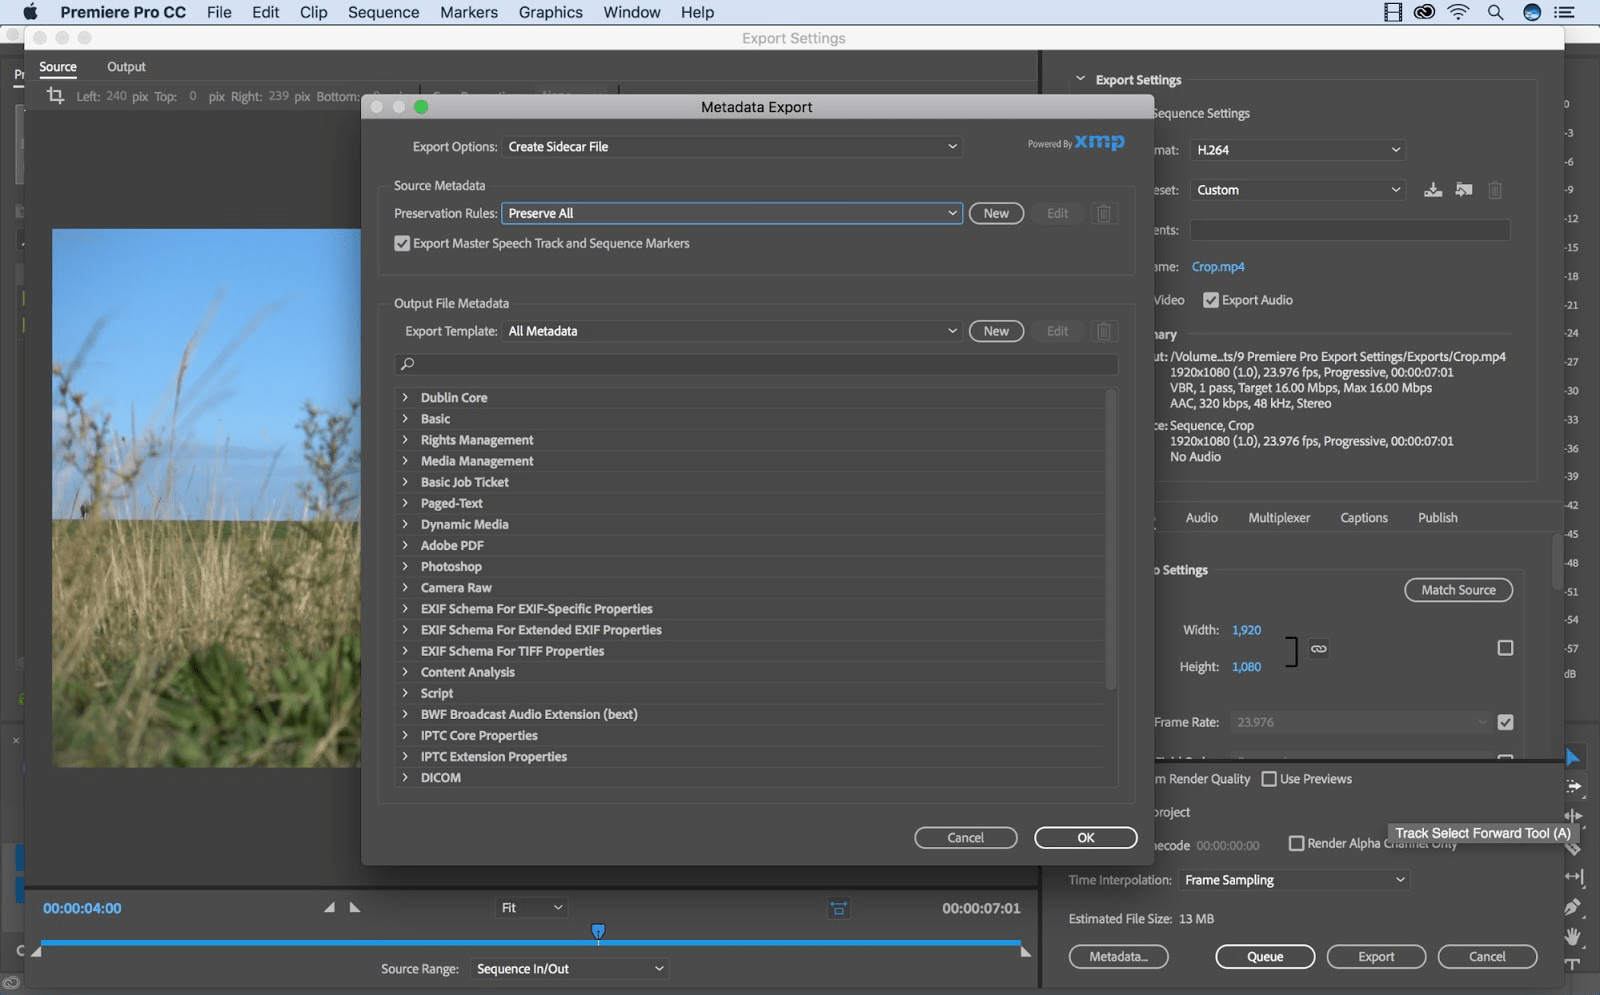
Adobe Premiere Pro Media Encoder
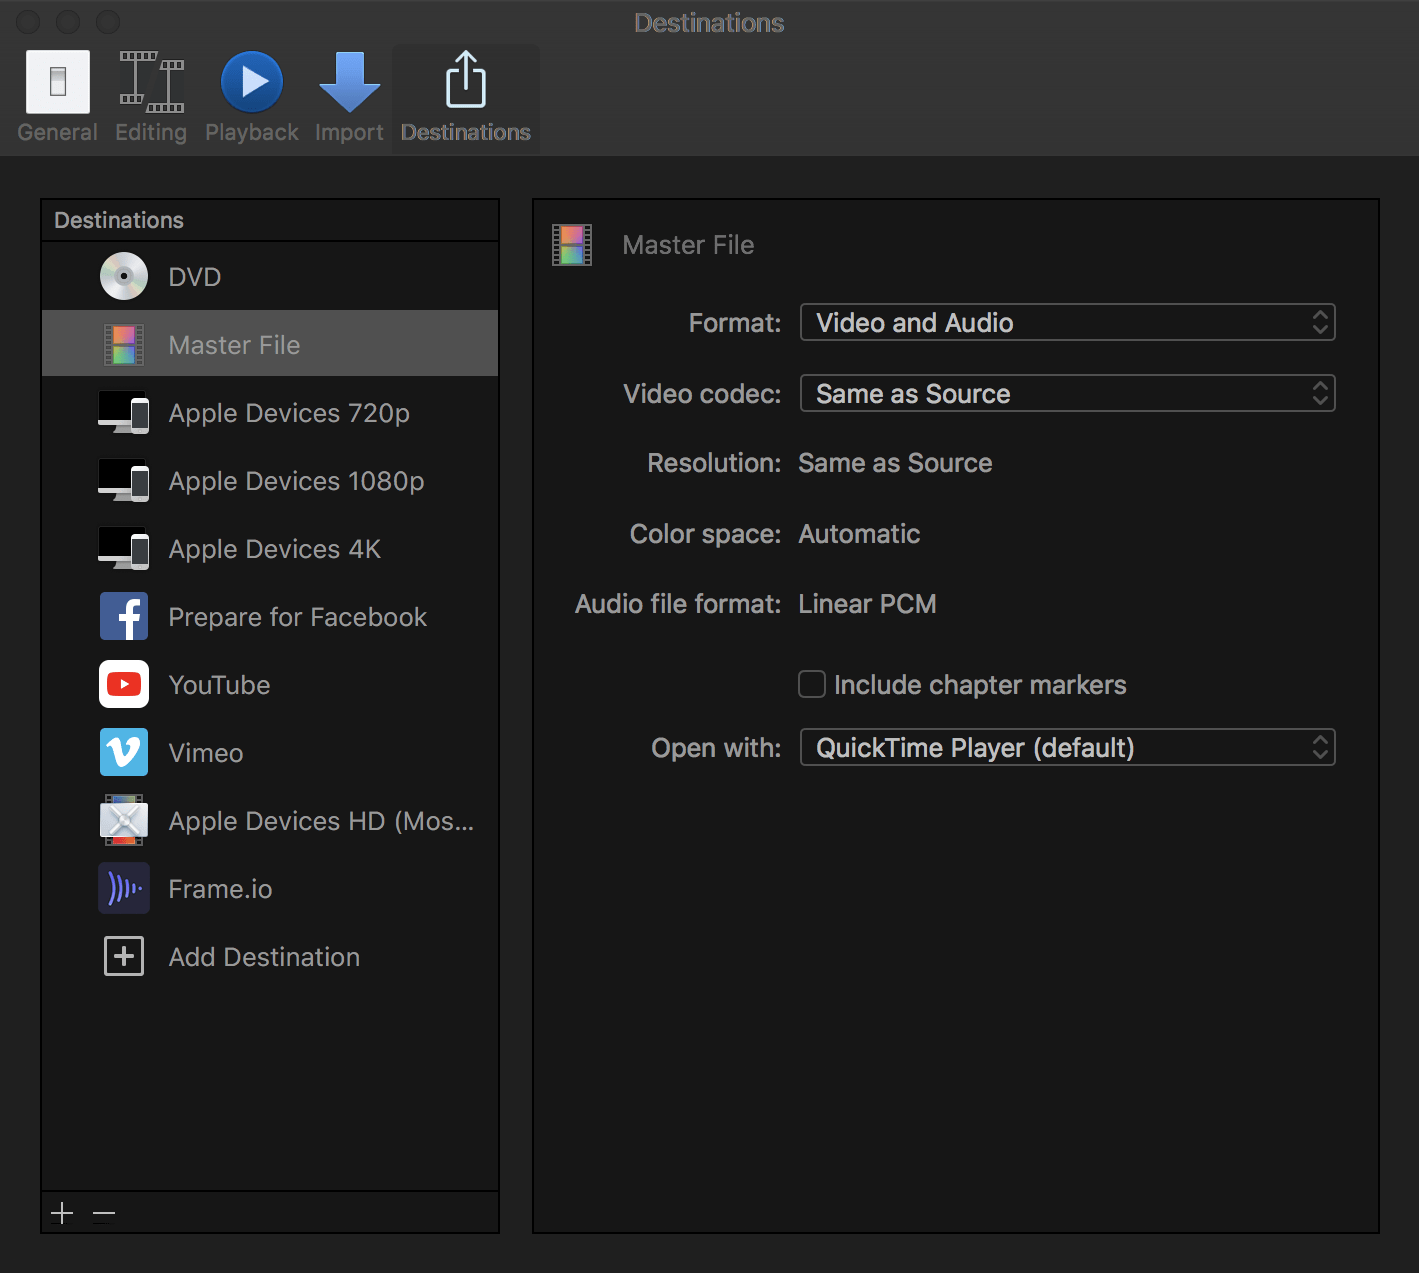
What type of video codec should my mezzanine file be?
A good rule of thumb is to create a mezzanine file in the highest quality you can without exceeding the quality of the highest resolution of video in your timeline. For example, if you shot something on your cell phone (H.264), exporting in an uncompressed format would be a waste of drive space. You can’t add image fidelity to media where it wasn’t originally present. Imagine taking water from a small glass and pouring it into a larger glass. It’s the same amount of water – just in a smaller container.
What if my source media is very compressed?
The exception to this is if all of your media is compressed – perhaps all shot on a cell phone (H.264) – then exporting to a cell phone format would further reduce the quality of your file. This is because lightweight codecs like H.264 are Long GOP and extremely lossy, and thus tend to breakdown following subsequent rounds of re-encoding. In this case, we will want to create a non Long GOP mezzanine file, that is as perceptually lossless as possible. Often, this becomes a mezzanine file in a ProRes or DNxHD/DNxHR codec. On the higher end, formats like image sequences (DPX, TIFF, J2K, etc.) are another popular choice.
As the industry moves to UHD/4K and HDR, new formats and codecs have been developed to handle the increase in image fidelity for video endpoints. While ProRes, DNxHR, and image sequences are well equipped to handle this, what formats do we create for delivery?
A vast majority of video endpoints and broadcast NOC outlets look for video in a traditional 16×9 aspect ratio. However, the rise of video acquisition with mobile devices, plus consumption of those same videos on social media sites like Instagram have led to the need to deliver media in different aspect ratios. This can include: Landscape (1.91:1), Square (1:1), and Vertical (4:5).

What type of audio?
Video without audio is just surveillance! That’s the last thing we want. So, we must encode our audio in a way that not only retains the audio fidelity of your project, but also so it can be decoded and played back by the viewer.
Perceived audio quality, just like video quality, can vary incredibly on where and how the end user decides to view the media. Is it being heard through a small mobile device with headphones, or in a movie theater? Each media outlet will manipulate your audio. This manipulation can be in the form of file size compression (bitrate) or tonal compression (dynamics). Both can affect the artististry in your project, so it’s important to create your files audio tracks properly.
Audio layout in your NLE
Most NLEs support mono and stereo audio editing. Some even support various versions of editing or mixing surround (5.1, 7.1, etc.). However, most NLEs understand that professional audio manipulation isn’t best suited for an NLE toolset. The video editing toolset is prominently frame based and centered around video augmentation, not audio.
Because of this, it’s common practice to migrate the audio work to an audio centric NLE, also called a DAW (Digital Audio Workstation). Often this migration is in the form of an AAF file (not to be confused with the audio format AIFF). Audio is then worked on within the DAW, and then imported back into the NLE. The audio and video files are then married/exported into a mezzanine file, as noted above.
Like video mezzanine files, audio mezzanine files shouldn’t be at a higher quality than the source media. However, if the source audio media is highly compressed, then exporting into a perceptually lossless format is preferred. Also, because audio takes up far less storage space than its video counterpart, it’s not uncommon to convert audio to 16-bit or 24-bit WAV or AIFF files, at 48kHz (or better).
There are audio laws. Yes, legal ones.
I’m sure you’ve watched a show on T.V. or online, followed by a commercial or subsequent video, and found that the volume between the two are completely different. This is a major problem, not only for the enjoyment of the media you’re consuming, but because hearing damage can potentially occur at high volumes. Due to this, the CALM Act (Commercial Advertisement Loudness Mitigation) was put into law by the FCC to ensure that broadcast television aired content at similar volume levels. Mixing to be in compliance with the CALM Act is important to ensure your audio isn’t rejected by the NOC.
While there is no current enforceable CALM equivalent for online-only video, it’s good practice to adhere to the same standards. This allows viewers who are consuming both (re) broadcast media from television, as well as exclusively online content to enjoy the content without constantly adjusting the volume during playback. It should be noted, however, that may online platforms attempt to do this for you, but without your knowledge.
Closed Captioning
Captioning, both open and closed, serves many purposes. Open captioning, or timed segmented transcriptions and descriptions of the audio, are permanently “burned” into the video frames of your finished media and are thus always visible. Closed captioning (aka “CC”), on the other hand, follow the same basic concept as open captions, but are optional viewing for the end user. In essence, these closed caption files can be toggled on and off by the end user if the media player supports it. The key to giving a user this functionality is to not only ensure the media player supports closed captioned media files, but also embedding (muxing) the caption files into the correct place within the media file and its wrapper so it can be accessed.

What type of captioning?
The most common use of closed caption files is for various languages. This allows your media to be consumed and comprehended by viewers who don’t speak the language spoken in your video. Many VOD outlets will request one or multiple translations to broaden your media’s reach.
Standalone caption files can take many formats. These formats have varying degrees of usefulness: some handle visual formatting for the text, with options such as bold, underlined, or italicized text. Many flavors even have various fonts that can be used, plus placement of the text on the screen. While there are dozens of formats in use, let’s cover the most frequently used formats for web and broadcast.
- SRT (SubRip)
- VTT (WebVTT)
- SCC (Scenarist Closed Caption)
- TTML (Timed-Text Markup Language)
- STL (EBU-STL)
- TDS (Caption Center)
- RT (Real Text)
- SMI or SAMI (Synchronized Accessible Media Interchange)
- CIN (Captions, Inc.)
- ASC (Cheetah ASCII)
- CAP (Cheetah Binary)
- CAP (NCI Binary)
I know! There are a ton of formats! Luckily, most closed captions file are nothing but specially formatted text, so a quick internet search will find many free sites that can convert between the formats. If your endpoint is requesting captions, they will outline the format they require.
Once you have your files captioned in your NLE, how to we pair the captions with the media for your deliverables? This is where you need to make the decision – will your caption files be embedded, or sidecar?
Embedded or Sidecar?
Embedded
While an all-in-one embedded file sounds like the most complete option, it’s not always the easiest. This is because of the wrappers the media resides in. A Quicktime MOV wrapper, or an MXF wrapped file (for example) have different specifications as to where the captioning is referenced within the wrapper. This can also differ if the media is standard definition or high definition. If the end point or VOD outlet doesn’t support that wrapper, or the caption file is not embedded correctly, the closed captioning files may not be found by the media player. An embedded closed caption file also reduces the flexibility you have with that file, as it’s formatted in only one way – that is, how the media file wrapper requires it.
Sidecar
A sidecar captions file is a standalone, self-contained file that is meant to be referenced by a media player that understands the relationship between the closed caption file and media file. This is primarily done through the timecode present in the media file, and its matching timecode within the caption file. The media player will access both and sync the playback during viewing.
Considerations
While providing a captions file for optional viewing seems to be pretty self explanatory, there are some considerations to be made.
If your media is going to social media outlets like Facebook, many users have the audio disabled for autoplay videos. This means as users scroll down their timeline, they will not hear your audio by default. Many video producers will burn open captions into their video, so the message behind the video is conveyed without audio…or to entice the viewer to enable the audio.
YouTube, and its parent Google, suggest that media files which are captioned may improve their search engine ranking or even strengthen their applicability to various searches. In short, captioned videos may receive an SEO boost. The exact amount of usefulness provided by captioned files is not public information, however.
YouTube allows for users to upload caption files, too. Plus, YouTube will try and create its own caption files for uploaded videos. Often, this type of automated captioning is less than optimal. Poor audio quality, accents, and background noise can interfere with the YouTube algorithm. So, it’s best practice to caption your files manually or use one of several online providers who will transcribe your video for a cost per minute.
Check for Quality Control
Quality control, also known as “QC”, is the method of checking your deliverables to ensure they meet the requirements outlined by the deliverables document from your endpoint. QC is not only a visual “check”, but also includes scanning the files for technical issues like legal audio and video levels, proper timecode, and file metadata, just to name a few. For broadcast, QC is largely an automated process, where specialized software applications QC your media, and generate a report with issues and their respective timecode values. Note that visual QC is subjective as opposed to a “pass/fail” stamp.
Failing QC can be a time consuming and expensive proposition. Most media created for broadcast are on tight production schedules. If a file fails QC, this means more time and money is spent to remedy the failure. It’s also quite embarrassing! This is why it is so important to review the media closely before submitting the files to the endpoint.
Quality Control can encompass hundreds of potential issues. Some common QC flags include:
- Bad/dead pixels
- Visible production equipment
- Compression Artifacts
- Compositing Errors
- Luminance Shift
- Color levels (examples: Rec. 709 vs. Rec. 2020)
- Incorrect audio levels and noise
- ADR (levels and sync)
- Incorrect timecode and frame rates
- Missing caption files
- Incorrect wrapper, audio placement and language tracks
- Poor quality footage (stock or low res source material)
In addition to the visual QC process, many video endpoints have automated QC applications to check the media files for potential issues that may not be seen visually. Baton and VidChecker are common QC tools for this purpose. In response to this, many media creation facilities have adopted the same QC tools for use in-house to avoid the failing at an outside facility. Many of these tools also have the ability to “fix” the media file errors they find. However, these automated QC systems may not recognize that when a flag is triggered, it is an artistic decision as opposed to an error. This is another reason why a visual QC is also strongly encouraged.
Wrap it up and export
You have your picture locked, and your audio is finished and married to your video in your project. Now: how do you get your finished project out to the world? There are a few ways to accomplish this.
First, as we discussed earlier, exporting a mezzanine file from your NLE or finishing system is preferred, so you have a master file with which to create your various deliverables versions from. This ensures that you have the highest quality to start from. The next step is creating the individual versions for your delivery. We now have several options and tools available to create these files.
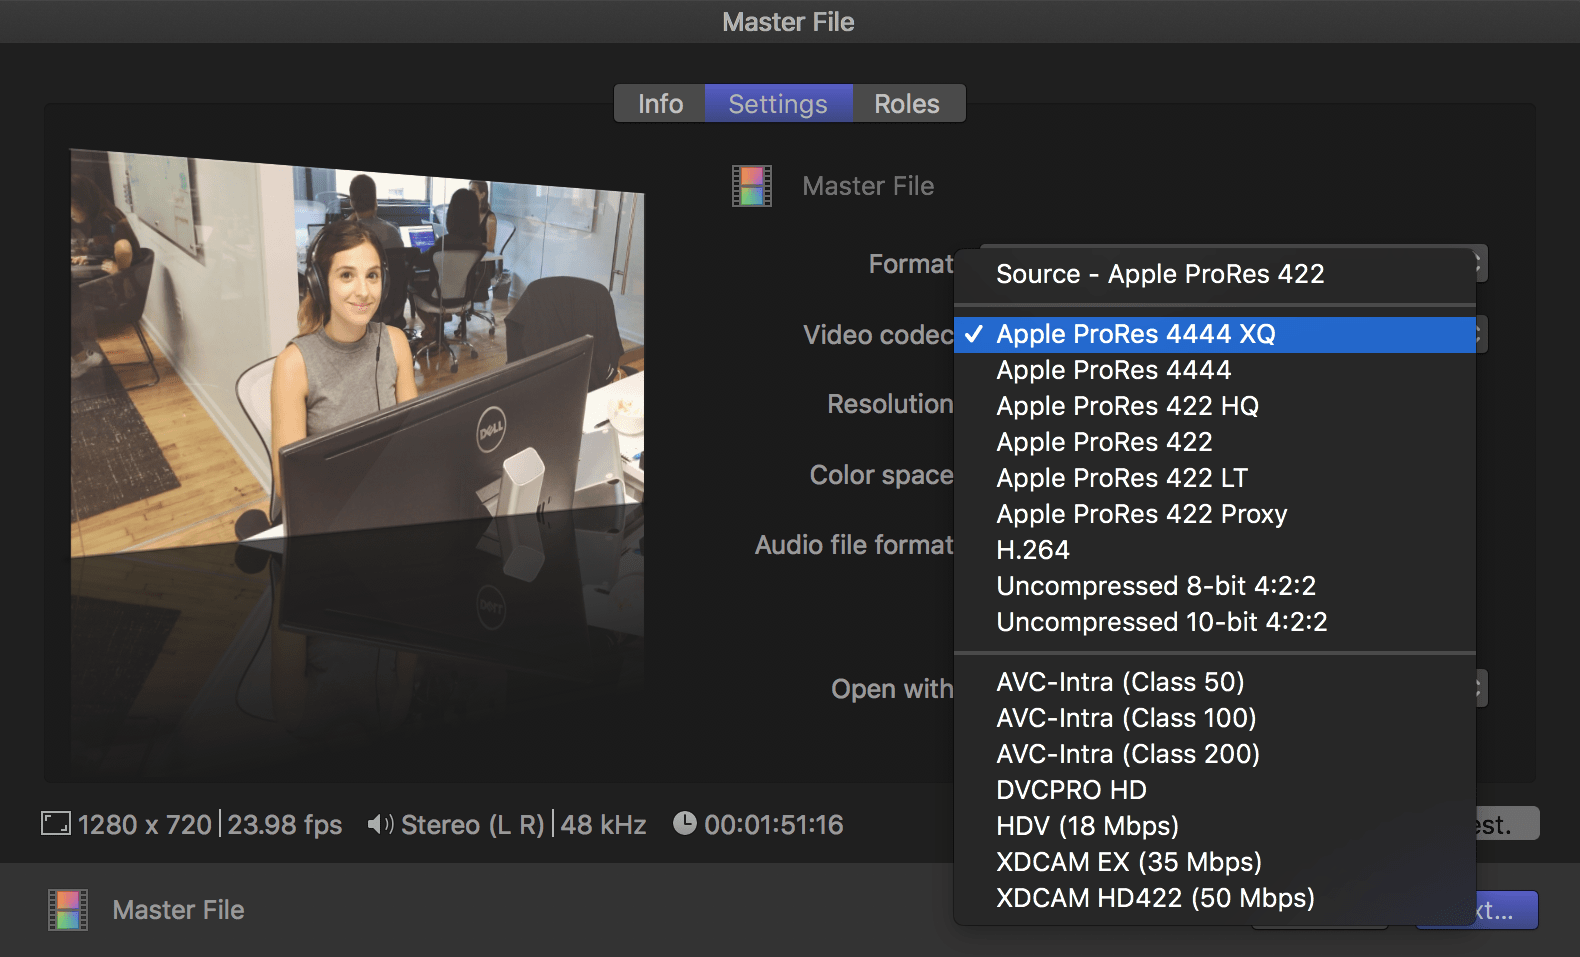
Hardware or Software?
Transcoding can be done either “in software” on a Mac, Windows, or Linux operating system with a specialized transcoding application, or it can be done “in hardware”, which requires the user to play the video out of the computer via “baseband” connections (video cables).
Send Off The Files
Now that your media files are created, we need to deliver the files to the end points. Most VOD platforms have web page based upload forms. For groups of files, or large files, however, web-based (HTTP) uploads can be slower and less reliable than optimized connections. HTTP is also not as secure as other transmission methods, meaning your media stream could be intercepted. To combat this, we have purpose-built media transfer tools.
FTP, or File Transfer Protocol, is a legacy way of transferring files that offers a bit more resiliency than traditional HTTP methods. However, FTP is a two step process – upload to a server, and download from that server to another system. This means that transfer time may be longer than a direct peer-to-peer transfer.
Dedicated file transfer services, like Aspera, Signiant, File Catalyst, and offer accelerated and secure file transfers between locations. These transfers are routinely faster than FTP or HTTP, and some even meet MPAA (Motion Picture Association of America) certification or the newer TPN for security. These transmission methods are considered facility-based tools, and thus are more expensive than FTP or HTTP methods.
Frame.io also offers accelerated file transfers alongside its collaboration toolset. Although Frame.io runs on standard HTTPS, its speeds match or exceed those of the dedicated file transfer solutions, and it also offers enterprise security as audited by TPN.
Continue readingfor free
Unlock all 100,000 words of the Frame.io Workflow Guide and learn how the pros do workflow.

Chapter 09
Case Studies
We walk you through the details of a range of different workflows, from Hollywood tentpoles to wedding videos, so you can see the tradeoffs.
1 minute read
Thank you to all our case study contributors, and to our writer, Lisa McNamara!
Now that we’ve covered all of the main concepts and processes of post-production, it’s time to get some real-world experience. As you’ve learned, there is no single best workflow. Each project’s unique circumstances requires a unique workflow design.

So we sat down with the creative and technical teams on a series of popular projects from different sides of the professional video industry, to learn the details of their workflow. The budgets and timeframes vary widely, from a months-long Hollywood tentpole to a weekly YouTube show, but each of the teams we spoke with is at the top of their game, doing killer work.
Continue readingfor free
Unlock all 100,000 words of the Frame.io Workflow Guide and learn how the pros do workflow.