Prep
Editing Codecs
5 minute read
When choosing a codec for the editing phase of your project, there are some important considerations to keep in mind.
Compressed Codecs will Slow Down Your Editing.
Most lower to mid-range cameras record with codecs that use temporal compression, also known as long-GOP (group of pictures) compression. These codecs do a great job of minimizing the file size of your footage, but your computer will have to work much harder to edit them. Why is this?
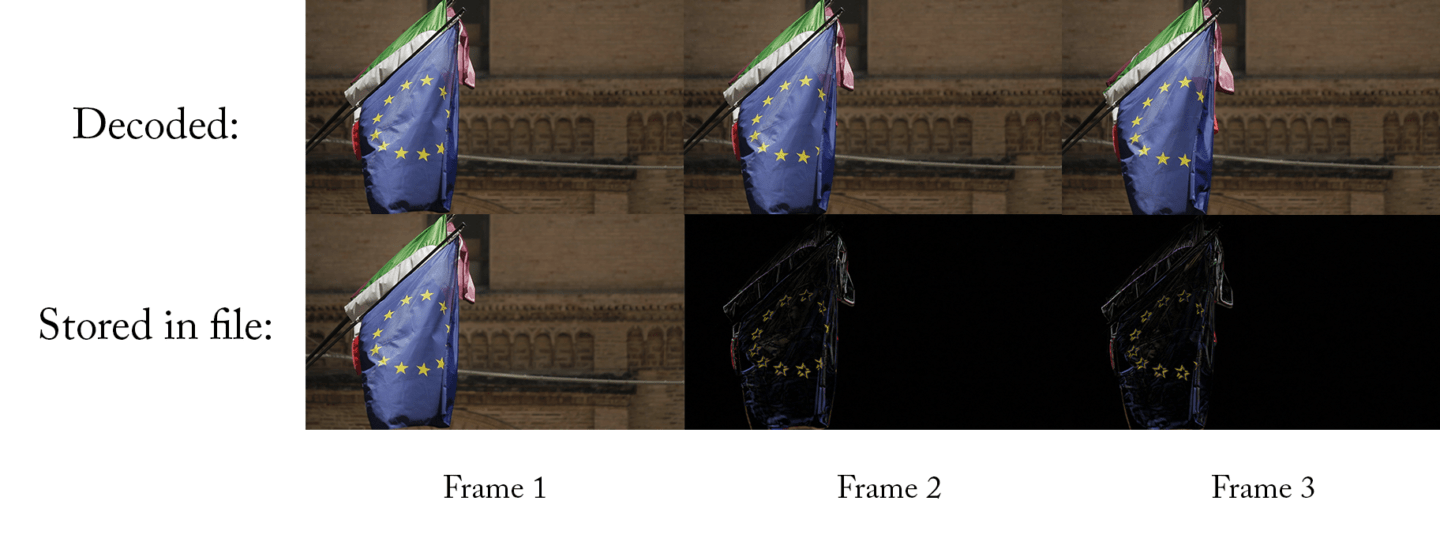
The simple explanation is that temporal compression saves incomplete information for every frame. Long-GOP codecs track the video from frame to frame, and then only save the information that changes between them. Anything that stays the same is merely referenced from the frame at the beginning of the group. This means that every frame is not a complete picture, but rather just the “new” information necessary to reproduce changes in the image.
If a video doesn’t include a lot of motion, then the video file can be a whole lot smaller than it would be otherwise. For example, imagine a video where the difference between the first frame and last frame is just a few pixels. In this case, the codec only needs to store the identical pixels once, and the “new” pixels every time they change between frames.
If this sounds great, try editing with a long-GOP codec. As you scrub through the timeline, your computer will likely stutter at least a few times. That’s because the computer has to look at a whole series of frames to reproduce an image. If you’re playing the footage forward, that’s not usually an issue, but when you’re jumping around a sequence or even playing a clip backward, there will be a high computational cost. This can slow your editing down significantly, especially if you’re editing in 4K.
When transcoding your files for editorial, be sure to avoid long-GOP codecs (like most versions of H.264). The better option is to choose an Intraframe codec, which stores a complete image for every frame. File sizes for intraframe compression are obviously bigger, but they do not incur the same computational burden of Long-GOP codecs. ProRes, DNxHD/HR, and Cineform are three great codec options for editing.
High Bitrate Codecs Will Slow Down Your Editing
For low to mid-range codecs, you don’t have to worry about the bitrate at all. Once you start moving up the codec ladder, however, high bitrate codecs can cause issues with editing, especially if you’re working on “everyday” computers and high resolutions.
The reason is that your computer needs to be able to read the data from your hard drive at a rate that is at least as high as your codec’s bitrate. It makes sense — if your codec has a bitrate of 50Mb/s (fifty megabits per second), then your computer needs to be able to read that file from the hard drive at least that fast. Else, the playback will fall behind and stutter.
[Note: Mb/s stands for megabits per second, while MB/s stands for megabytes per second. There are eight bits in a byte, so you need to multiply by 8 when converting from MB/s to Mb/s]
The good news is that hard drives are getting faster every day, so a bitrate of 50Mb/s is not going to cause any problems. But what if you’re editing ProRes 422HQ at 4K, which has a bitrate of 734Mb/s? The average external hard drive is only just barely fast enough to play that back, and some cheaper hard drives won’t manage it at all.
And then, what if you’re editing a multicam sequence with three cameras? Now you need 3x that data rate: 2,202Mb/s! At that point, you’re going to need to invest in some higher-performance storage. If you don’t, then your timeline is going to be pit of despair.
Some editors already have such speedy storage. However, if you do not, you can achieve significant savings both in cost and flexibility by using a proxy with a manageable bitrate. If you go that route, it may be feasible to keep the entire film stored on the internal hard drive of a laptop, allowing you to work from the beach, from home, or on a plane or train.
Editing in LOG will Slow Down Your Editing
Shooting in LOG is one of the best ways to preserve as much of your image’s dynamic range as possible. This gives you much more flexibility when it comes to crafting the “look” you want in post. Now that LOG profiles are available even on most prosumer cameras, it’s an extremely popular way to shoot.
The downside is that LOG images that come straight out of the camera don’t look so great. It can be difficult to pick the best take from a scene when you can hardly distinguish an actor’s facial expression from the wall behind them. So, you need to add in a bunch of contrast and saturation in order to preview the image accurately and make your creative decisions. The easiest way to do that is to apply the appropriate LUT to all of the clips when editing.
This can be a huge annoyance to manage, and can also slow down the computer. With a LUT applied to every clip, that adds another computational step. First the computer has to decode each frame, then it has to apply the LUT, and only after that can it display the image. Of course, you can avoid this issue editing the LOG footage without a LUT, but that’s certainly not ideal.
The most common way to overcome this issue is to pre-bake the LUT into proxies files of the LOG footage. If you’re going to convert your files into proxies before editing them anyway, then you might as well apply the LUT during the transcode process. That way, the editor is always working with footage that has good contrast and color, but doesn’t have to bother with LUT management or decreased performance. Keep in mind, you should only bake-in LUTs if you’re going to switch back to the original camera files later.
Continue readingfor free
Unlock all 100,000 words of the Frame.io Workflow Guide and learn how the pros do workflow.
