Color
The Tools of Color Correction
5 minute read
To plan artistically-sound color correction for your project, you first need to be familiar with the universal tools of the trade.
Color
The colorist’s most fundamental tool is, well, color. This might seem obvious, but digital color is complicated and needs some exploration.
When we talk about colors in everyday life, what we’re really talking about are human perceptions. Our brain interprets a particular wavelength of light in a certain way, and we call that color by a particular name. Red, green, blue, periwinkle, etc.
But digital color is different. Since computers don’t have eyeballs, the only way they understand color is based on what we tell them. Engineers and scientists had to develop complex mathematical schemes to instruct computers that one color is blue, another is red, and so one. How exactly this was achieved is a very complicated story, but it boils down to a few key concepts
Digital color is defined in terms of fundamental properties that can be measured and calculated by a computer. There are different ways to talk about these fundamental properties, but one of the most common ways is with hue, saturation, and lightness.
Hue is what people are normally referring to when they say “color.” Red, green, and blue are the 3 primary hues that digital color is concerned with, plus the three secondary hues yellow, cyan, and magenta, which are created by mixing the primary hues together. All other colors can be made by combining different amounts of these hues.
Saturation is the intensity of a color. If a computer wants to display the color “red”, it will also have to specify the question “how red?” A computer can answer this question with the saturation value of a color. The higher the saturation, the more intense the color. On the other hand, a color with no saturation will appear gray (have no color).
Lightness is a representation of how light or dark a color is. As you can probably guess, a digital color with a higher lightness value will appear closer to white, and one with a lower lightness value will appear closer to black.
These three fundamental properties can be used to describe any color to a computer. For digital video, they are separated into two parts of an video signal, called Luma and Chroma.
Basically, Luma contains the brightness information of an image (i.e. it’s the black and white part of the video signal). So, that means it holds the lightness values of every pixel.
Chroma contains all the color information of an image, including the hue and saturation for the three primary color channels of every pixel.
This is a radical simplification of digital color, but it illustrates the complexities you deal with when you talk about color in your project. It’s a foundation from which you expand and finesse your creative and technical skills.
Manipulating Color
Now that we have a basic grasp of how digital color works, we are better prepared to use it for our artistic purposes. But how exactly do you manipulate color for your project?
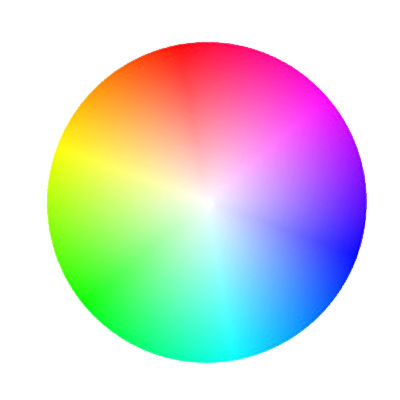
Perhaps the most common tool for working with color is the Color Wheel. This isn’t exactly the color wheel you remember from grade school art class, though they do look similar. Color wheels let you quickly adjust the hue, saturation, and lightness of colors at the three tonal ranges (that is the blacks, midtones, and whites) of your image. This makes them a powerful tool for a wide array of color correction tasks.
Another option for manipulating color is the Curves tool. This tool presents a simplified version of a video signal as a diagonal line in a graph. By “curving” the line within the graph, you can rapidly adjust the color balance, brightness, and contrast of an image. While curves are a lot less intuitive at first, they can still be used for very precise color correction in your workflow. In some cases curves will be your first choice, either for the sake of speed or simplicity.
There are a great many more tools for working with the color in your project, but color wheels and curves are arguably the most universal. Pretty much every piece of software capable of image manipulation has some form of these tools.
Evaluating Color
Manipulating color is tricky business. Video monitors (even the same model) often vary in how they display colors. In theory, properly calibrated displays fix this issue, but in reality they can still drift apart over time.
Even if you re-calibrated your monitors every day, there’s another problem. Human eyes aren’t consistent either. Your eyes (and brain) adapt your perception of color depending on a number of factors, including the lighting of the viewing environment, the amount of motion in an image, and even your level of stress. Put simply, color is hard because your equipment lies, your eyes lie, and your colleagues lie (because their eyes lie too).
But scopes never lie. Scopes are specialized tools that measure exactly what is contained in a video signal. They measure this information, and then visualize it onto a type of graph. There are several different types of scopes, and each uses a different graphing method to visualize the video signal for different purposes.
In general, most scopes help you understand some aspect of the color and/or brightness information in an image. So, even if your monitor displays wildly inaccurate color, scopes measure the source information of a video signal. That means you can always get a clear representation of the actual visual characteristics in your footage.
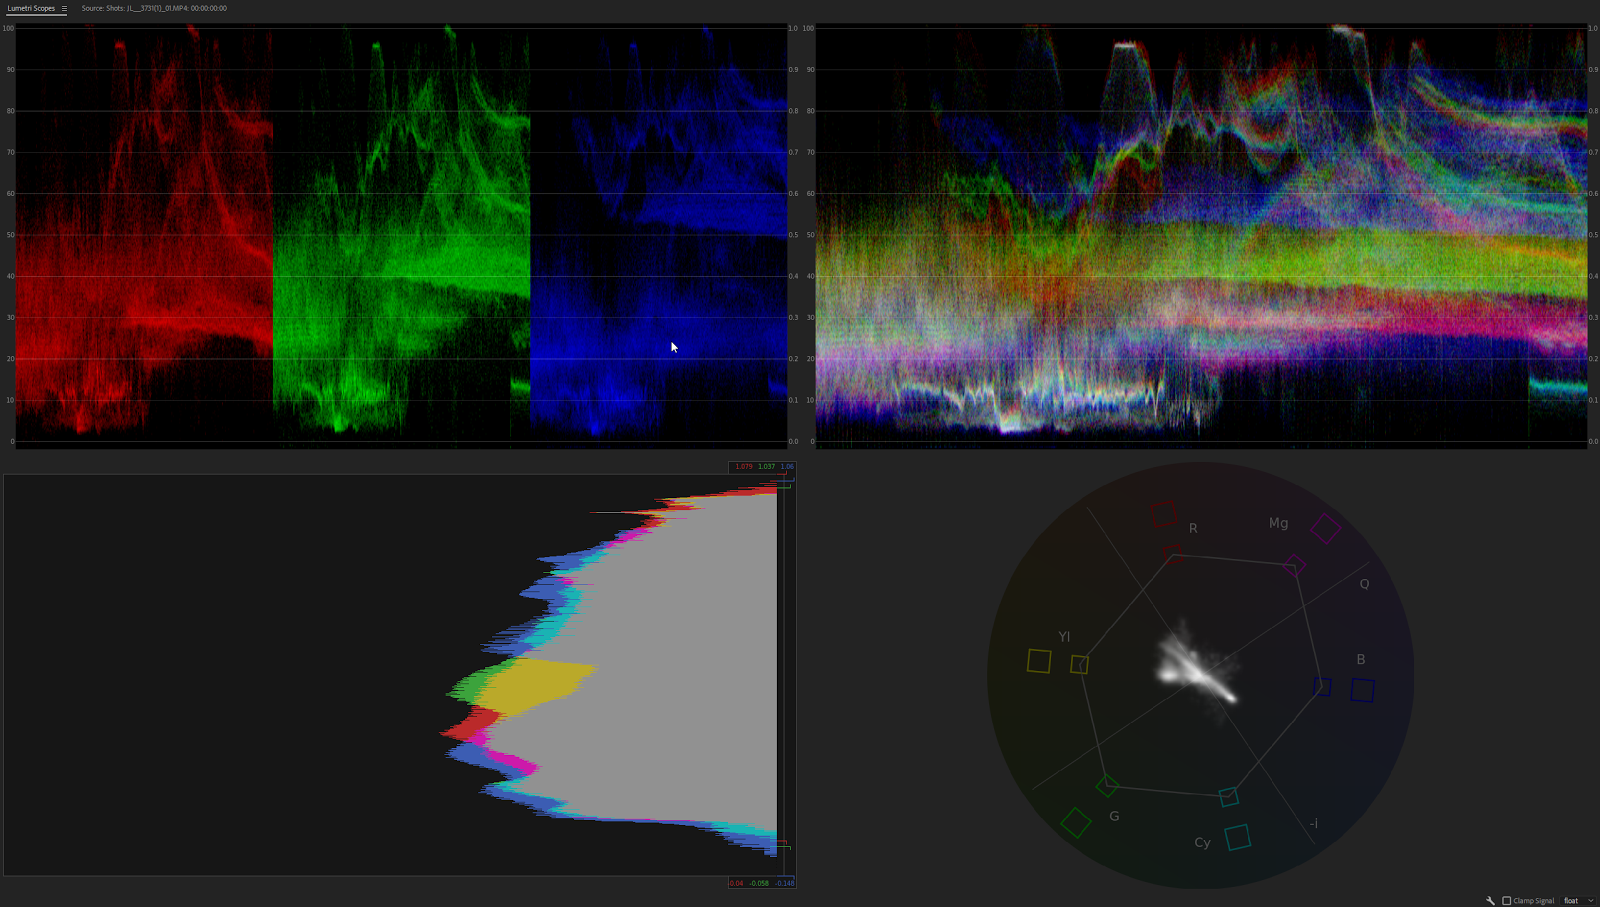
The best part about scopes is that they are universal. No matter what hardware or software you use, they always show the exact same values for the same video signal. They are a fundamental tool, so you really need to know how to use them when it comes time to color correct your project. Without them, it will be difficult to know if you’re crushing the blacks in an interior scene, clipping the whites in clouds, or if you have the correct hue and saturation for your customer’s logo.
They really are the only way to accurately evaluate the colors in your video signal.
Continue readingfor free
Unlock all 100,000 words of the Frame.io Workflow Guide and learn how the pros do workflow.
