Edit
Avid Proxy Workflow
9 minute read
With its built-in proxy workflow, Avid Media Composer makes editing with high-resolution media as painless as possible – you can do it all without ever leaving the program or interrupting your work.
By the end of this article, you’ll understand how to use the source browser to link to high-resolution camera media, transcode that media to lower resolution proxies, and relink back to the original media when necessary.
We’ll also talk about Avid’s proxy mode timeline setting, which we can combine with proxy media to get even better performance.
The first step to get your proxy groove going is to bring in high-resolution media files to your Avid project.
Importing vs Linking
There are two ways to bring media into an Avid project:
- Link Media. Linking to source media allows us to take advantage of AMA (Avid Media Access), which links the file-based media directly into a bin through a plug-in, leaving it in place on the hard drive and maintaining all file and folder structures.
- Import Media. Importing source media creates new MXF files that are placed and managed within the Avid MediaFiles folder, on whichever drive you’ve specified in your Import Settings, and does not maintain original file and folder structures.
When working with high-resolution camera media, it’s generally best practice to maintain the original folder structure, especially if you’ll be color correcting in another application like DaVinci Resolve. In some cases, linking also provides more control over your media, like with RED footage, where linking with AMA allows you to access and edit color profiles for the raw media.
Installing AMA Plugins
Before we can actually link media, we need to download and install the correct AMA plugin for our source media. Though a few standard plugins come bundled with Avid, like one for Quicktime Media sources, most have to be installed manually, which allows camera manufacturers to update them with each new camera release.
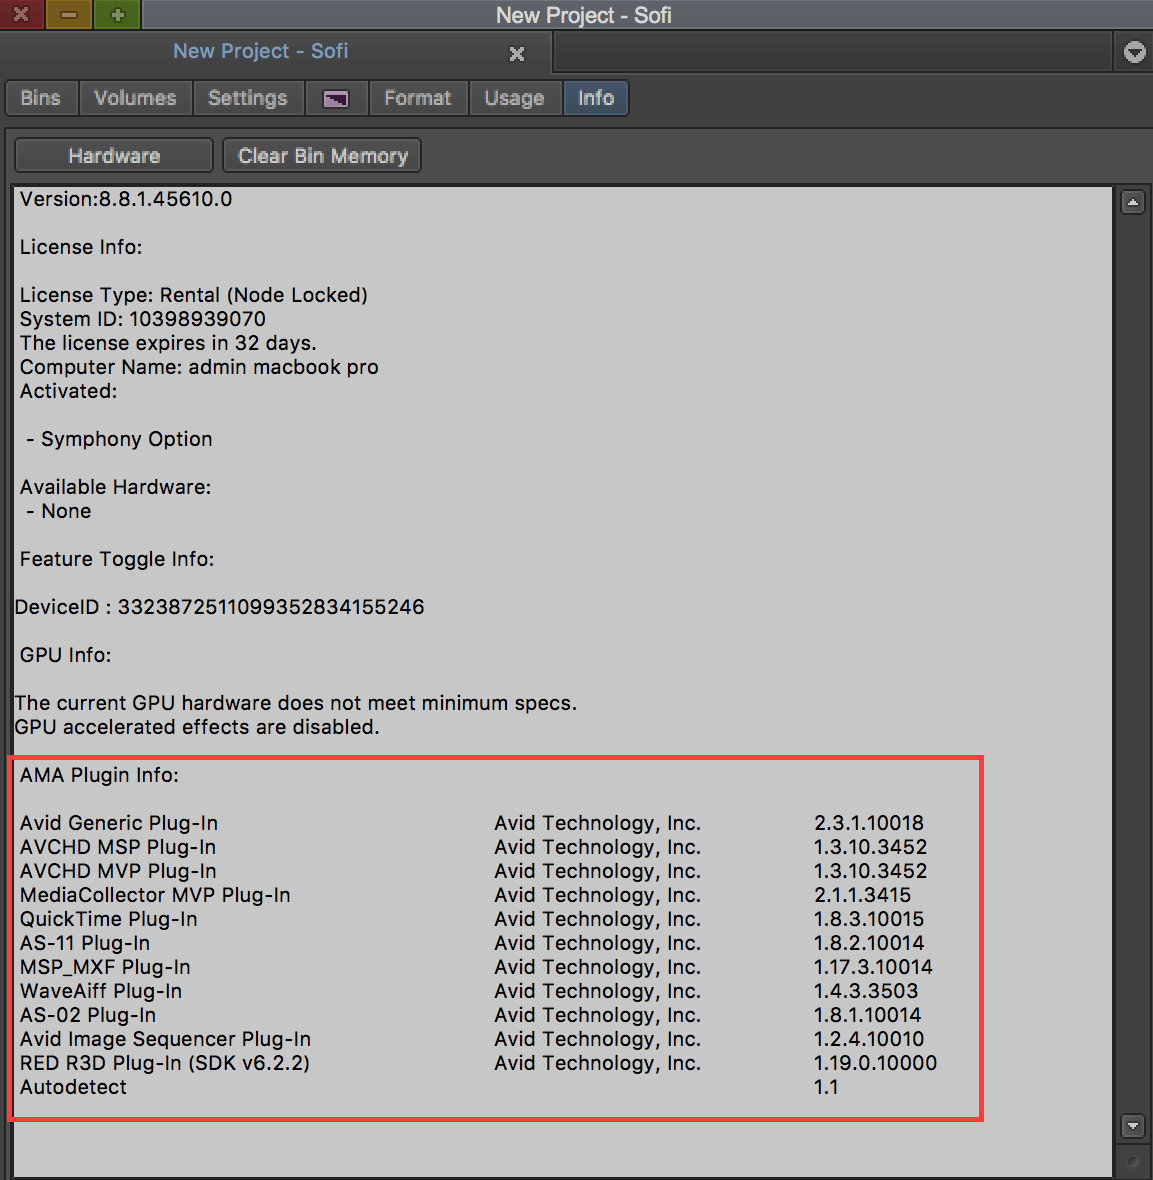
You can find a list of downloadable plugins on Avid’s AMA page. If you’re not sure if you’ve already installed a specific plugin, you can check by opening the Project Window (⌘9) and clicking the Info Tab.
Once you install the plugin for your specific camera media, the process of linking and creating proxies is the same for each plugin.
Linking File-Based Media with AMA
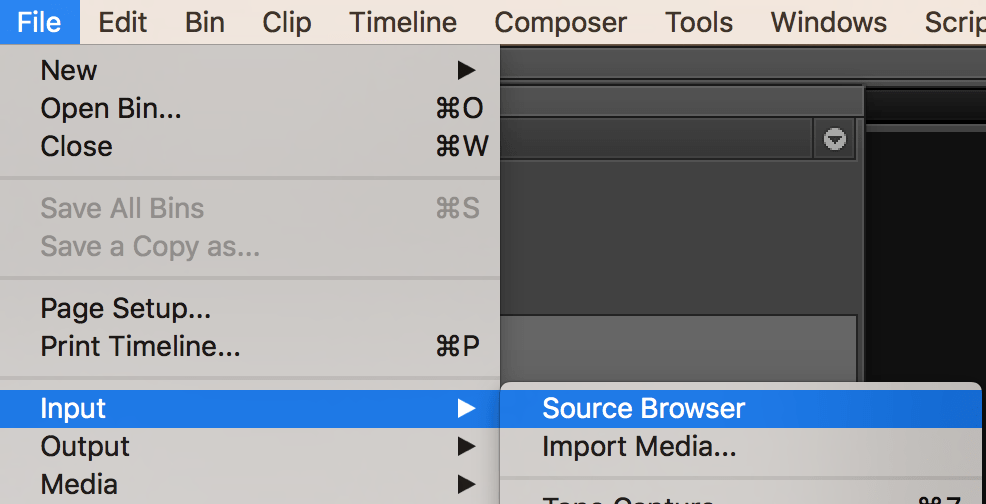
Open the Source Browser (File > Input > Source Browser), which allows us to browse for files to either import to or link to.
Make sure the Link option is selected in the lower left corner. In the lower right corner, notice the setting for Target Bin. In the drop-down menu, you can set which bin you’d like your linked clips to end up in or even create a new bin.
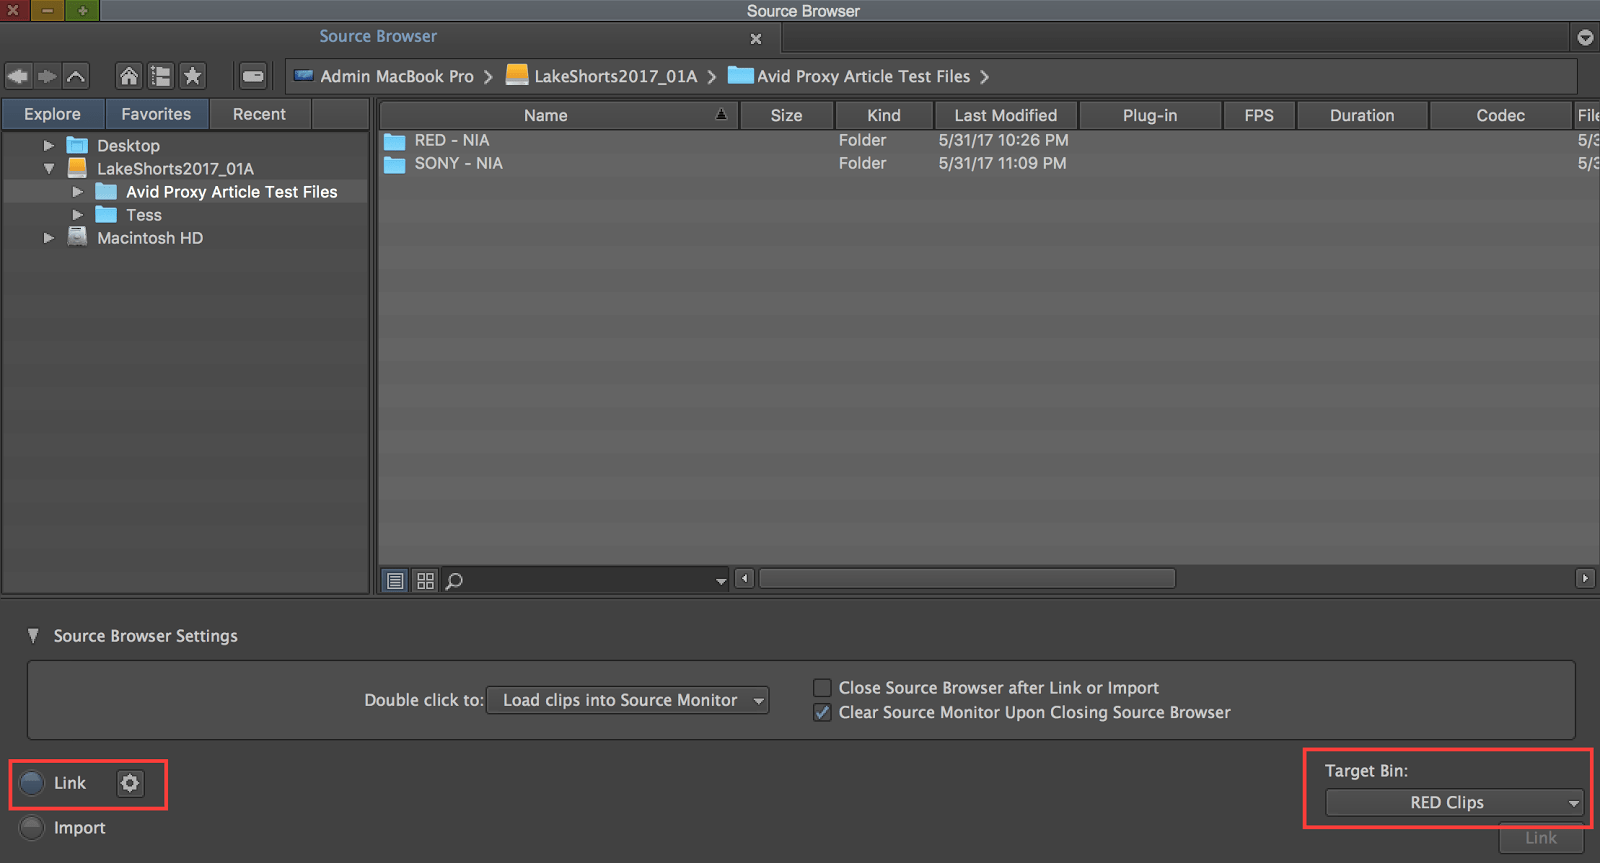
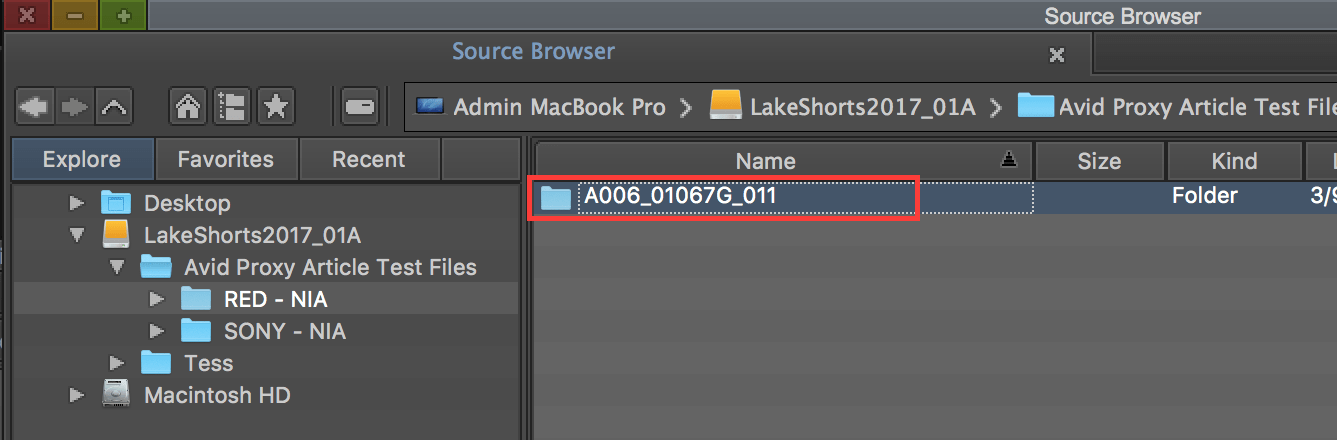
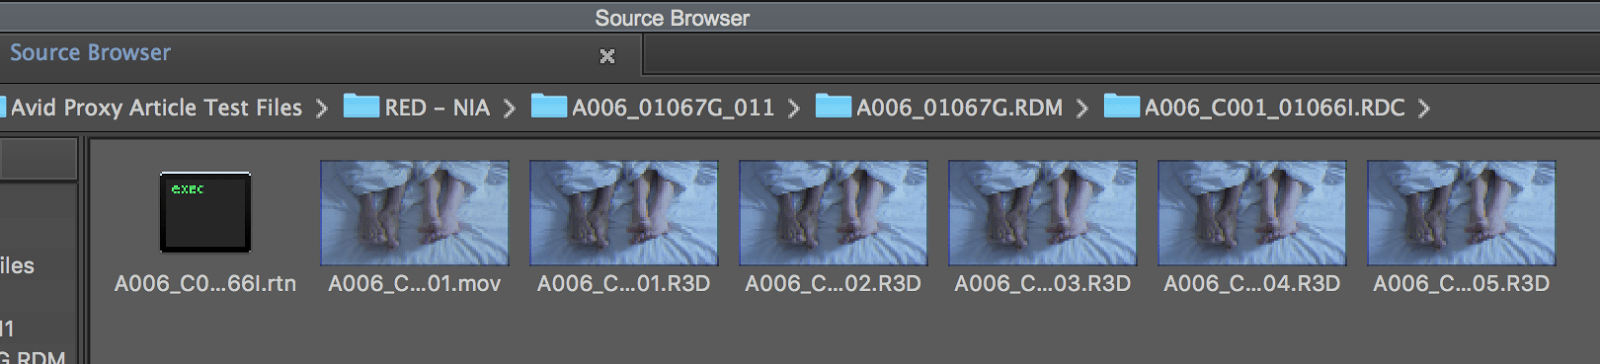
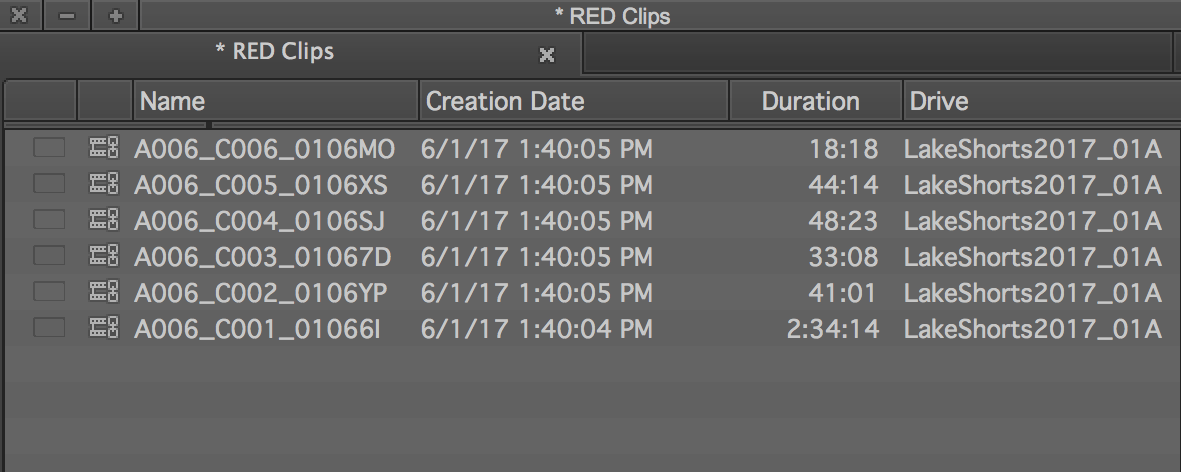
Once you’ve set your target bin, use the left-hand side of the browser to navigate to your source media. In this example, I’m using RED media, which like most high-resolution cameras, uses a very specific file structure that includes many folders. In most situations, you can select the outermost folder(s) and all the clips inside will be linked.
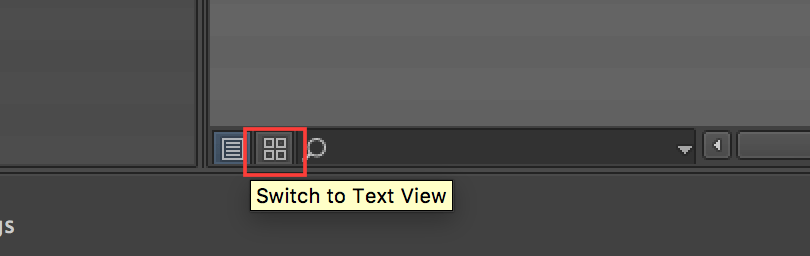
If you prefer, you can also select the thumbnail view option and preview clips.
For an even better view, set the drop-down menu next to “Double click to” to “Load clips into source monitor.”
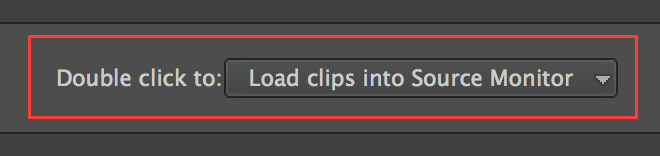
Now you can playback clips in the source monitor by double clicking them, without actually bringing them into the project.
Once you’ve selected your clips, click the Link button in the lower right corner and they’ll populate the specified bin.
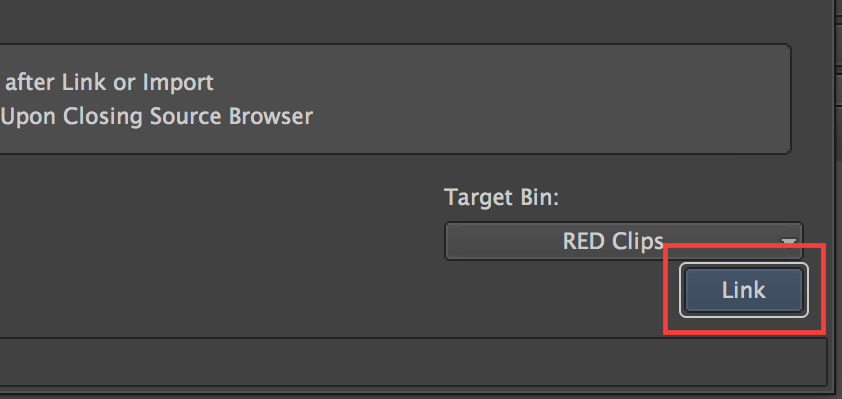
Note: If you want the Source Browser to close automatically, select the Close Source Browser after Link or Import option.

Transcoding AMA-Linked Media in the Bin
Your high resolution linked media will now be available in the bin you specified.
Now we’re ready to transcode the source media to a more portable, edit-friendly, proxy resolution.
While I like to transcode right after linking, you can actually begin to edit the source clips and transcode at any time if you prefer. For example, you can string out a sequence of selects and then transcode just the clips in that sequence to save time and drive space.
I don’t recommend getting too deep into organizing your clips before you transcode. Transcoding in Avid works bin by bin, so if you organize a project into scenes before you transcode, you’ll have to select the clips in each bin separately (or make a sequence containing the clips you want) to transcode, which can get tedious.
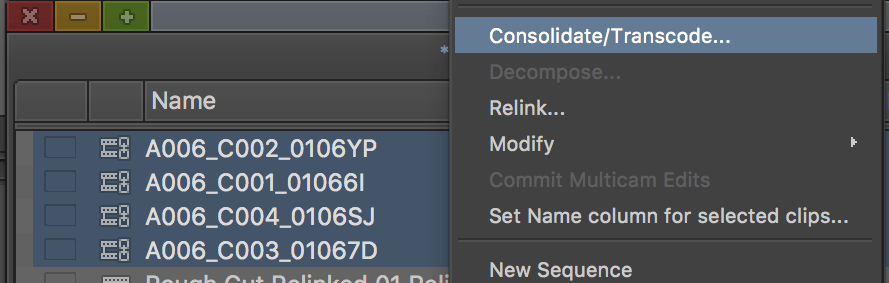
In the bin, select all the clips (or a sequence) you want to create proxies for, right-click and select Consolidate/Transcode from the context menu.
In the dialogue box that opens, select the Transcode button in the upper left-hand corner.

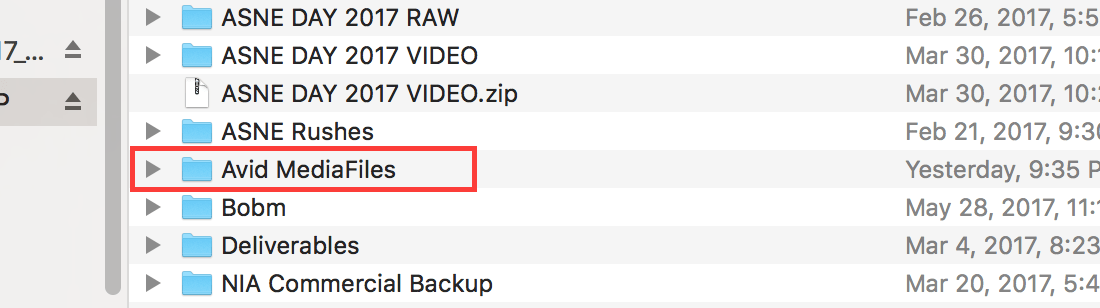
Below the Transcode button, you’ll see an option to select Target Drives. Avid treats transcoded proxies like imported media, meaning it places and manages them within the Avid MediaFiles folder, so we have to specify where we’d like that folder to go.
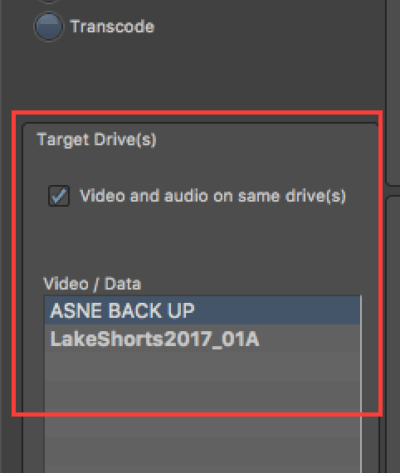
I prefer to transcode directly to a portable drive so that my source media and proxy media are in separate places. That way, I can easily take my portable drive with me. But if you don’t have a separate drive available, or are transcoding for performance rather than portability, you can transcode to the same drive as your source media. You can always copy your proxy media to a different drive later if you change your mind.
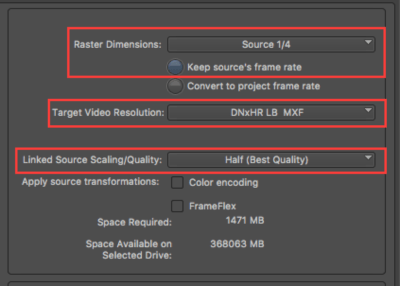
Once you’ve selected your target drive, choose an option under the Raster Dimensions drop down menu. This will determine the frame size of your proxy media. 1/4 is usually a good choice (and allows us to best take advantage of the timeline’s proxy mode, explained later on), though it will depend on what frame size you’re starting with. In this example, I’m working with 4K RED files.
Under Target Video Resolution, select DNxHR LB, which is a low bandwidth, lightweight codec.
In most cases, you’ll want to select the “Keep source’s frame rate” option so that you don’t have any issues relinking back to the high-resolution media.
Under the Linked Source Scaling/Quality drop down menu, I generally choose Half (Best Quality), but you can choose whatever you’d like. This setting affects the playback quality of the proxy media, so depending on your computer’s RAM and graphics card, choosing Full may impact how smoothly your footage plays. If you’re starting with 6K media, then I probably wouldn’t go above Half, whereas if you’re starting with 2K, you’ll likely be able to play back well at Full.
Finally, at the bottom of the Consolidate/Transcode dialogue box, you’ll see a checkbox for “Run in background.”

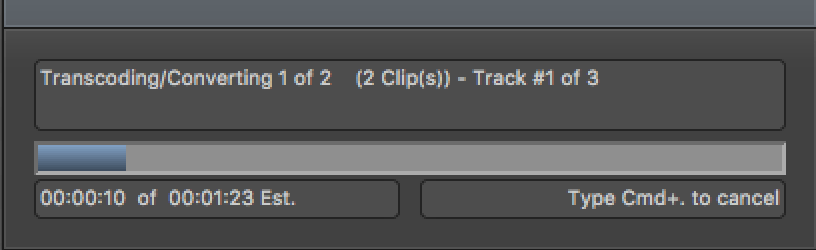
If you leave this option unchecked and then click Transcode, a progress bar will come up while Avid creates the files and you’ll have to wait for the transcode to complete for continuing to work in the project.
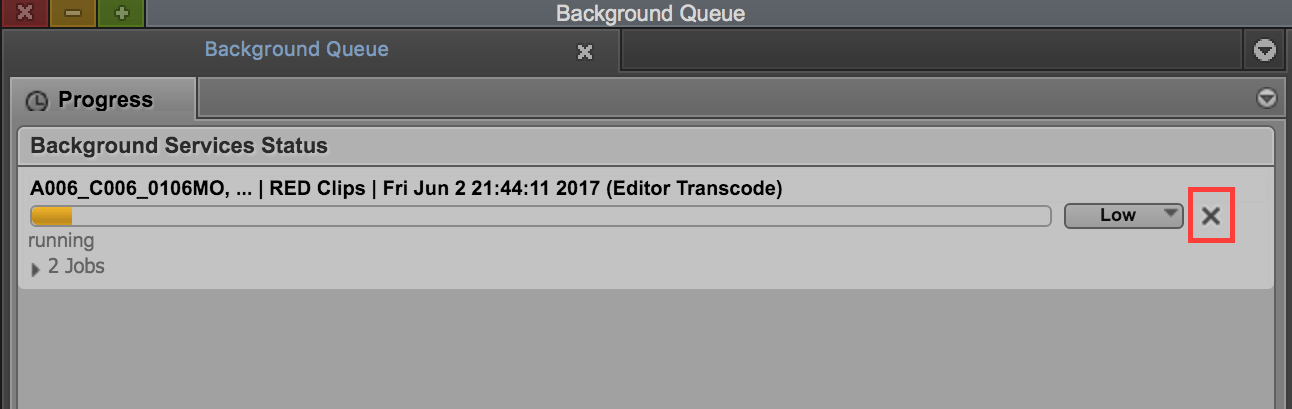
If the box is checked, Avid will transcode your files in the background and you can keep working in your project while you’re waiting. I like this options because you can check the progress of each clip being transcoded by opening the Background Queue under Tools > Background Queue. You can also cancel the transcode here by clicking the X on the right-hand side of the progress bar.
Either way, once your transcodes finish, you’ll notice that the proxy clips appear in the bin with a .new extension. In the Drive column, you can verify that the .new clips are on the drive you chose for your proxies and in the Video column, you can see that the clips are DNxHR LB.

To avoid confusion, move the proxy clips into a new bin that’s clearly labeled.
Now you can organize and edit your project with the proxy media for improved speed, or take your drive with the proxies on the go, leaving the original high-resolution media behind.
Setting a Proxy Mode for the Timeline
In addition to working with transcoded proxy media, you can also switch to a proxy mode in the timeline to playback high-resolution media at a lower resolution.
This proxy mode is only available for high-resolution projects (not for HD projects) and is different than the video quality options (yellow/green modes) because your sequence will render at whatever proxy quality you’ve selected.
To get the best performance, you can first transcode your media to a proxy resolution (like 1/4) as described above and then set your timeline to playback at the matching proxy resolution (1/4). That way, there’s no real-time processing when the clips are played.
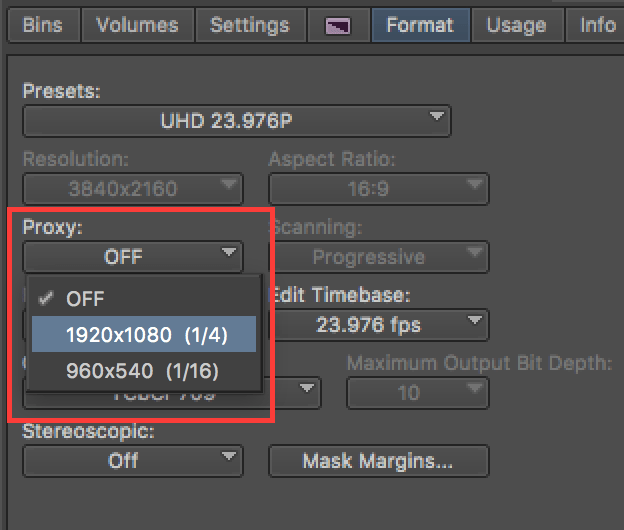
To set the timeline’s proxy mode, open the Project window (⌘9) and select the Format tab. Under the Proxy dropdown, you can choose to play back your clips at 1/4 or 1/16 of their original resolution.
Any clips that are resized will have a spatial adapter applied, which is shown by a green dot on the clip in the timeline.
When you render or export your sequence, it will use the proxy resolution that you’ve chosen. You can change the proxy mode anytime, but any previously rendered media will go offline unless you switch back to that proxy mode.
Remember that when you want to export your sequence, you need to turn off the proxy mode to set your media back to its full resolution.
Relinking to High-Resolution Source Media
Once you’re done editing your project with proxy media, you’ll want to switch back to the high-resolution media before outputting your final sequence.
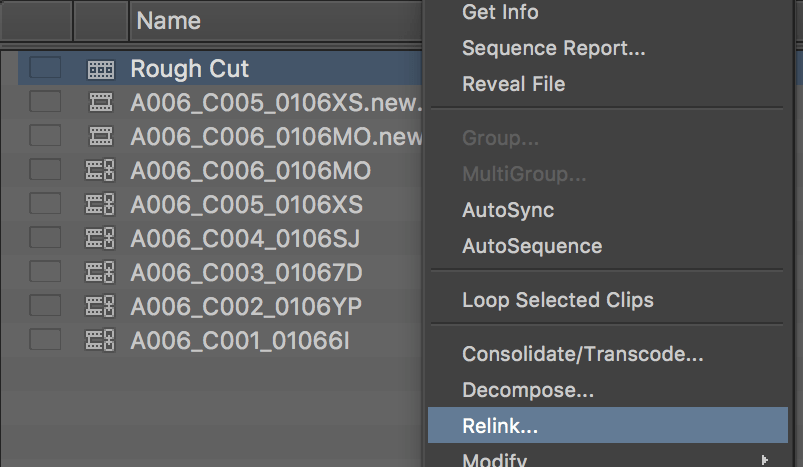
Right click on your final sequence and select Relink from the context menu.
In the Relink dialogue box, you can choose which drive your high-resolution media is located on under the “Media on drive” drop-down menu, or leave it set to All Available Drives.
Under Video Parameters, set:
- Relink to: Any video format
- Relink method: Highest Quality.
At the very bottom of the dialogue box, check the “Create new sequence” box.
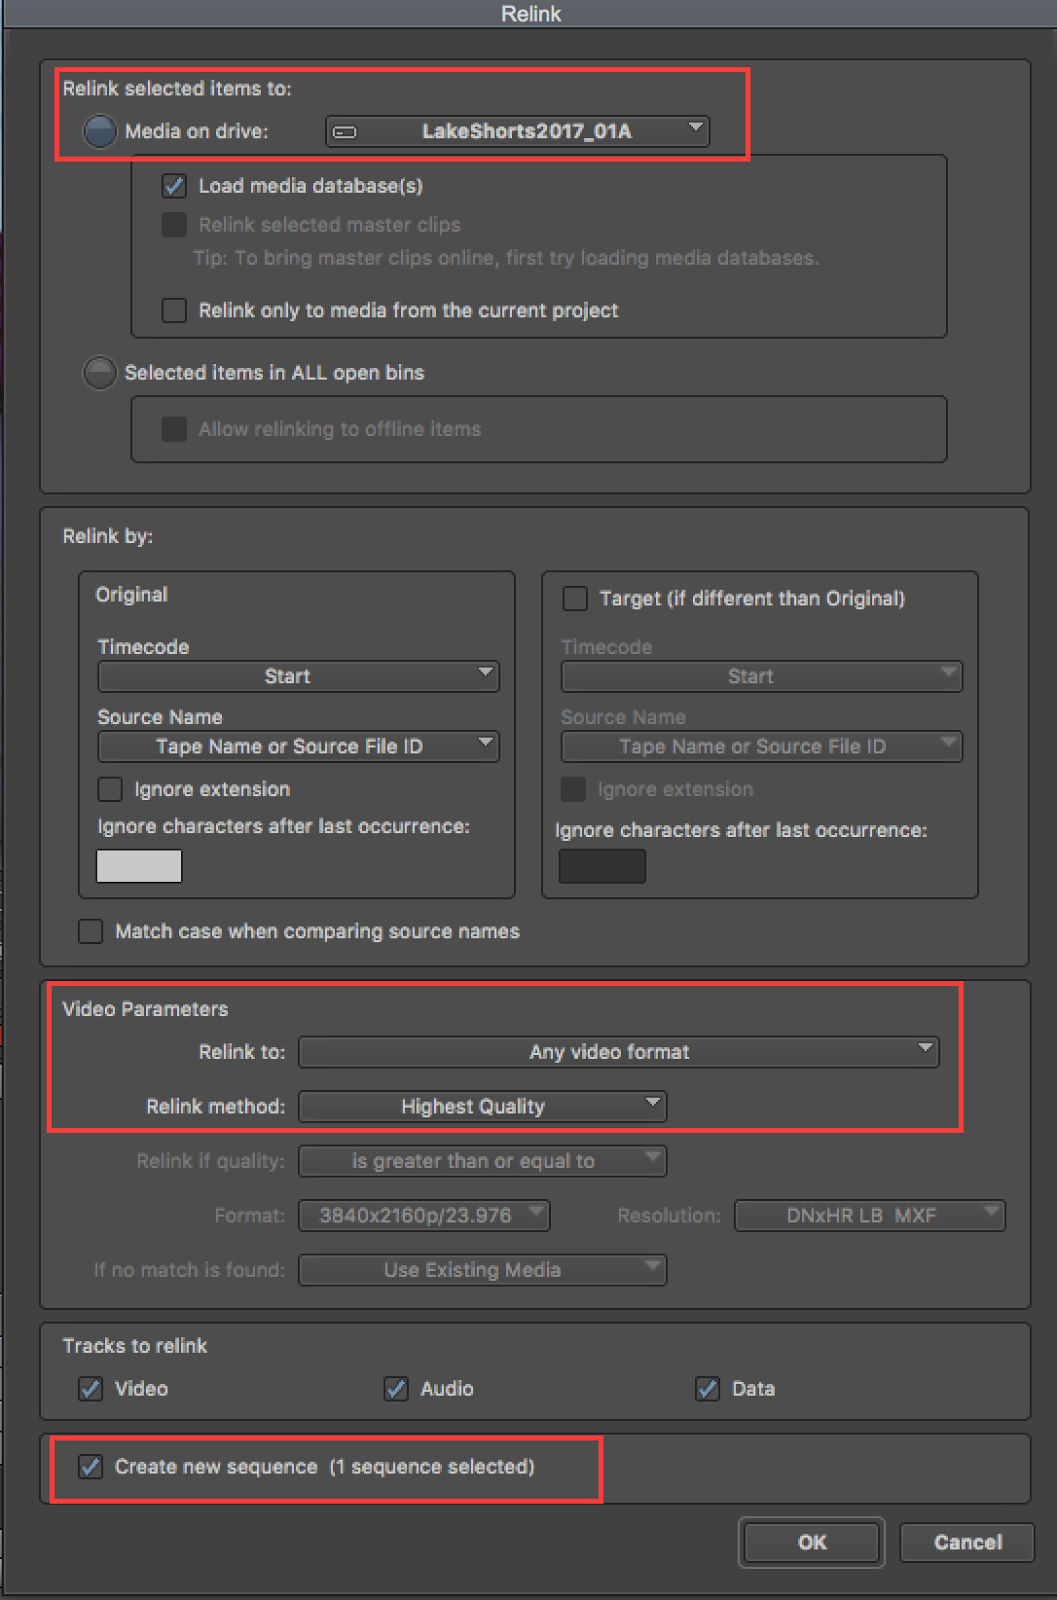
Click OK.
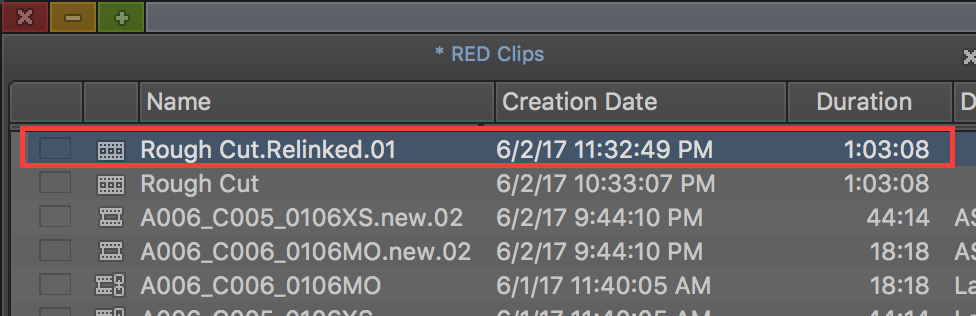
A new sequence with a .Relinked extension will appear in the bin, using the original, high-resolution AMA-linked clips.
You can use this new sequence to do all of your final outputs at the highest quality.
Relinking to Proxy Media
You can also relink a high-resolution sequence back to existing proxy media, if necessary.
As described above, right click on the sequence in the bin and select “Relink from the context menu.” In the Relink dialogue box, choose which drive your proxy media is located on under the “Media on drive” drop-down menu, or leave it set to All Available Drives. Check the boxes for “Load Media Databases” and “Relink only to media from the current project.”
Under Video Parameters, set:
- Relink to: Any video format
- Relink method: Specific Resolution\
- Relink if quality: is equal to and choose the correct Format and Resolution
At the very bottom of the dialogue box, check the “Create new sequence” box.
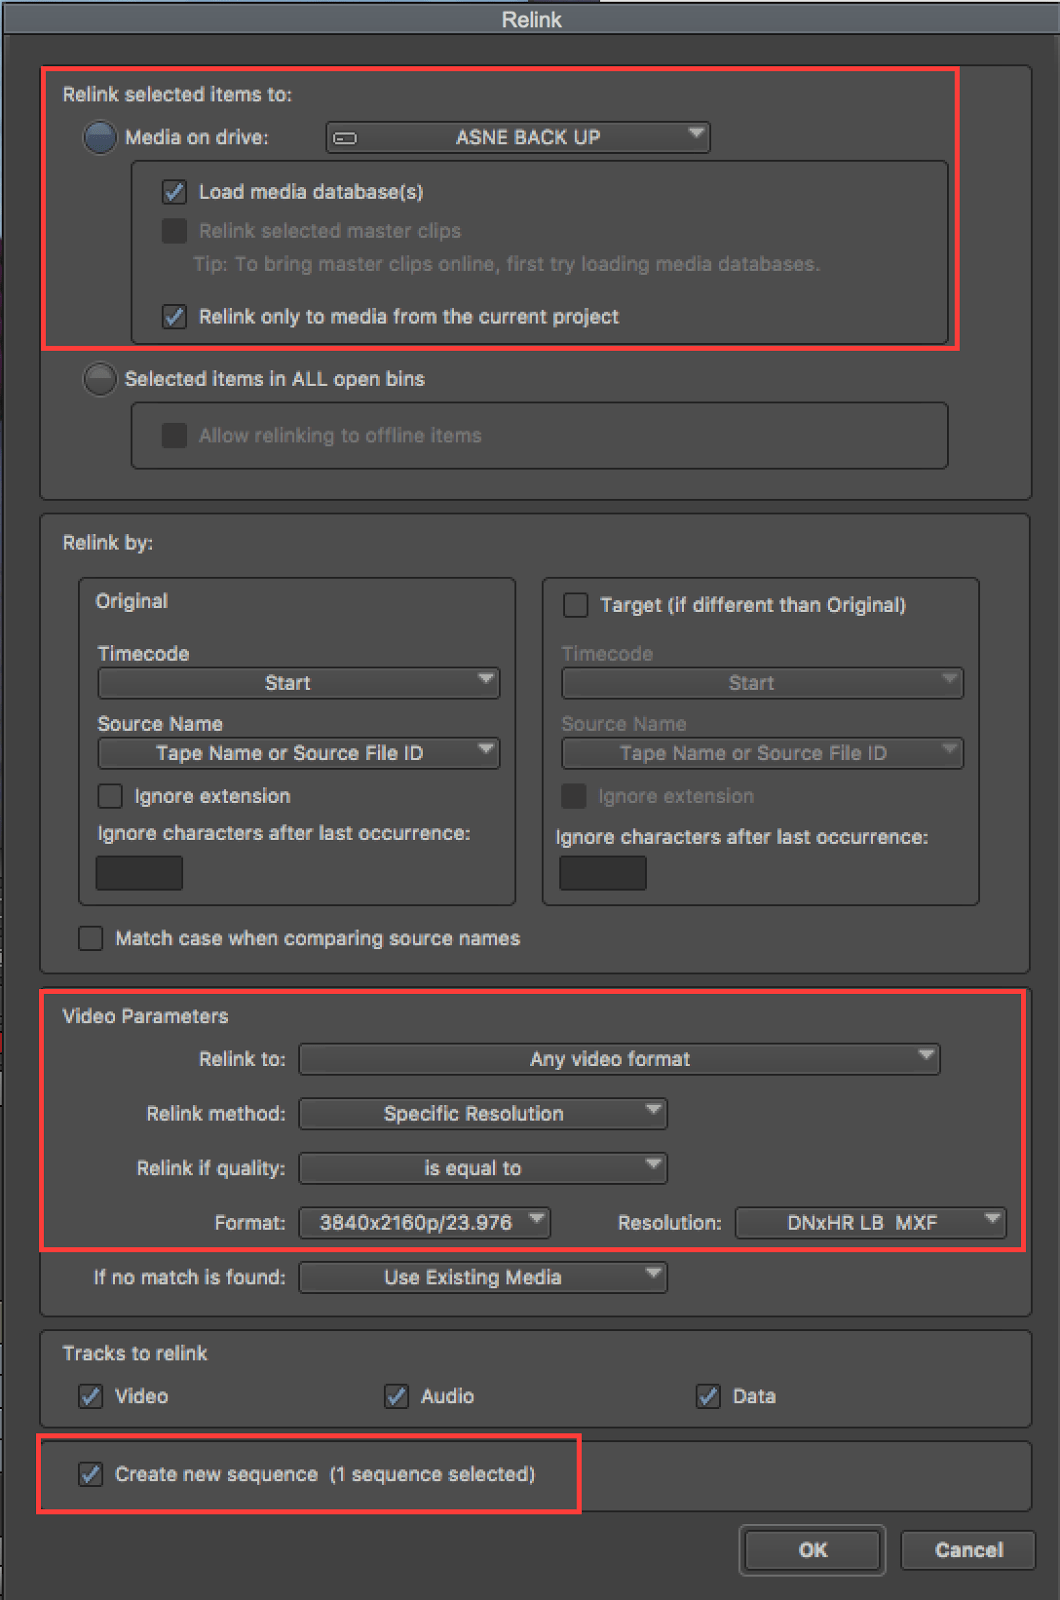
Click OK.
A new sequence with a relinked extension will appear in the bin, now using the proxy media.
MultiRez and Dynamic Relinking in an Interplay Environment
MultiRez and Dynamic Relink allow you to create two sets of media files—for example, a high res and low version—that apply to the same master clips. You can edit with the low-res media and just use the high res media for output, and you can automatically switch from one to the other without having to use the Relink command.
To take advantage of MultiRez and Dynamic Relink, you have to have the Avid Interplay Media Indexer installed.
Interplay, Avid’s MAM (Media Asset Manager), is a high-end product that comes with dedicated support from Avid, and so we assume that, if you have an Interplay system, you probably don’t need this guide. For more about this workflow, see Avid’s help documents here and here.
Taking Your Proxy Media on the Go
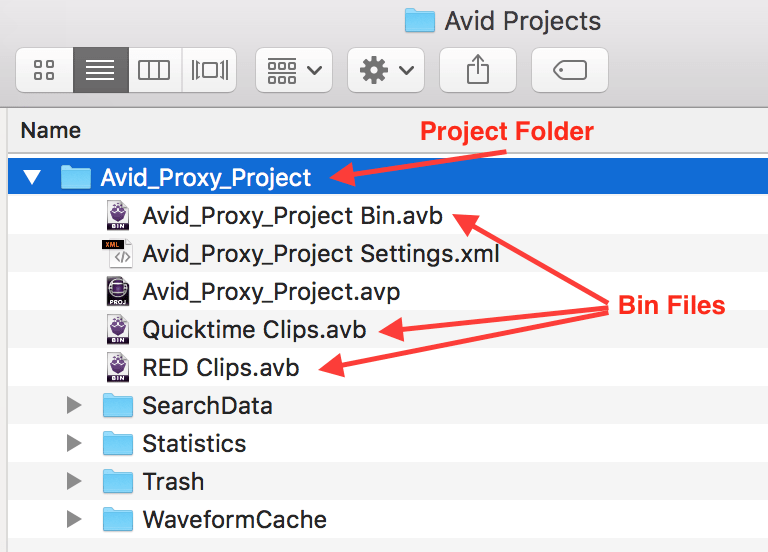
Avid is particularly well-suited to sharing lightweight proxy files with others or moving them between small, portable hard drives because all you need to get a project up and running is the bin (.avb) file with your clips and sequence.
Sharing proxy media between drives is as simple as copying over the root-level Avid MediaFiles folder on the drive with your proxies.
You can copy an entire project by selecting the project’s outermost folder (the name of the project) to a new drive, or you can choose to copy over a specific bin or bins that you can then open in a new project.
Wrapping Up
Avid’s proxy workflow is both easy and integrated; you can go from start to finish without ever leaving the program or holding up your work.
Combined with Avid’s simple project and bin structure, taking your work on the go is as easy as copying over the project or bin you want and taking your proxy media drive with you.
Continue readingfor free
Unlock all 100,000 words of the Frame.io Workflow Guide and learn how the pros do workflow.
