Prep
Real-World Remote Dailies Workflows
10 minute read
Delivering dailies digitally can save time, money, and hard drive space. They also give you the added benefit of sharing dailies easily with your team, which lowers the barriers to creative collaboration.
Rather than hiring runners or a courier service, a properly designed digital dailies workflow can get your editor the files they need with a simple upload, even on a standard or unreliable internet connection.
So how do you design a workflow best suited for your project? Let’s first go over some of the major workflow components, then we’ll dive into some real world examples to help show you how to put it all together.
But first, a quick word on how to think about your workflow.
A Workflow is Always Evolving
The optimal workflow must consider all the different aspects and needs of a particular project at once. As you read through and digest this section, think of the different components of these workflows like a puzzle. Consider how changing one might affect the others.
One way to successfully approach a workflow is to always keep the end goals in mind. Is your top priority getting files to the editor as quickly as possible? Or is sharing synced dailies with a specific LUT applied to a high level producer your end game?
Just as important, make sure you’ve started an open dialogue with all of the post-production team members who will be affected by the workflow. You may not always think of a small change that has a big impact for the colorist if you’re more of an editor.
As you become more experienced and lock in tried-and-true methods, make sure to remain open to new ideas. Don’t just recycle old habits because they’re familiar.
Now, let’s get started!
Internet Connection
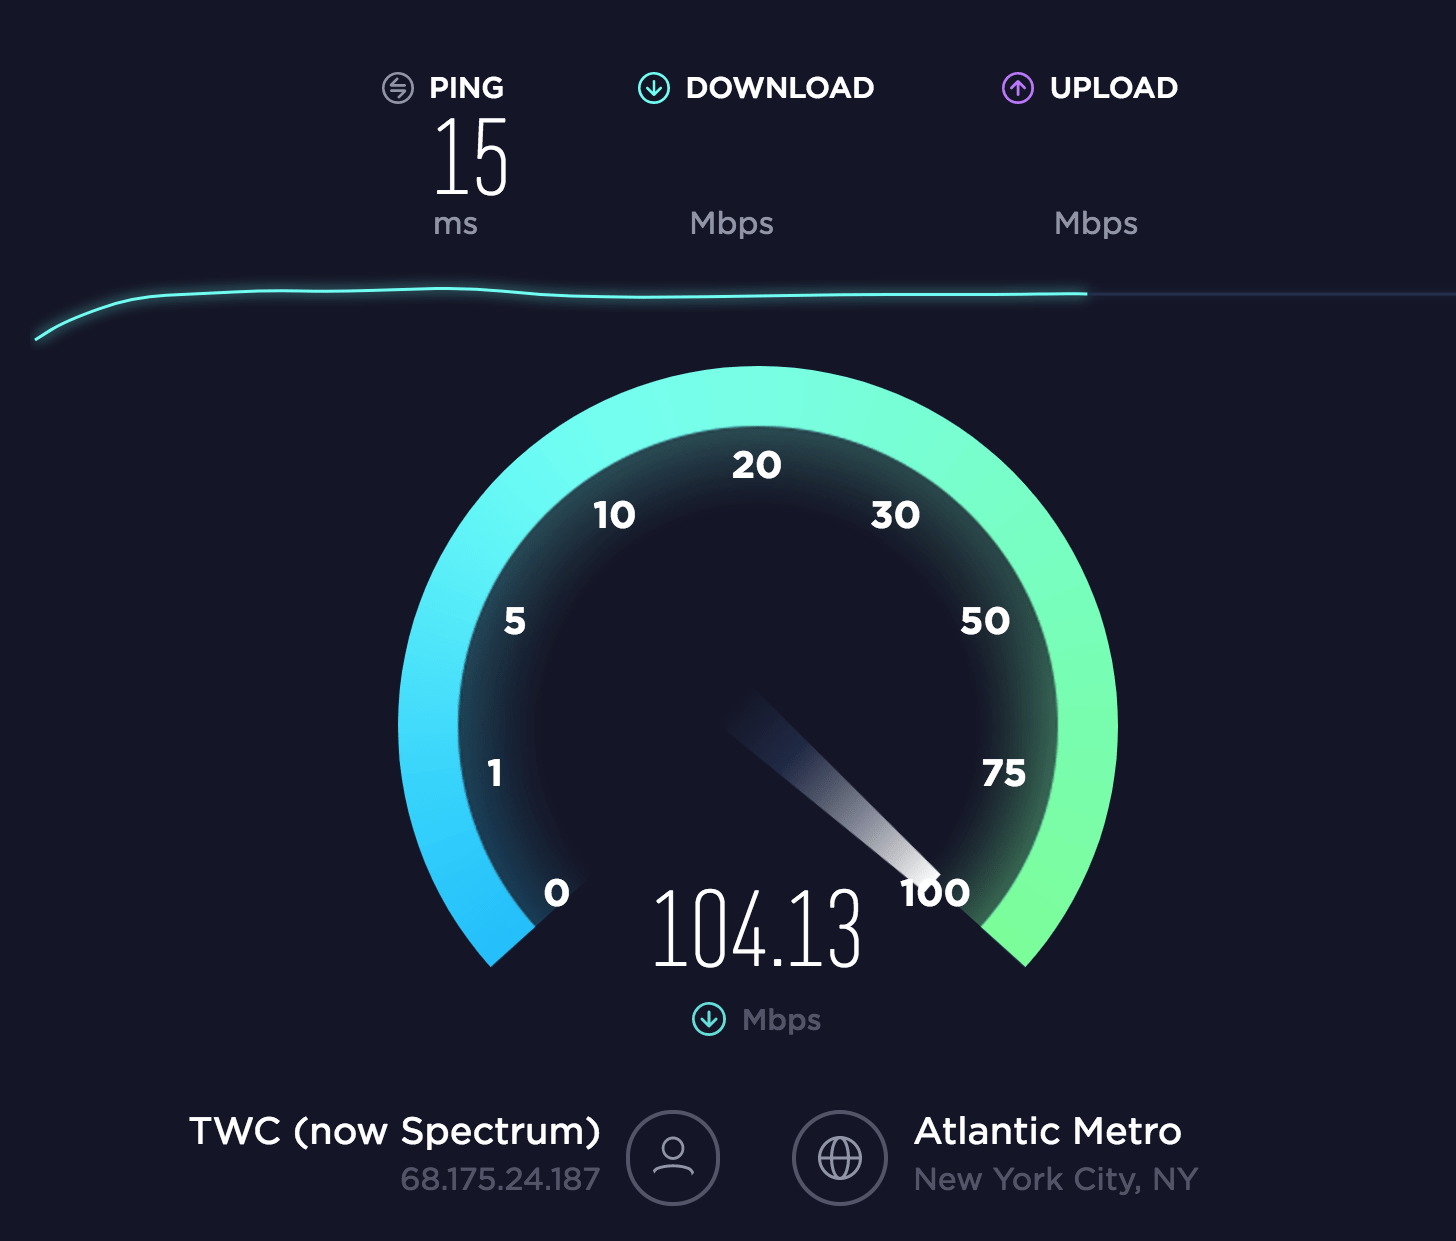
While it’s really not necessary to have a lighting-fast internet connection to take advantage of uploading dailies (though it helps!), it’s useful to know what you’re working with.
Get an understanding of your upload and download speeds with a website like SpeedTest and then run a few real world tests of your own.
Upload some files to your chosen dailies server and time how long it takes. See what happens if you upload in batches versus all at once, or if the uploads stall out and have to be restarted with connection disruptions.
Give it as real a test as you can, either with similar footage from a past project, or by asking for some sample footage. Try to replicate a typical day’s worth of files so you know exactly how long it’ll take. The Simple Formula to Calculate Video Bitrates can help you calculate projected file sizes based on your dailies footage.
If you’re on the production team, it’s also a good idea to check in with your editor and make sure they’ve got a reliable connection. Downloading is typically much faster than uploading, so they’ll have an advantage even with slower speeds, but loop them in on your test and make sure there are no issues on their end.
Once you have an idea of your upload speeds, you can begin to make adjustments to your dailies’ resolution and codec to maximize your upload/download time.
Camera, File Type, & Resolution (Frame Size)
The footage that you’re starting with will determine a lot about your dailies options. If you’re shooting in 4K, you’ll likely want your dailies to fall somewhere in the 2K to HD range, unless your project is very short or your internet connection extremely fast.
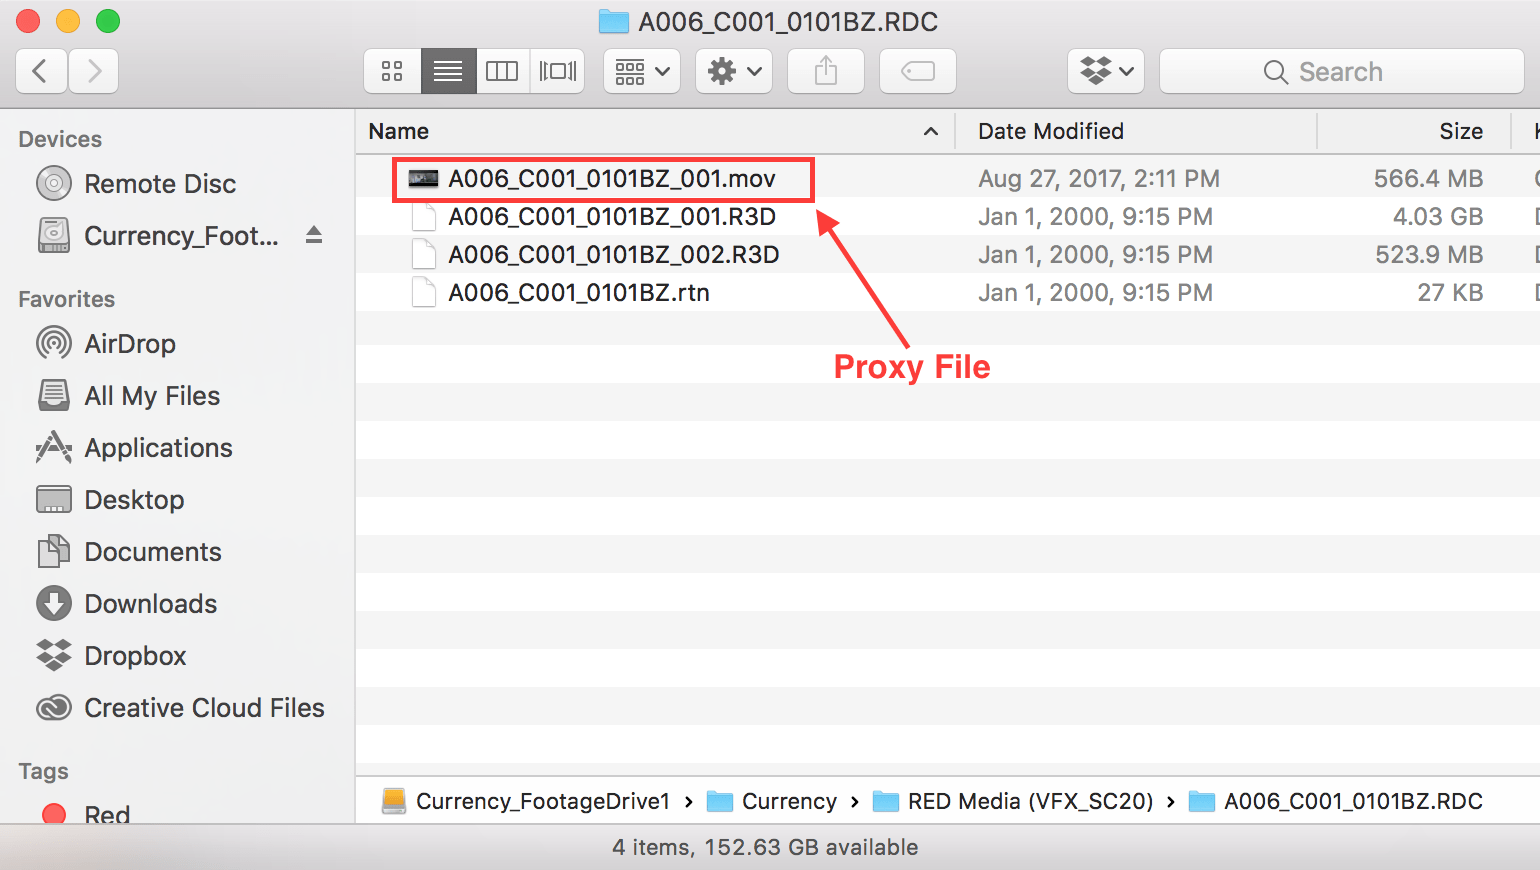
Talk to your director of photography about the chosen camera’s capabilities. Many high–end cameras have the ability to record proxy files alongside the raw footage and those proxies can be an excellent choice for dailies.
For example, RED cameras can record in any of the different ProRes formats. On RED projects, you can request 1920×1080 ProRes Proxy or ProRes422 as the in-camera proxy format, so that you can use these files for dailies.
This can be a huge time-saver, because it can allow you to skip the next step, transcoding dailies.

Transcoding Dailies
If your camera doesn’t natively support proxies, you can always transcode your RAW footage into an edit-friendly codec.
If you’re on the production team, always discuss choosing a frame size and codec, with your editor. An editor may have a computer capable of editing 4K, but may prefer 2K files to save on disk space and get even better performance.
Or you might have an editor who prefers to be mobile, making HD dailies the right choice, both for greater performance on laptops and significantly less disk space requirements.
To Sync or Not to Sync
If there’s no sync sound in your project (usually commercials), then all you really have to worry about is having upload-friendly file sizes and an edit-friendly codec and resolution.
If your project has sync sound, consider again the purpose of your dailies upload. Are you simply delivering footage to the editor, or are you creating dailies that will be viewed by other team members, like a director or producer?
If the dailies are being reviewed by other team members, decide if they’ll need synced footage. Often, a scratch audio track is recorded alongside the video and this will usually suffice for the purpose of reviewing dailies. However, in scenarios where there isn’t a scratch track (such as if you’re planning to sync by timecode alone) or the scratch track quality is very poor, you may decide to sync the dailies before passing them along to other team members.
If you’re only delivering to the editor, then you have a bit more flexibility. For example, in the case of a RED shoot where ProRes proxies are being generated alongside the RAW footage and there’s no need for transcoding, you may choose to begin uploading the dailies while simultaneously syncing and organizing the footage in your chosen NLE. At the end up each day, you would then upload the project file or bin for the editor, or back it up to a shared server.
If you don’t have lower resolution edit-ready proxies coming directly out of the camera, then you’ll likely choose to sync and transcode before uploading files for your editor.
Once you know the frame size and codec your editor prefers, you can use DaVinci Resolve to sync and transcode your dailies. Syncing is so easy in Resolve that in some scenarios (as illustrated below) it’s worth re-exporting your footage even if you don’t have to transcode for the edit.
Real World Examples
Now that we’ve gone over the different aspects to consider when crafting a remote dailies workflow, let’s take a look at how it all comes together with a few examples based on real-world projects.
Ex #1: Feature Film, Sync in Premiere, Upload to Frame.io
Camera: RED Scarlet
Resolution: 4K
In-Camera Proxies: Yes
Shooting Location: Out of state
Assistant: Yes
This feature film was shooting several hours from the editing suite. That said, there was a very capable assistant editor on-set to prepare the footage, so there was no need for the main editor to be on set as well.
After talking with the DP and sound mixer (always do this first!), this editorial team decided to use the Scarlet’s in-camera proxy recording feature to remove the need for transcoding. 1920×1080 ProRes Proxy files were chosen, plus a reliable scratch audio track feeding into the camera.
The director had access to a dailies drive on set, but the team also wanted to be able to easily share the dailies with producers in LA, while controlling who could download and who couldn’t. Frame.io allowed the team to deliver dailies to the editor and the producers in LA with just a single upload.
Because the location was very remote, the cast and crew were staying at a hotel with a pretty standard consumer level internet connection. Frame.io’s robust upload management enabled them to deliver entire day’s worth of footage, without much difficulty. The DIT would deliver the the in-camera proxies to the assistant editor, who then immediately ingested the footage into Premiere (ProRes Proxy files are edit-ready).
The assistance organized the footage by scene, and then used Frame.io‘s integrated Premiere panel to begin uploading the dailies.
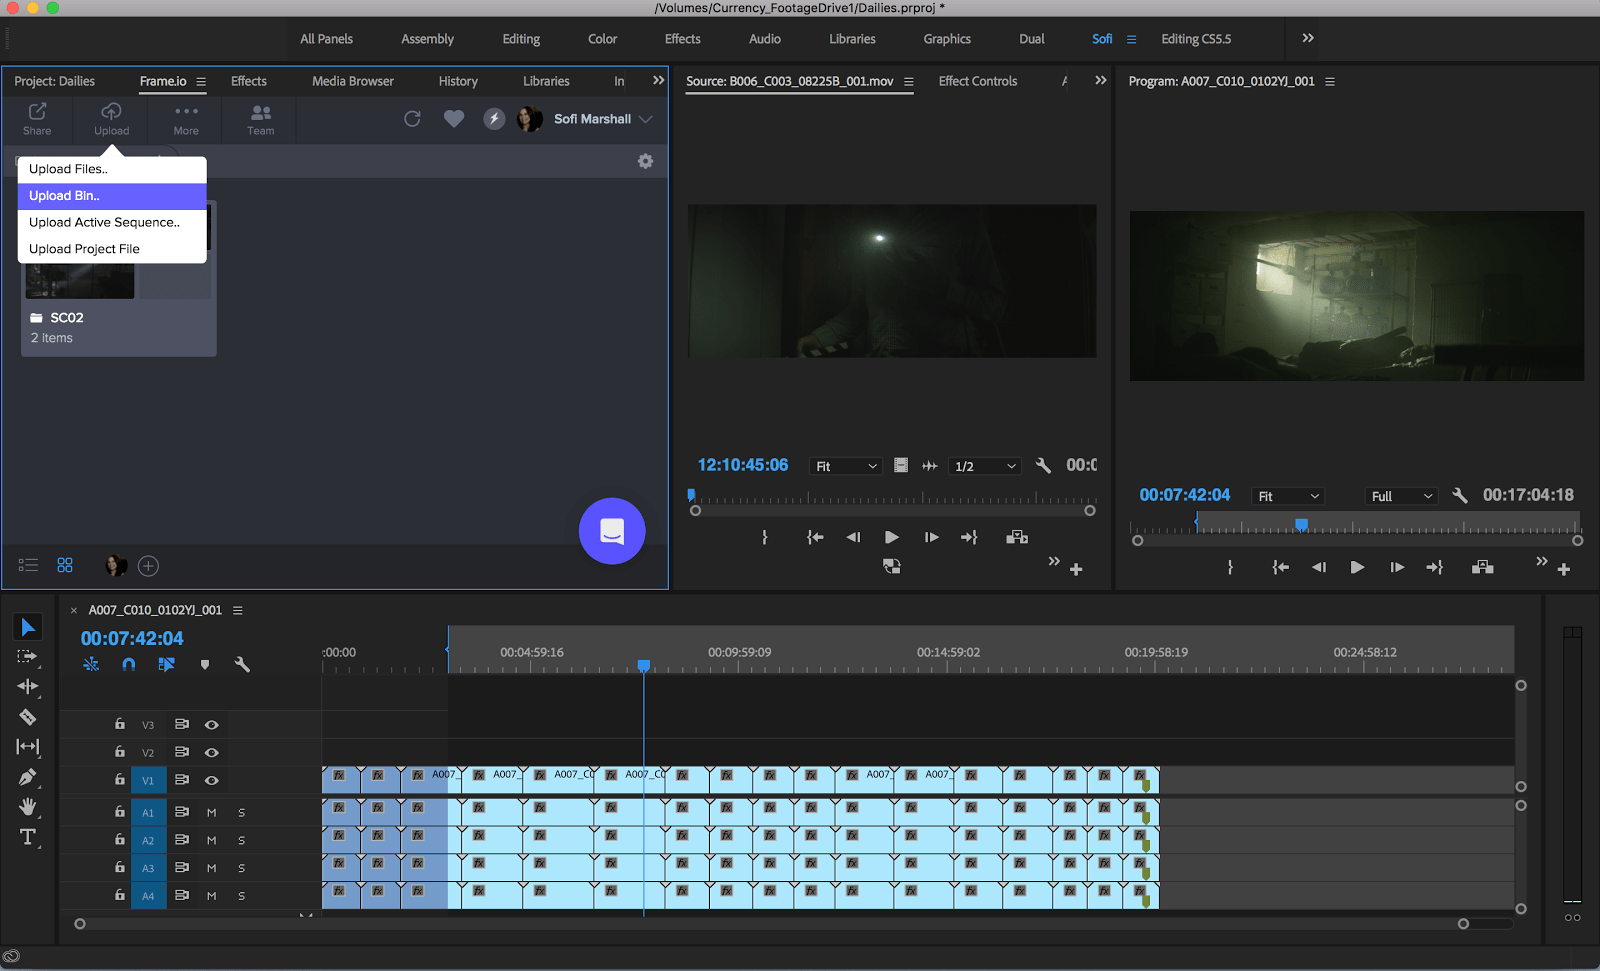
While the dailies were uploading in the background, the assistant would sync the day’s footage in Premiere, using markers to add any comments or useful information from the editor reports right into the clips. Since the scratch track was reliable enough in this case, the unsynced footage was shared straight from the camera. This enabled the team to create custom dailies links within Frame.io to share with the producers in LA.
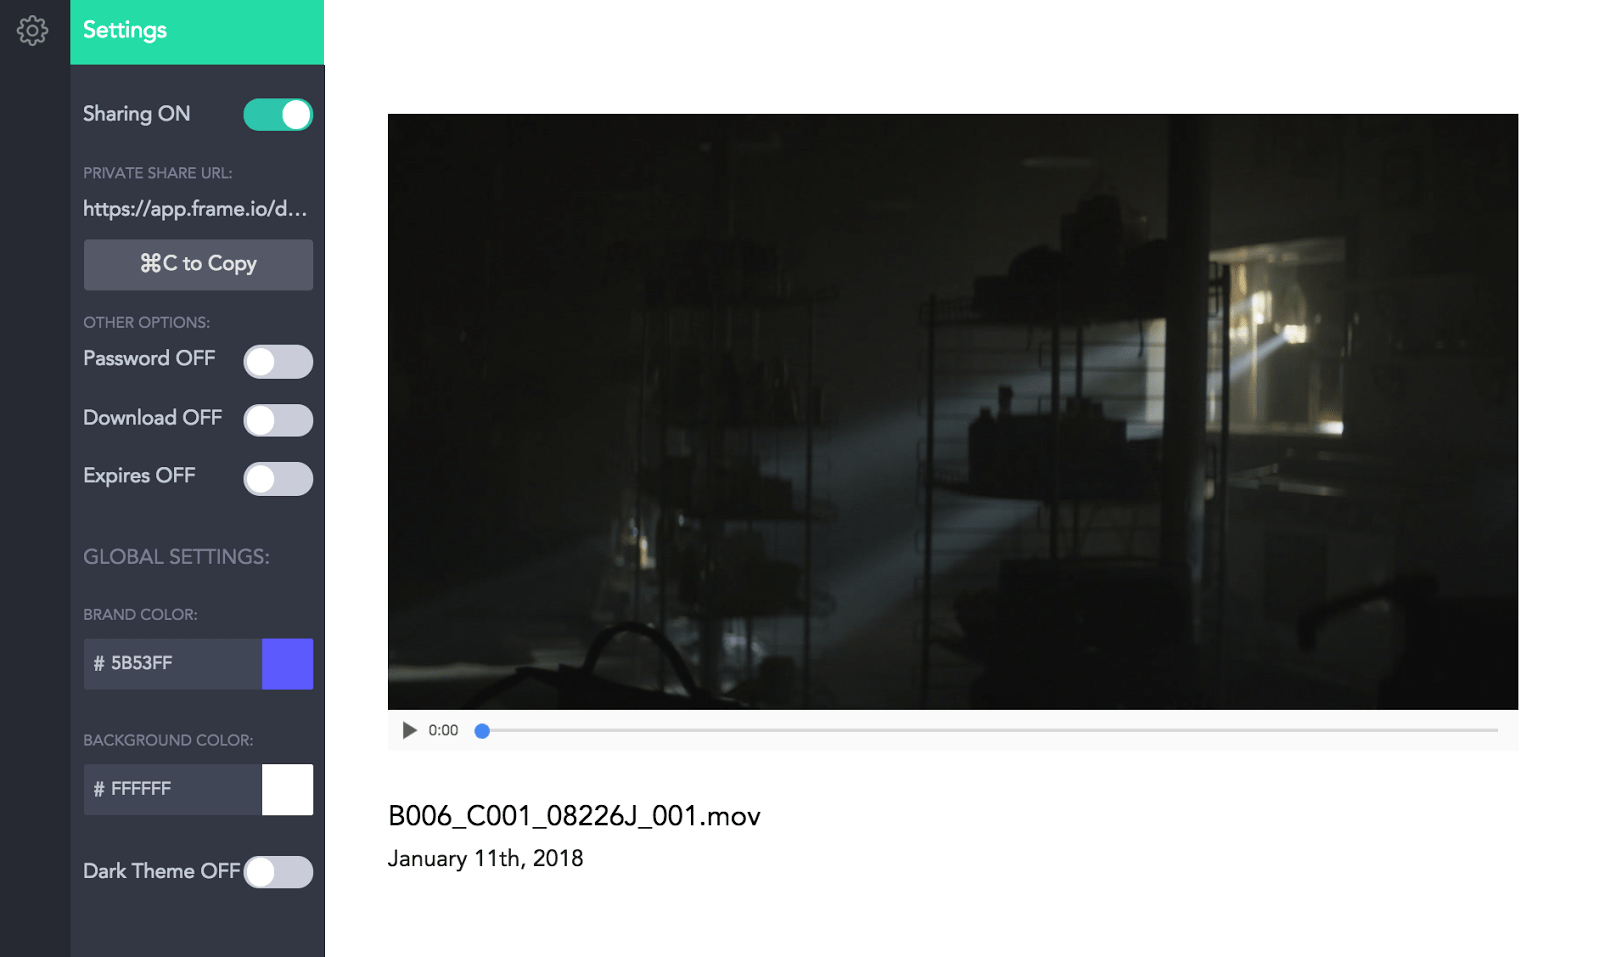
From those links, the producers could watch the dailies on whatever device they preferred—computer, phone or tablet—despite the files being somewhat large, without any buffering or stuttering problems. On top of that, this system allowed restrictions on downloading clips (when needed).
Finally, once the dailies uploaded, the editor was able to download them with the Premiere project, add each day’s new bins to the master project, and maintain the notes that the assistant editor had added to the footage as markers right in the timeline.
This workflow worked very well. Despite a slower than ideal internet connection, the crew never had a problem leaving the dailies uploading in the background, and the producers in LA enjoyed being able to reliably access the dailies on the go.
Potential Adjustments
If this team needed to send the producers synced dailies (because the scratch track wasn’t cutting it), that could be easily done. All you would need to do is auto-sync the in-camera proxies in Resolve, export out into the exact same codec and frame size (1920×1080 ProRes Proxy) and then go back to Premiere for organizing and uploading to Frame.io.
Ex #2: Feature Film, Sync in Resolve, Upload to Frame.io
Camera: Canon C300
Resolution: 4K
In-Camera Proxies: Yes, with limitations
Shooting Location: Local
Assistant: No
As is the case for most independent films, pulling a PA away from set to run footage and drives back and forth is less than ideal. Additionally, the need to purchase additional shuttle drives and a large backup drive to store the raw files is a resource drain.
In this project, the sound recordist was capturing a reliable audio scratch track, so the unsynced dailies would be fine for the director or producers. On top of that, the DP chose the C300, partially for its capable in-camera proxy options.
However, the resolution and codec were predetermined and couldn’t be changed without adjusting the RAW files’ resolution.
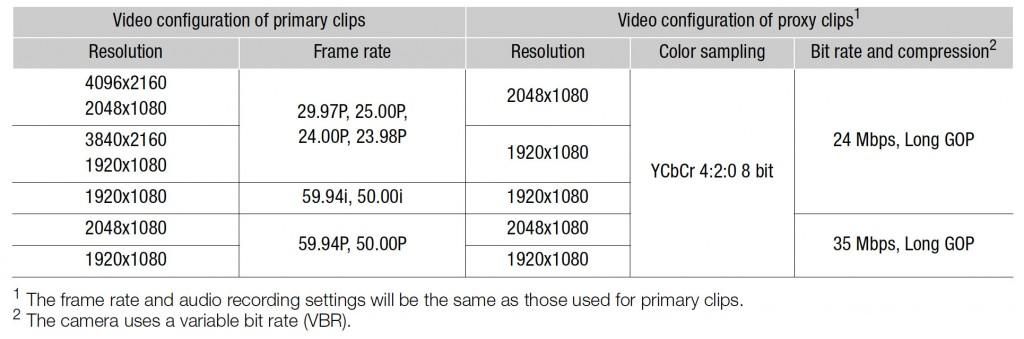
In this case, the proxies were set as 2K H.264 files wrapped in an .mfx, since the shooting resolution was 4K. Normally, H.264 files set off a red flag for most editors in terms of edit-friendliness, but the C300’s proxies are incredibly tiny, totaling only about 10-12GB per full shoot day. The team wanted to take advantage of that.
After a few tests, it was determined that playback wasn’t a deal-breaker, but it wasn’t perfect either. These files definitely stuttered, and there was delay when scrubbing clips in the viewer. But, much of the editing was going to be done while in the field/travelling, so the team wanted files that were small enough to fit on a portable, bus-powered hard drive, but still perform well on a laptop.
The team’s tests showed that the only way to make editing speed on the laptops decent was to decrease playback resolution significantly. Another piece of the puzzle to consider was that there was no assistant editor due to budgetary restrictions (read: independent film). Since all syncing was being handled by the editor, the team wanted it to happen as quickly and painlessly as possible.
So what did they do?
As was alluded to before, they turned to Resolve for batch syncing. As the team learned, as long as the files do not change resolution, Resolve can transcode from H.264 to ProRes Proxy very quickly.
The team’s tests proved that their ultraportable laptops could handle 2K ProRes files without much trouble. So, they decided to upload the C300’s tiny, in-camera dailies after each shoot day, bring them into Resolve for audio sync, and then transcode to 2K ProRes Proxy dailies to use in the edit.
It took about 30 minutes each day to sync and transcode a day’s worth of footage with the editor’s laptop. While this process added an extra step in the dailies workflow, it was completely viable with the available hardware, and saved a lot of time in the long run (because of the improved editing performance).
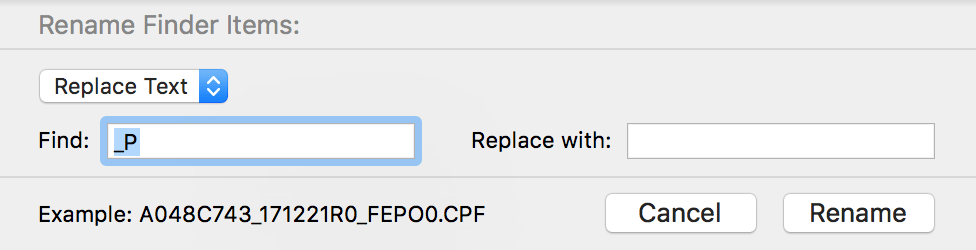
[Note: The C300 has a unique feature that adds a “_P” to the end of its proxy clips. That should be a big red flag for you if you’ve ever done an online edit, as you generally want the proxy and master clips to have the exact same file names. To eliminate this issue, simply select the entire contents of each day’s proxy folder, right click and select rename. In the rename dialogue, use replace text to find the _P and replace it with nothing.)
Again, Frame.io is a good choice for this example workflow, as it allows a director to have easy access to the in-camera proxies even as they travel, or during a break on set. The editor could have easily shared the proxy files after sync with only a few clicks.
Potential Adjustments
If you don’t travel during a project, or are working on a high-powered desktop, then there’s a good chance the playback of the original in-camera proxies would be completely fine for the edit. In that case, you may not need to transcode in Resolve. However, in that case you would need to sync clips individually in an NLE, or would have to turn to something like PluralEyes.
Continue readingfor free
Unlock all 100,000 words of the Frame.io Workflow Guide and learn how the pros do workflow.
