Edit
Premiere Pro Proxy Workflow
19 minute read
Premiere Pro makes proxies easy. Really easy. Like, toggle back and forth with the click of a button, easy.
So put away those thoughts of an arduous, error-prone process and embrace Premiere Pro’s integrated, simple, and intuitive proxy workflow. With a little know-how, anybody can take advantage of its benefits.
By the end of this article, you’ll have a complete understanding of Premiere Pro’s Create Proxies, Attach Proxies, and Reconnect Full Resolution Media workflows.
This simple chart can help you determine where to begin and which workflow is most relevant.
It all depends on your starting media. If you have…
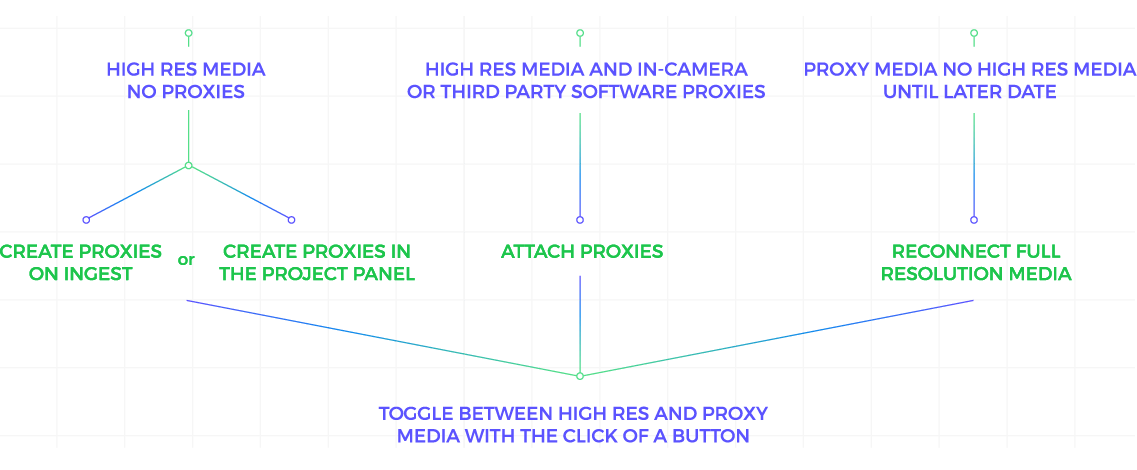
If you can identify your workflow, feel free to jump ahead to a specific section, or read on to gain a complete understanding of Premiere Pro’s proxy workflow.
What Are Proxies Again?
Proxies are lower resolution copies of your media that are created in one of two ways – either by transcoding raw media to an intermediate codec or by simultaneous in-camera recording, a standard feature on many high end cameras.
Editing with proxy media is commonly referred to as an offline edit, while the process of relinking back to the full res media at the end of a project is called the online edit. Premiere Pro’s proxy workflow essentially combines the two, allowing you to effortlessly switch between offline and online, all within the same software.
So, how does proxy editing work? Let’s start by adding a simple button.
Adding the Toggle Proxies Button
The Toggle Proxies Button is powerful. With one click, you can seamlessly switch back and forth between proxy and full res media. By default, it’s not mapped to the monitors or the keyboard, so let’s add it.
In the bottom right of either the Source Monitor, Program Monitor, or both if you’d like, click the Button Editor (+). This opens up a panel of buttons we can add to the transport control area of the our monitors. Hover over a button icon to reveal its name, or refer to the image below for the Toggle Proxies Button icon.
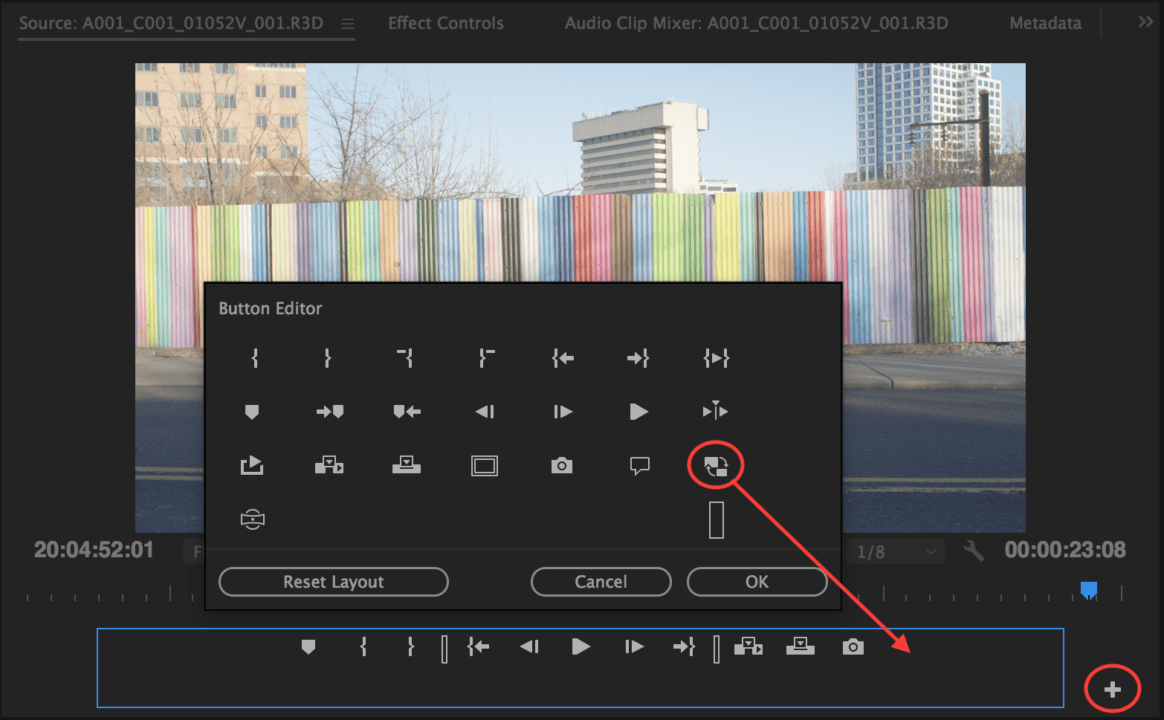
Click and drag the icon in line with the other buttons in the transport control area. When the button clicks blue, you’re viewing proxies in the Source and Program Monitors. When it’s white, you’re looking at your full resolution media.
You can also set a shortcut for Toggle Proxies in Keyboard Shortcuts, if you’d like, or alternatively, you can find the same setting in Preferences —> Media —> Enable proxies. The buttons, keyboard shortcut, and preference are all linked, so setting it in one place sets it globally.
Now that we know how to toggle proxies on and off, let’s get started creating them.
1. Creating Proxies in Premiere Pro
Understanding Ingest Settings
Most of us know a few different ways to import footage into Premiere Pro. You can choose “Import” from the file menu, double click empty space in the project panel, use the media browser to locate and import clips, etc.
By default, when we import footage, we simply create a clip in the project panel that points back to the files on our hard drives. The original media isn’t changed, duplicated, or moved in order for us to work with it in the project.
By adjusting our Ingest Settings, we can tell Premiere Pro to behave differently when we import media.
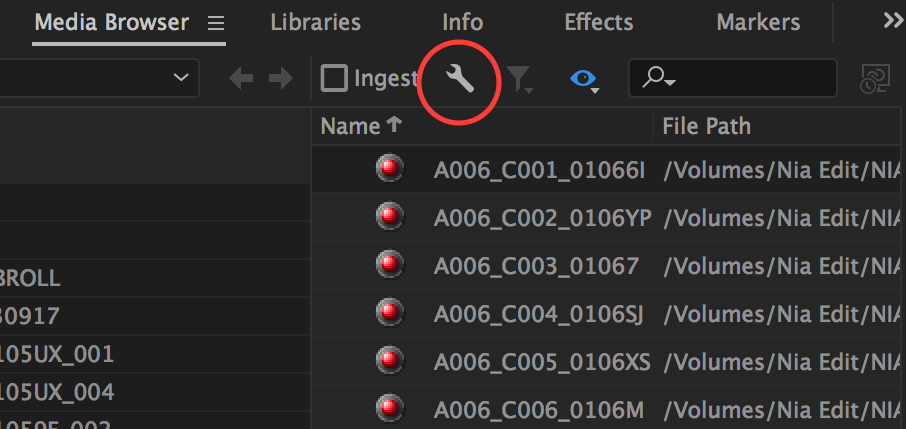
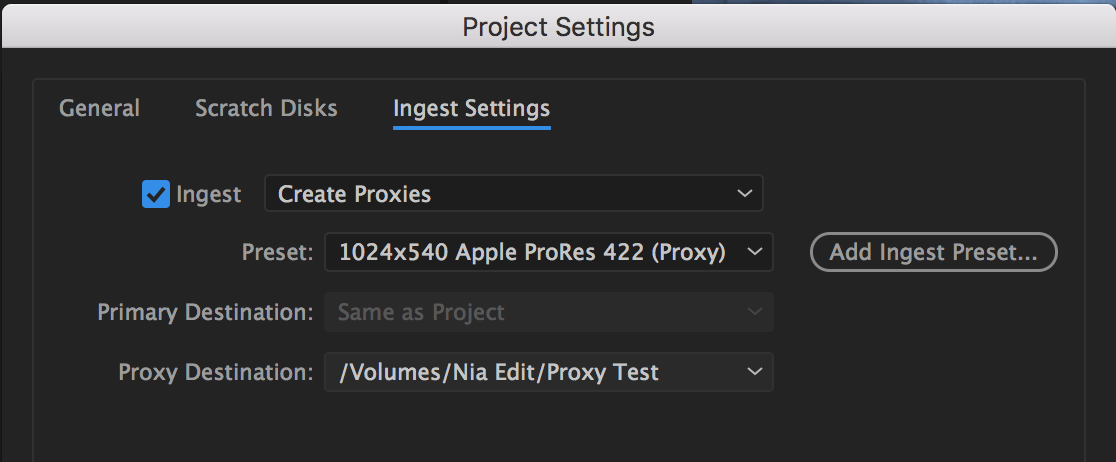
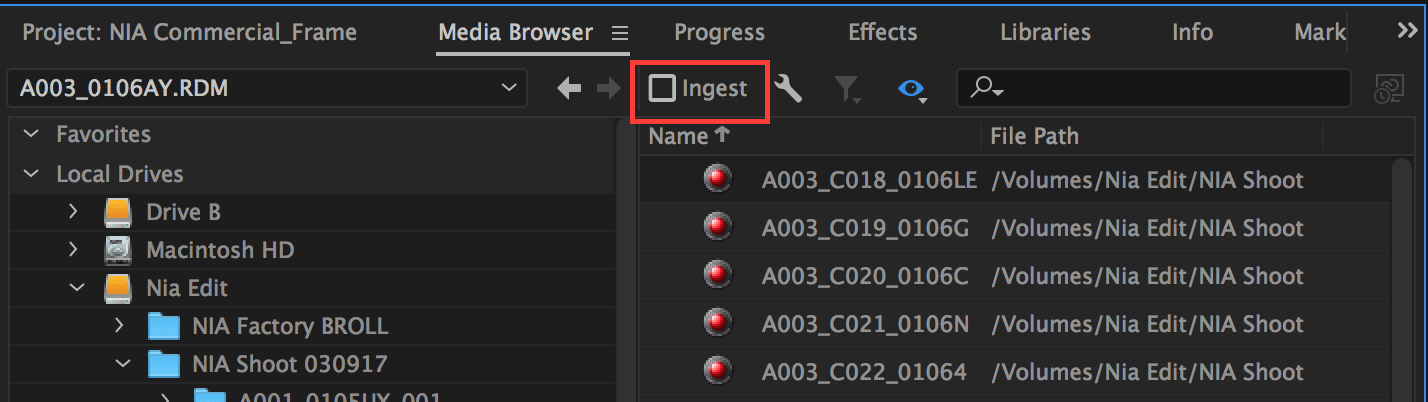
To open Ingest Settings, navigate to the Media Browser and locate the “Ingest” checkbox on the top right menu bar. Click the wrench to the right of the Ingest check box to open Ingest Settings. Alternatively, go to File —> Project Settings —> Ingest Settings.
By default, Ingest is unchecked and our options are greyed out. Checking the box here will also check it back in your Media Browser, meaning that the settings you choose will be applied on your next import unless you uncheck the box.
When checked, four ingest options are available in the drop down menu. We’re mostly concerned with the last two, but let’s briefly go over each one.
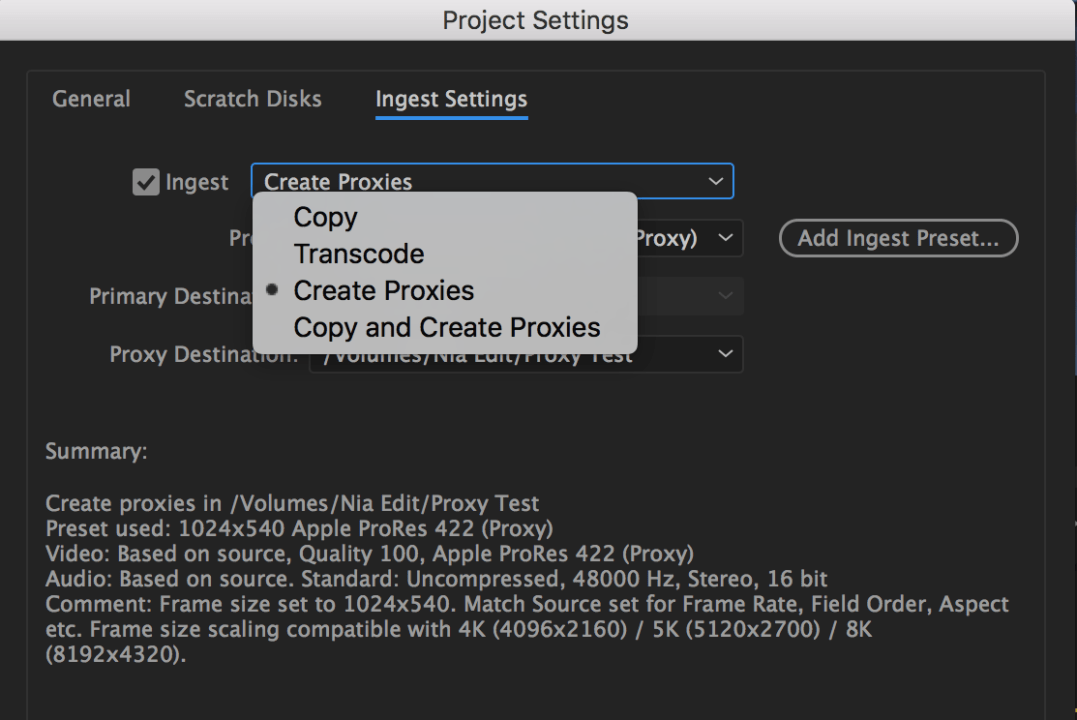
- Copy and Create Proxies: Copy camera media as above, and create and attach proxies for that media as above.
Creating Proxies on Ingest
Let’s choose the Create Proxies option and take a closer look, noting that Copy and Create Proxies is identical in function, with the added step of setting the Primary Destination for your copied source media.
Create Proxies is ideal when you’re working with large files, such as 5K, 6K or 8K media, with no in-camera or third party software proxies (such as proxies created in DaVinci Resolve).
Once we’ve selected Create Proxies, we have two additional options: Preset and Proxy Destination.
Let’s go over Proxy Destination first.
Choosing a Proxy Destination
In the drop down menu, you can determine where Premiere puts the generated proxies.
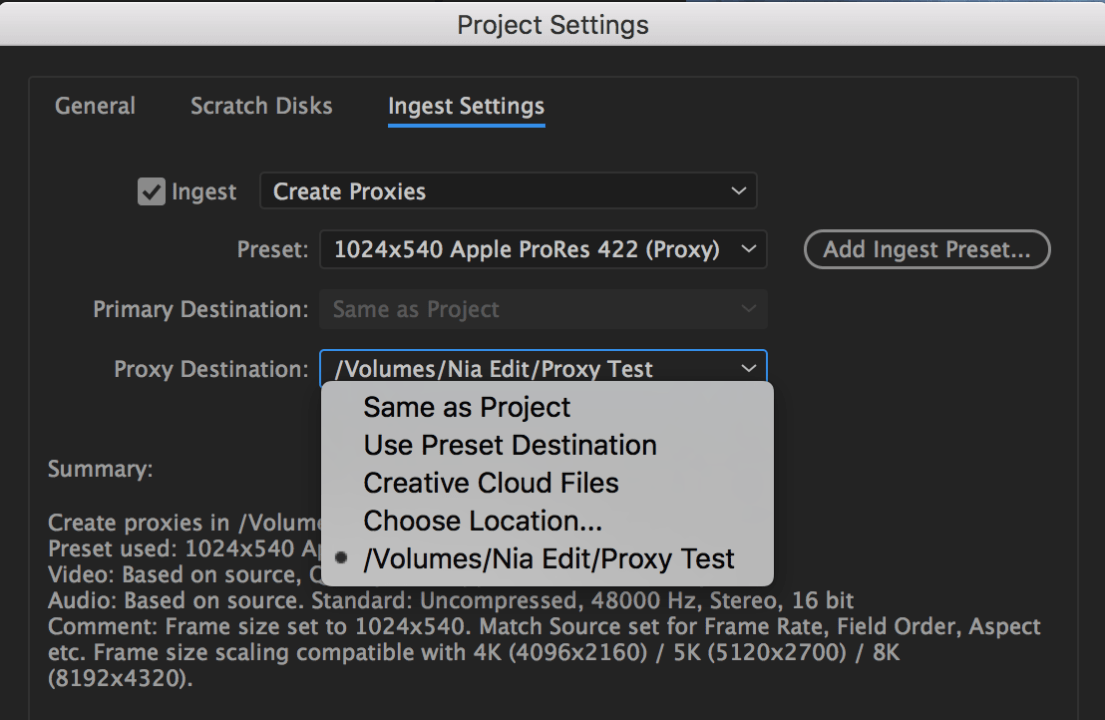
I advocate for selecting Choose Location and creating a dedicated proxy folder on your hard drive. That way, you’ll have all of your files in one place, which means you can easily copy them to portable hard drives for easy sharing or for travel.
The Creative Cloud Files option deserves a mention as well. This choice automatically syncs your proxy files to your Creative Cloud Files Folder, which in theory, means you have access to your proxies wherever you’re able to connect to your Creative Cloud account.
In reality, remember that you’ll need a significant amount of cloud storage to accommodate your files, as well as a fast internet connection to sync them across different devices.
Choosing a Preset
If you click the Preset dropdown menu, you’ll see that Premiere Pro has a list of defaults. While not comprehensive, these are usually good options to consider. If they don’t appeal to you, we’ll cover creating your own presets a little further on.
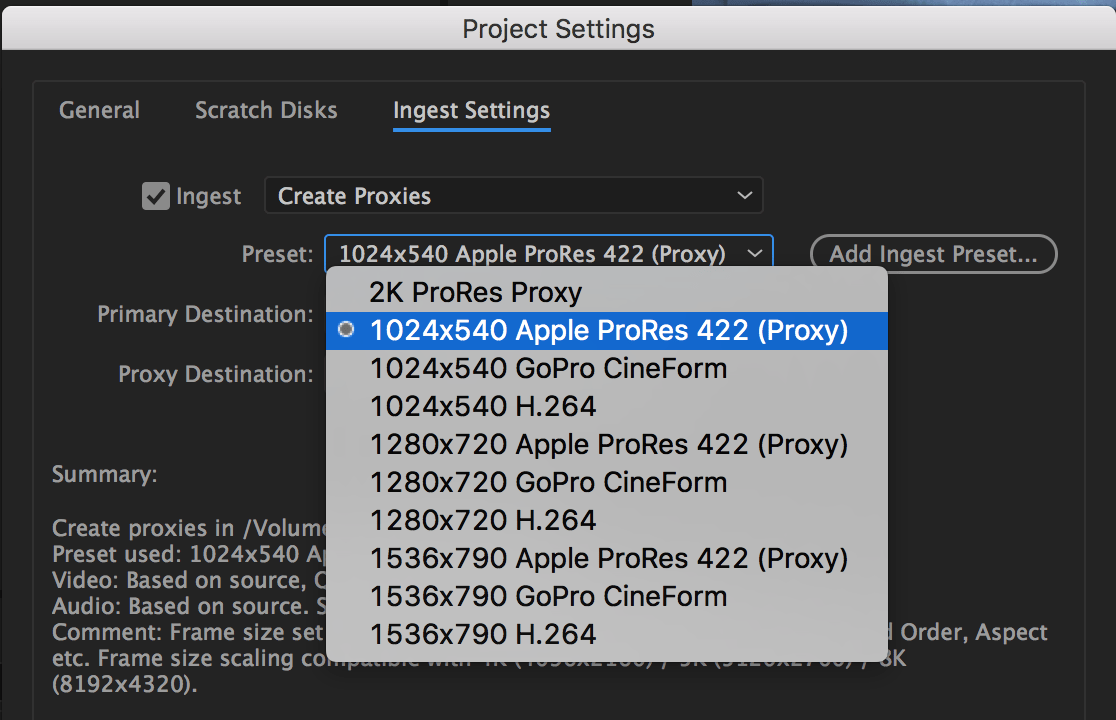
The Preset that you select will determine the codec and frame size of the proxy files. The beauty of a proxy workflow is that you always have the option to toggle back to your full res media. That means we can choose a preset that’s optimized for high editing speeds and low disk space.
You’ll notice that Premiere Pro has also preselected a few frame sizes for you. If you choose a preset, let’s say 1024×540 Apple ProRes 422 (Proxy), you can look in the Summary section below for suggestions of compatible source frame sizes.
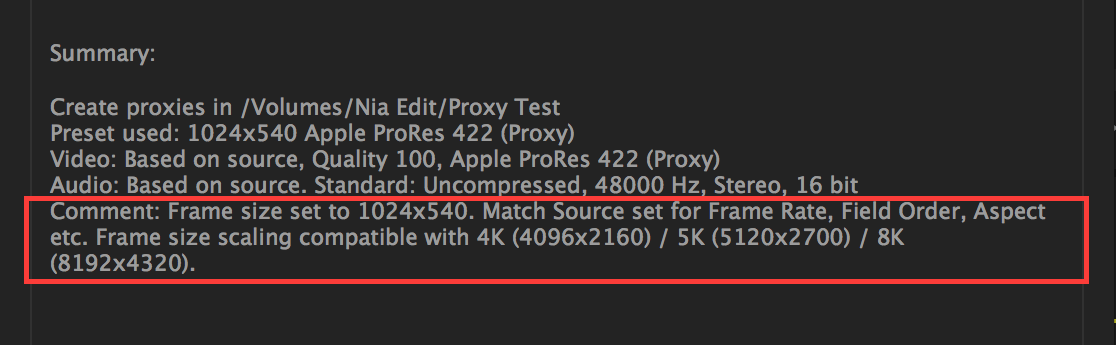
We can see that this setting works well with 4K, 5K, and 8K media because the frame dimensions share the same aspect ratio. Matching your proxy aspect ratio to your full res media is always preferable and yields the best results.
What About HD Frame Sizes?
It’s worth noting here that frame sizes with different aspect ratios, though not ideal, can work too.
Many people prefer to do their offline edit in the standard HD sizes of either 1920×1080 or 1280×720. If you’ve worked with 4K, 5K, or 8K footage before, then you know that reducing these resolutions to fit into an HD frame creates letterboxing, which means you’ll have thin black bars on the top and bottom of the frame to compensate for the slight difference in aspect ratio.
I’ve found that Premiere can handle proxies with letterboxing, but we don’t recommend it for the following reasons:
- When you toggle between your proxy and high res media, you’ll see your letterboxing appear and disappear.
- If you add titles or any effects that affect only part of the image (say, a masked color correction), they may not line up as intended when you switch back to the original files.
- Premiere always uses the full res clip while rendering, so if you partially render a clip, when you play it back, your letterboxing will disappear for the rendered portion of the clip, and reappear for the unrendered portion.
Background Processing and Monitoring Progress
Once you’ve selected a Preset and a Proxy Destination, it’s time to let Premiere Pro go to work creating your new files. Premiere Pro’s proxy workflow is seamlessly integrated with Adobe Media Encoder, which is where the encoding will actually take place.
As long as the Ingest box is checked in your Media Browser panel, Premiere will automatically add files you import that are eligible for proxies (audio files, graphics, etc., will not be impacted) to Media Encoder’s queue, applying the presets you selected in Ingest Settings.

It doesn’t matter how you choose to import, whether through the Media Browser, dragging and dropping into the Project Panel, etc., Premiere will apply your Ingest Settings and send a job over to Media Encoder to create your proxies.
A great feature here is that Premiere and Media Encoder use background processing. This means you can keep working in Premiere, labeling or even editing your clips, while the proxies generate in Media Encoder. When they’re done, they’ll automatically attach to your high res clips in the Project Panel.
You can monitor the background processing in two ways:
- In Premiere: Navigate to Window —> Progress to open the Progress Panel. You can leave it as a standalone panel, or dock it by dragging it near the Project Panel and letting go.
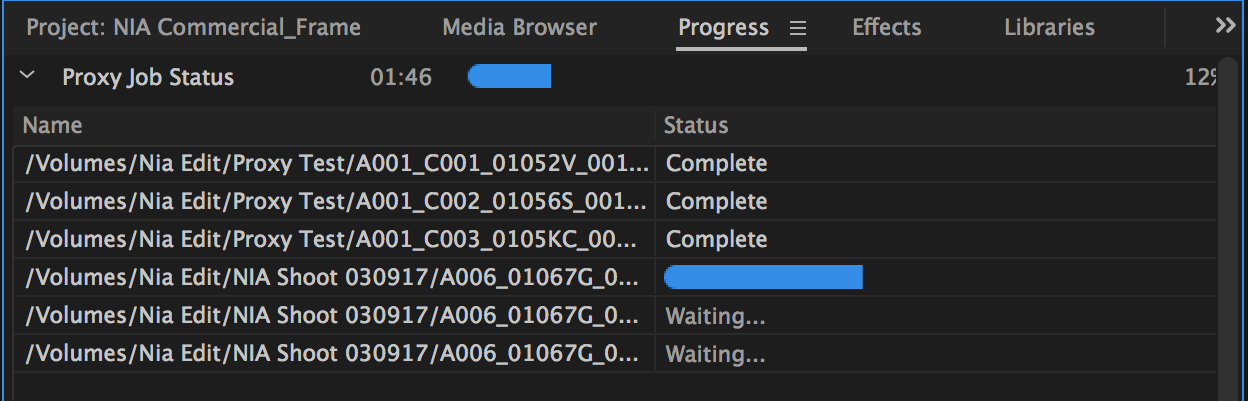
The Progress Panel shows you a list of all the proxies currently being generated, along with a progress bar. When they’re finished, the progress bar will change to Complete. In Media Encoder: You’ll notice that a few moments after importing clips, the Media Encoder application will open up in the background and get to work. The encoding clips will be added to the queue like any other job and you can monitor progress there as well.

While in Media Encoder, you can you can pause and restart the render queue without disrupting its connection to Premiere. However, if you stop the render queue in Media Encoder, the connection between the proxies and original files will be lost and you’ll have to connect them manually (see the Attaching Proxies section below).
Creating Proxies from the Project Panel
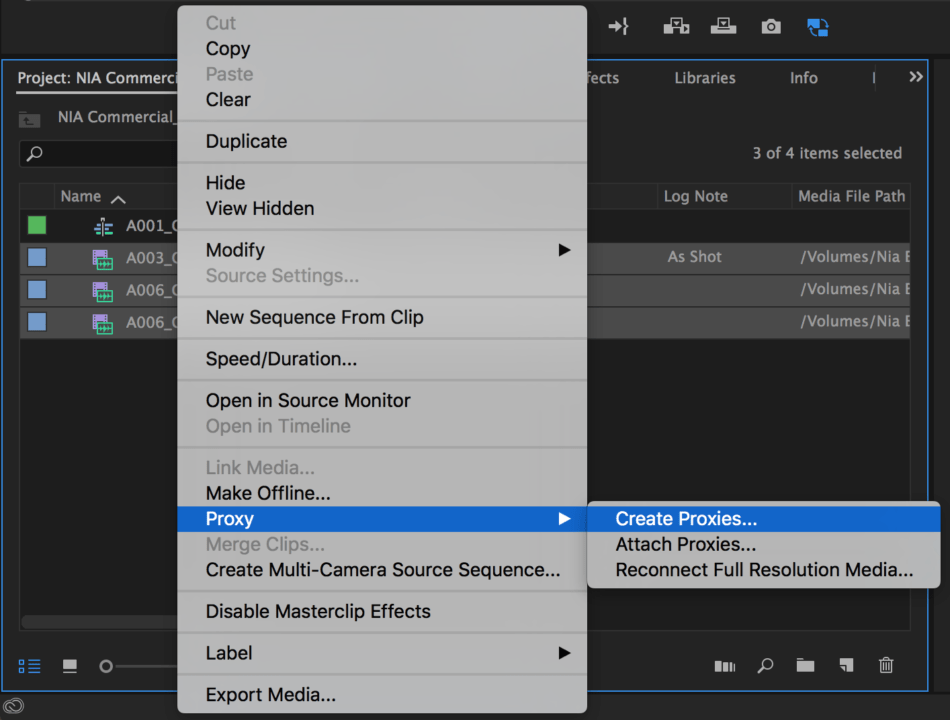
If you’ve already begun editing or importing without having created proxies on Ingest, don’t worry. You can still create them, right from the Project Panel, and have Premiere automatically attach them to your high res media.
I sometimes use this option when your imported camera media isn’t performing as well in Premiere as I’d like it to. Certain codecs perform better than others (here’s an excellent explanation for that) and if your editing speed is really suffering, you may choose to create proxies mid-project to complete the edit.
In the Project Panel, select the media that you want to create proxies for and right click on it. In the context menu, choose Proxy—> Create Proxies.
The Create Proxies dialogue box appears. While it looks slightly different than Ingest Settings, it contains the same options and information.
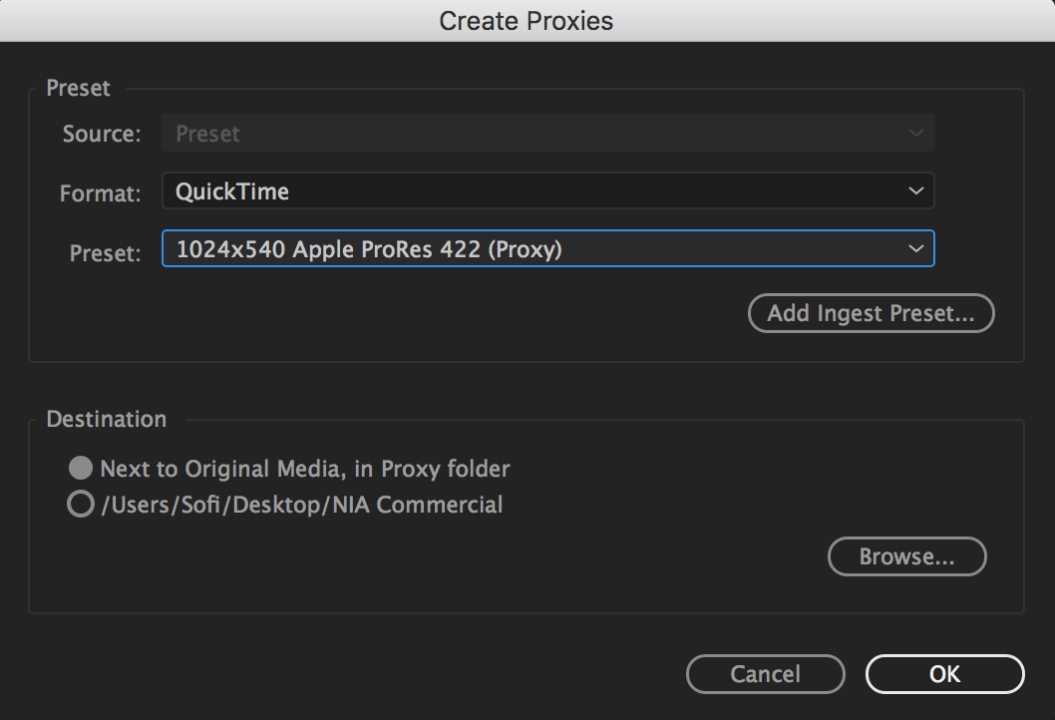
If you click on the Format drop down, you’ll see two default options: H.264 and Quicktime. These specify the general categories that your proxy presets fall under. Select each one and you’ll see that the options under the Preset menu change, and are the same choices we have in Ingest Settings.
There are two options for Destination:
- Next to Original Media, in Proxy Folder: If you choose this option, Premiere will create a new folder for each proxy clip, in the same directory as the original high res media. Because most high end cameras have a complicated file structure where each clip is isolated in its own folder, this option generally isn’t ideal. You’ll have a hard time grouping the proxies to move them to another drive, or deleting them when you’re done with the project.
- Browse: you almost always suggest browsing and selecting your own destination to ensure that all of the proxies are in the same folder.
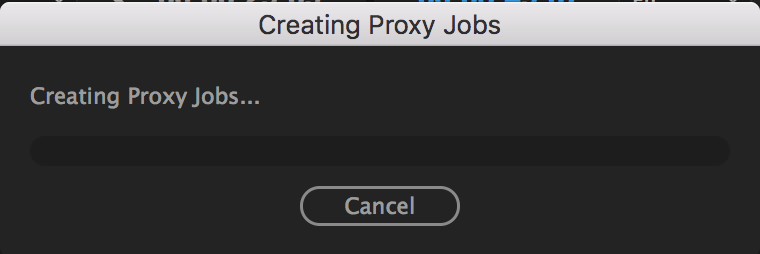
Once you set your Preset and Destination and click OK, a Creating Proxy Jobs progress bar pops up, which indicates that Premiere is sending the clips over to Media Encoder. Note that if you cancel this progress bar, the whole proxy creation process will be canceled and the clips will never be added Media Encoder’s queue.
Once the progress bar is complete, you can track the progress of the proxy creation as detailed above, either through the Progress Panel in Premiere, or by switching over to Media Encoder.
Creating Custom Presets in Adobe Media Encoder
In some cases, you may want to create your own preset. This option helps when you need to set a custom frame size or choose a slightly higher quality codec, which most often happens when you’re traveling and will only have access to the lower resolution proxy media.
Why? Because one of the benefits of working with 5K or larger media is that we have tons of latitude for repositioning and zooming. Being able to create a close up in post has can really save you.
But if you’re using the 1024×540 proxy preset, a frame that’s slightly smaller than 720p HD, you may have trouble discerning if your focus is still sharp. Using a 2K frame size (2048×1080) will be more useful to you, especially if you know your laptop can handle it nearly as well, as long as you choose the right codec.
My favorite codec is a lightweight flavor of Apple ProRes, like ProRes Proxy, ProRes LT, or even ProRes 422. If you work primarily on a PC, then you should likely opt for a similar flavor of DNxHD. Premiere handles both codecs extremely well.
To use your own preset in Premiere’s Ingest Settings, we need to first create it.
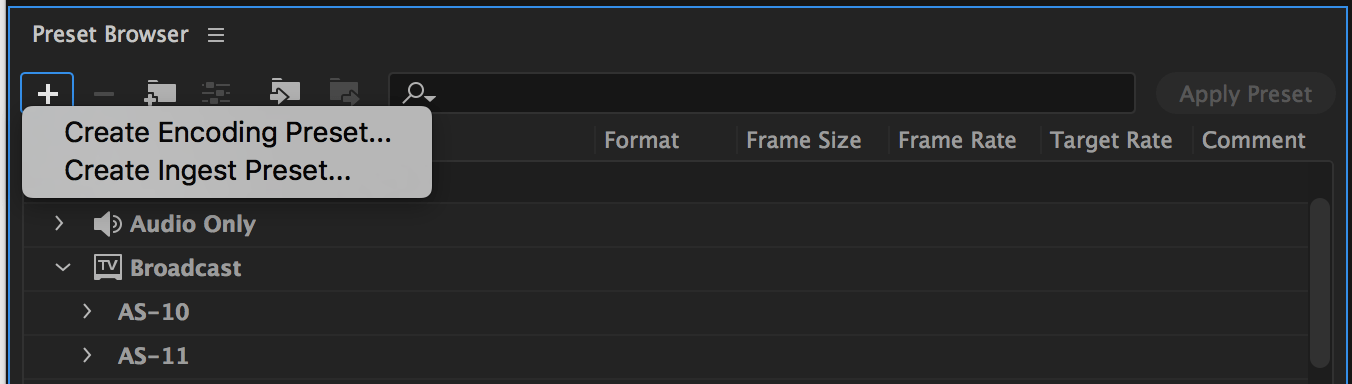
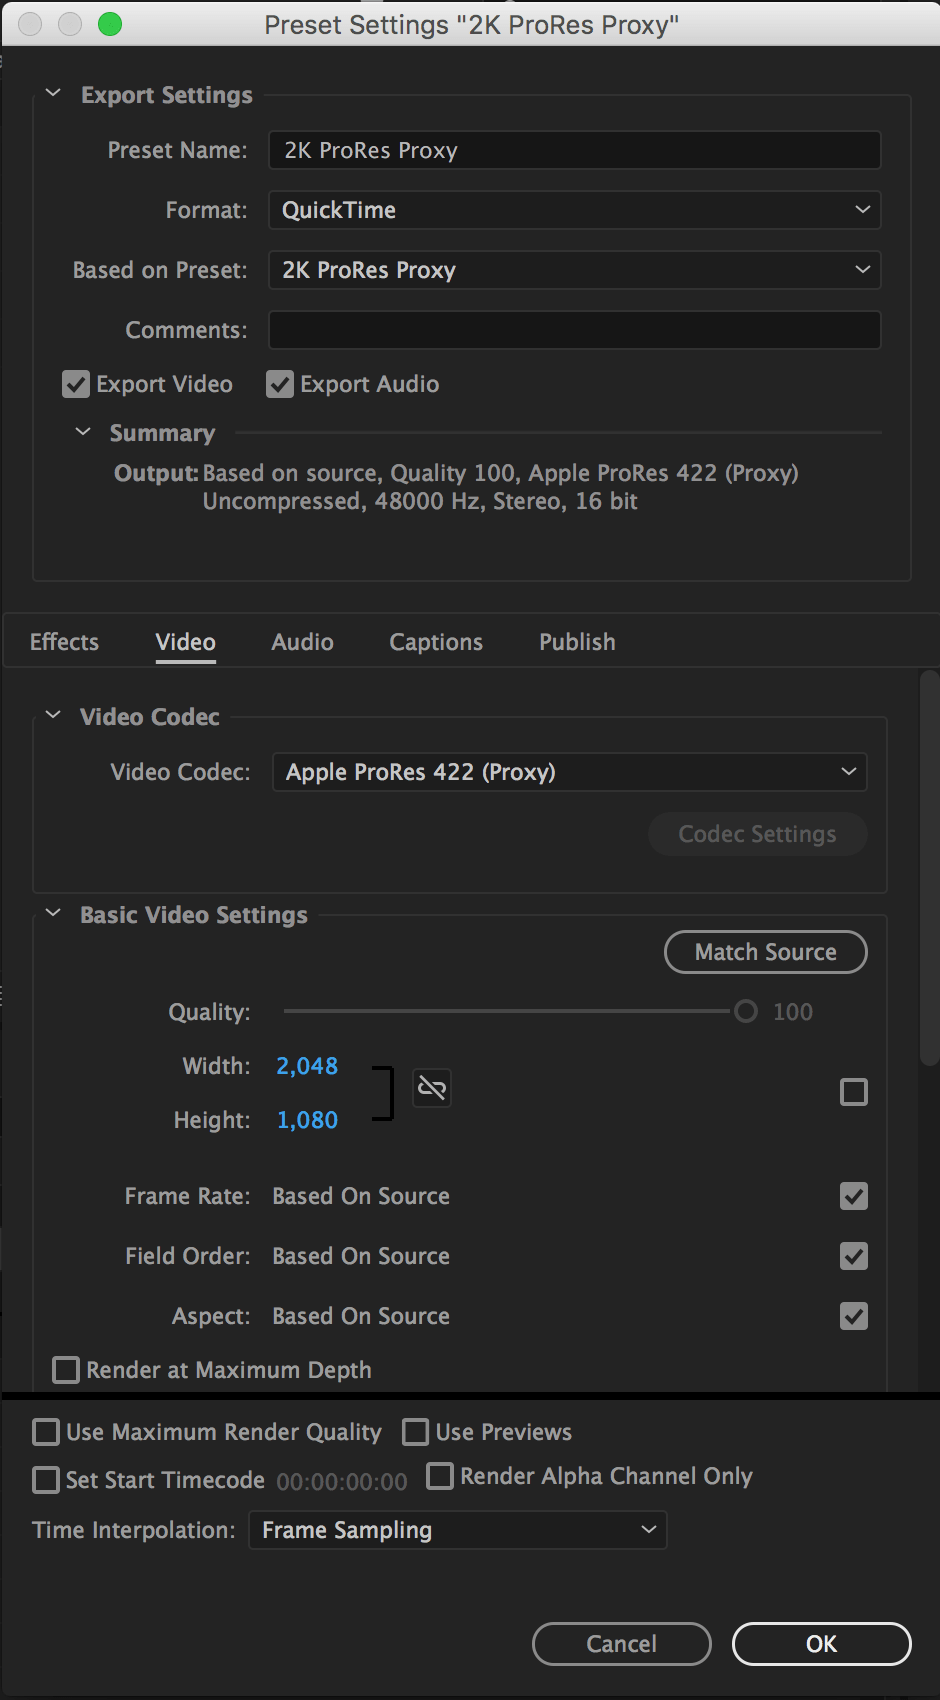
Open Adobe Media Encoder and navigate to the preset browser in the lower left of the screen. Click on the new preset button (+) and choose Create Encoding Preset.
In the dialogue box, set your custom options and hit OK. Here’s an example of a 2K ProRes Proxy Preset.
Now, back in the preset browser, click on the new preset button (+) and choose Create Ingest Preset.
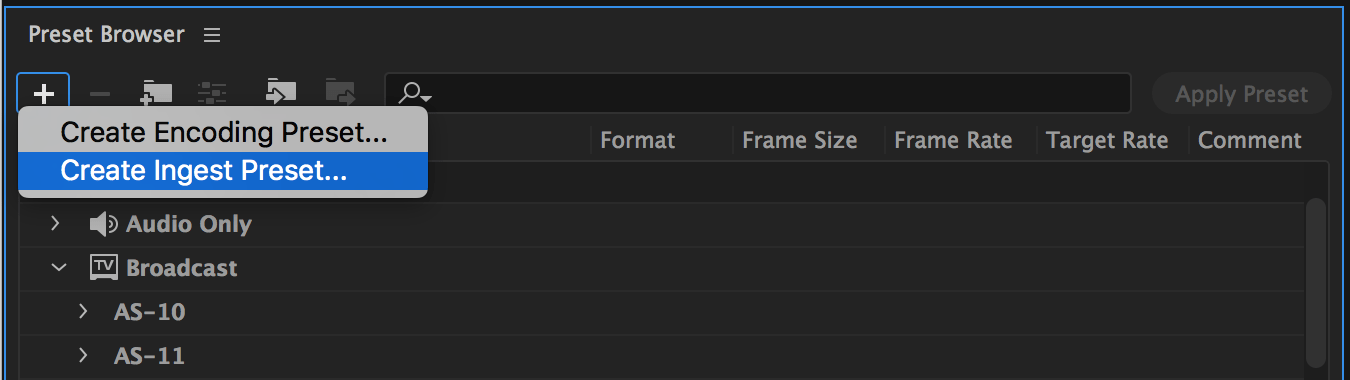
Name your Ingest Preset and then click the checkbox next to Transcode files to Destination. This option tells Premiere that the preset can be used for either the Transcode or Create Proxies Ingest Settings.*
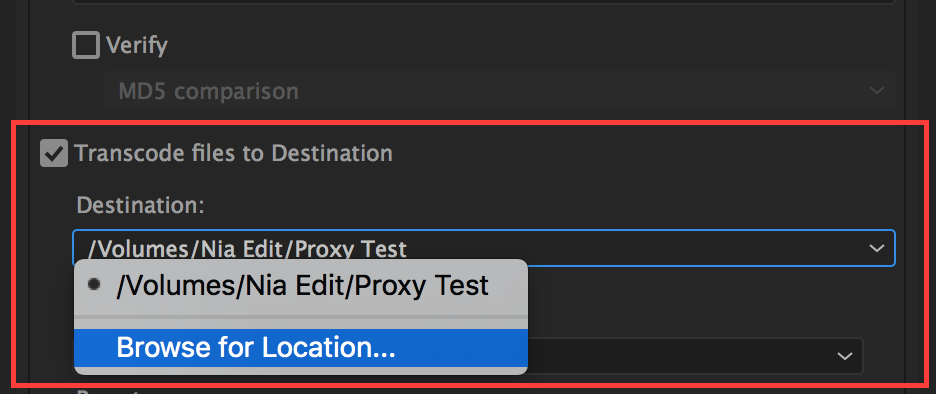
Under the Destination drop down, click Browse for Location and choose a destination for your proxy media. You can always change the destination when choosing your Ingest Settings back in Premiere.
Under format, choose the appropriate option, which for this 2K ProRes Proxy preset is Quicktime. Once you’ve selected the format, you’re able to choose the custom preset under the Preset dropdown.
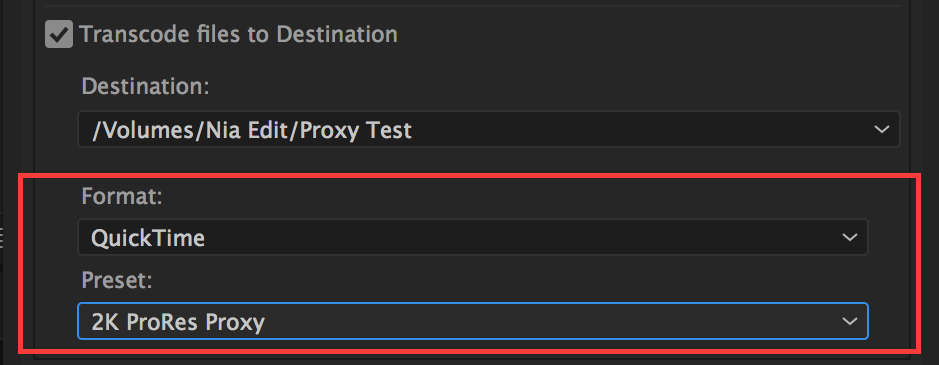
When you’re finished, click OK.
Next, export from AME
To import your newly created Ingest Preset into Premiere Pro, we first have to export the preset from Adobe Media Encoder to our hard drive.
Locate your preset in the Media Encoder Preset Browser, noting that your ingest preset will be labeled as Ingest under the Format column, while you’re Encoder preset will be listed as the format you chose, such as Quicktime, H.264, etc.
Right click the preset in the Adobe Media Encoder Preset Browser, and choose Export Preset.
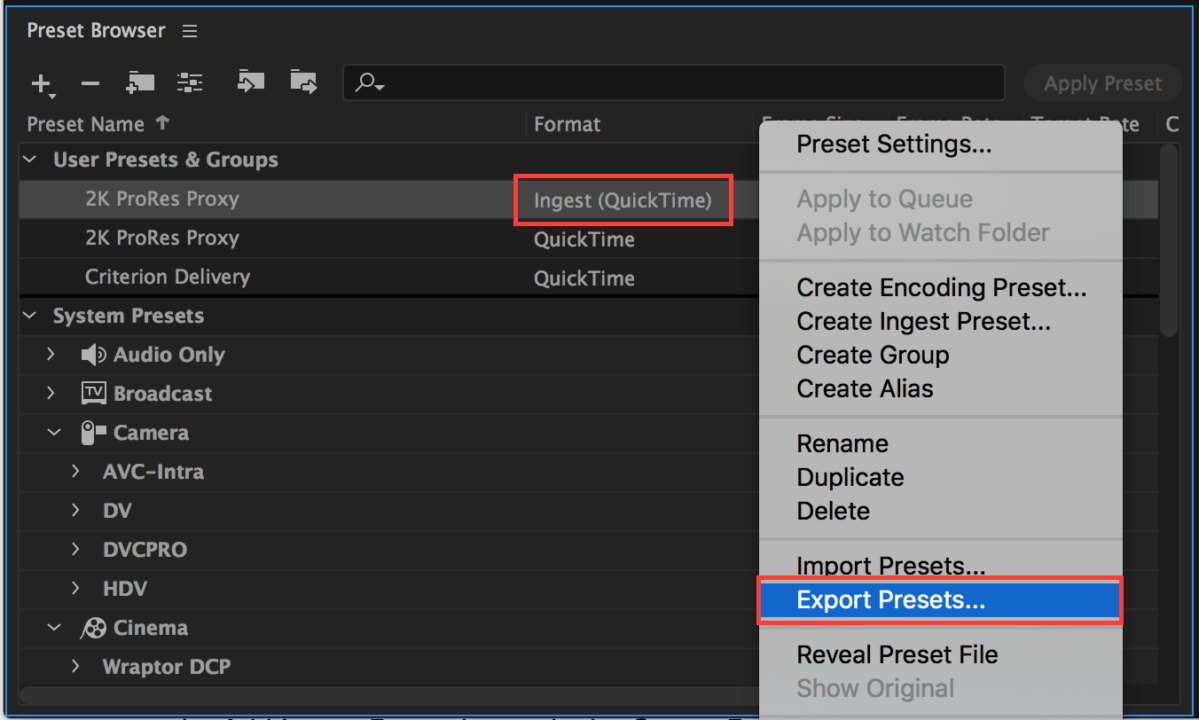
Select a location on your disk for the .epr file and click Save.
(*Note: Checking Copy files to Destination when creating an Ingest Preset will make your preset available under the Copy AND Copy and Create Proxies options in Ingest Settings. Checking both Copy files to Destination and Transcode files to Destination will make your ingest present available ONLY under the Copy and Create Proxies option.)
Importing Your New Ingest Preset into Premiere
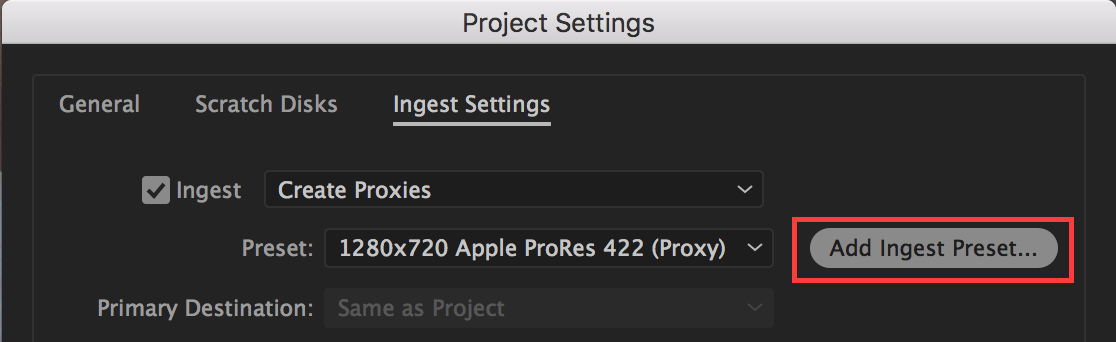
If your Ingest Settings dialogue box isn’t still open in Premiere, navigate back to it, either by clicking on the wrench in the Media Browser, or going to File —> Project Settings —> Ingest Settings.
Make sure Ingest is checked with Create Proxies selected, and click the Add Ingest Preset… button next to the Preset dropdown menu.
Navigate to your saved .epr file and choose Open. Your custom setting will import into Premiere and is now a selectable option under the Preset dropdown menu.
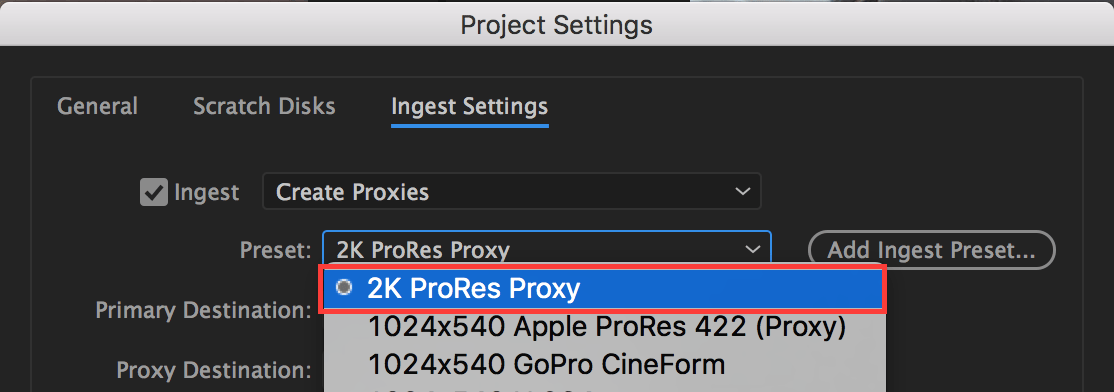
If you’re creating proxies in the Project Panel, rather than via Create Proxies on Ingest, you can use the Add Ingest Preset button in the Create Proxies dialogue box in the same way.
2. Attaching In-Camera Proxies and Third Party Software Proxies
You won’t always need to generate proxies on import as we’ve been detailing. Many high end cameras now have the ability to simultaneously record proxies right alongside the high resolution media. And for those cameras that don’t have this function, there are hardware solutions that make it possible.
Another very common scenario is that a third party software is used to create proxies, like DaVinci Resolve. Many people like to use Resolve to apply LUTs or watermarks to their footage, or to otherwise take advantage of Resolve’s powerful color correction tools. This is especially common on projects that shoot in LOG, which produces a very flat, desaturated image that benefits greatly from color correction, even in the early stages of the edit.
Luckily, Premiere has an Attach Proxies function that allows us to link existing proxies to our full resolution media and gain all of the same benefits as if they had been created in Premiere.
In the Project Panel, select the clips that you want to attach proxies to and right click. In the context menu navigate to Proxy —> Attach Proxies.
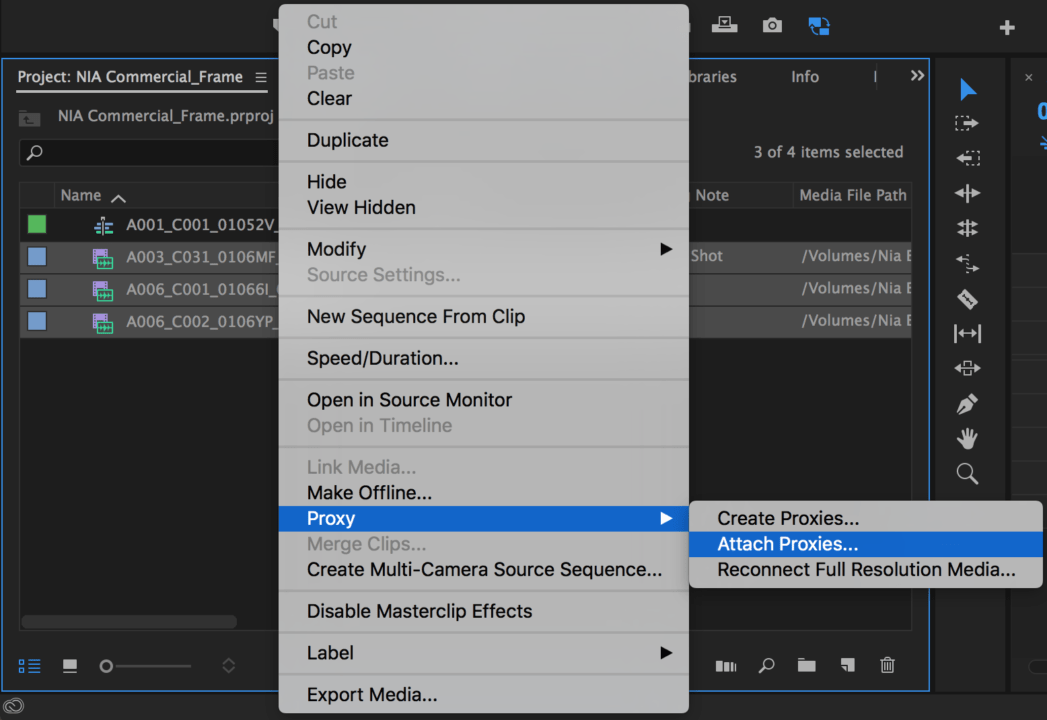
The Attach Proxies dialogue box opens, which looks nearly identical to the familiar Relink Media dialogue box and lists all the clips you’ve selected. Make sure the Relink others automatically box is checked and click the Attach button in the lower right corner.
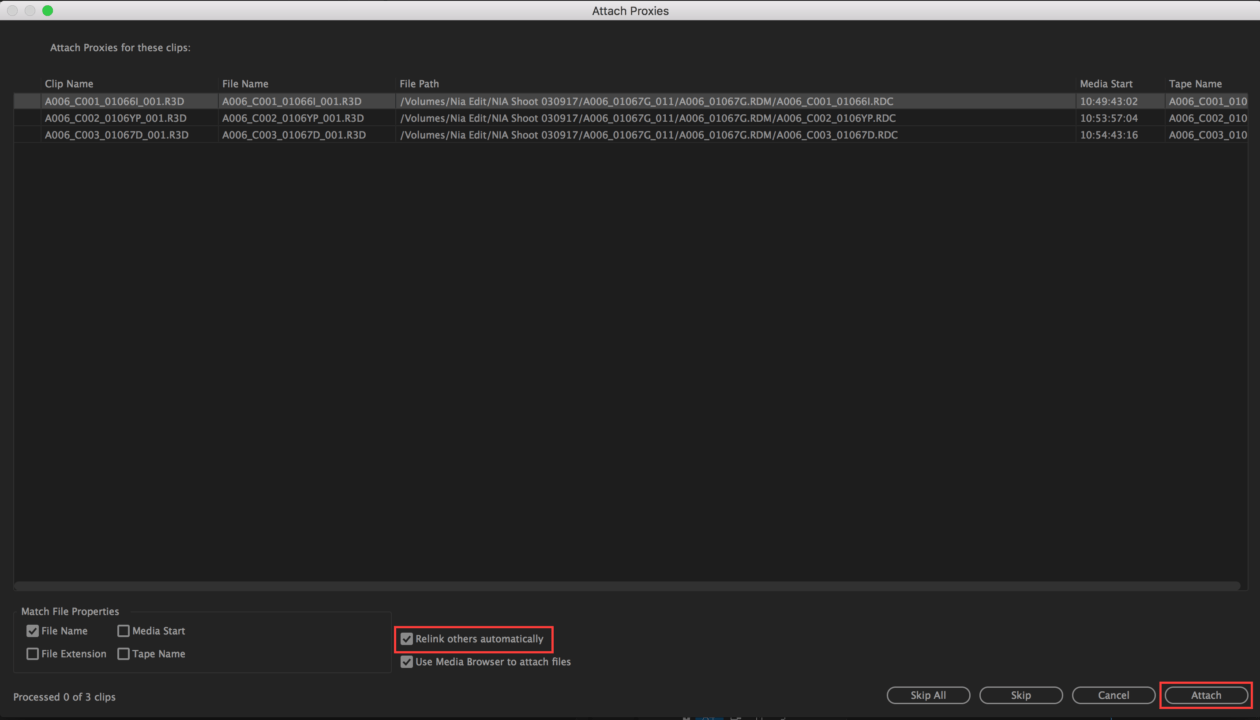
The Media Browser pops up, allowing us to navigate to the corresponding proxy to attach. If you’re attaching in-camera proxies, then Premiere Pro should automatically point you to the folder housing your full resolution media, which in most cameras is also where the corresponding proxy clip will be.
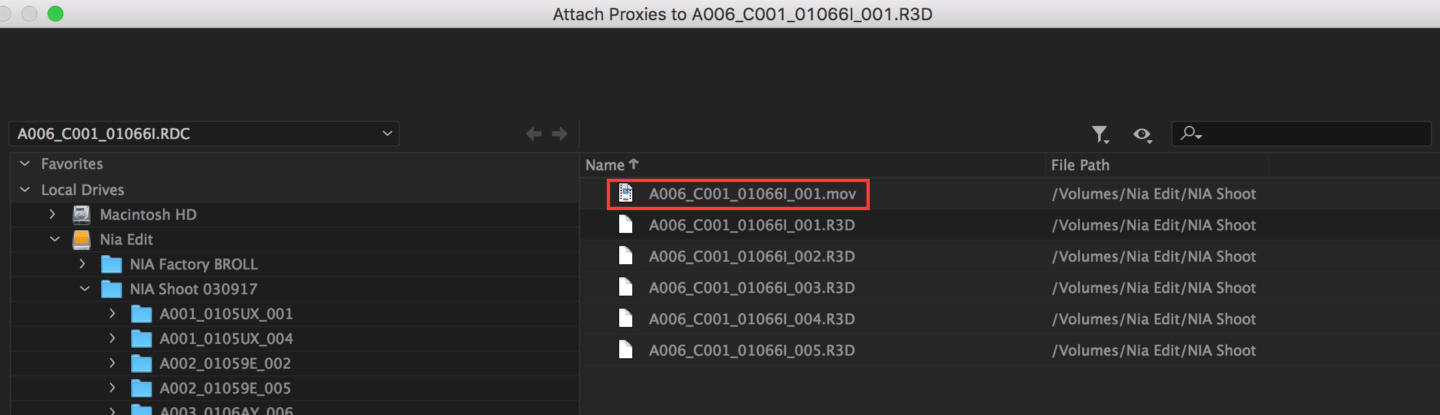
For example, if you choose to attach a proxy to a RED clip, Premiere brings you to the clip’s folder, and you can easily select the proxy .mov file right above the .R3D file and click OK.
If you’re attaching proxies created in third party software, then use the Media Browser to navigate to their location, choose the matching clip, and click OK.
In either case, Premiere should be able to automatically locate the remaining proxy clips, assuming you’ve maintained the proper folder structure for in-camera clips or created a single proxy folder for third-party created clips. If Premiere doesn’t Relink automatically, then you can repeat the process and link each clip manually.
When you’ve finished, your clips now have attached proxies that you can toggle between in both the Project Panel and the Timeline.
3. Reconnecting Full Resolution Media
The final workflow that Premiere Pro has accounted for is when you’re given ONLY proxies initially and the high resolution in-camera media is delivered at a late date. This sometimes happens when media is being shuttled from on set to an offsite editor in an effort to save drive space and get the editor working as quickly as possible.
In this scenario, we can begin our edit using the proxies we’re given and then use Premiere Pro’s Attach Full Resolution Media option to link our proxies back to their full res media when we receive it.
In the Project Panel, select the clips you want to attach full res media to and right click. In the context menu, choose Proxy —> Reconnect Full Resolution Media.
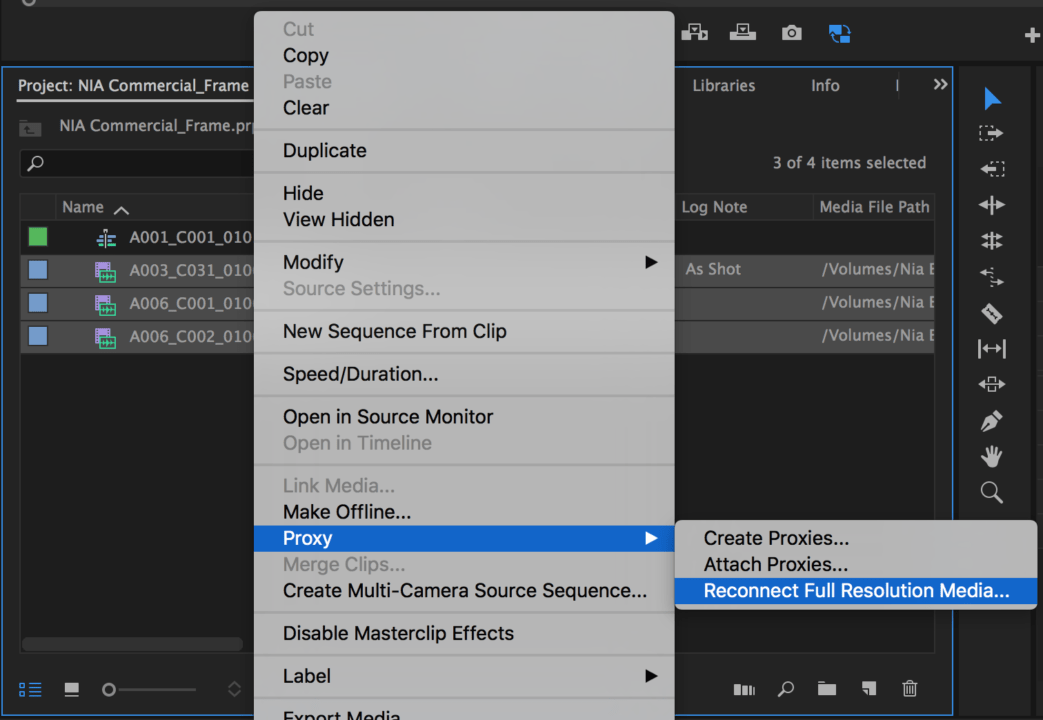
The Reconnect Full Resolution Media dialogue box opens, which works in the same way as the Attach Proxies dialogue box. Make sure the Relink others automatically box is checked and then, in the lower right corner, click the Attach button.
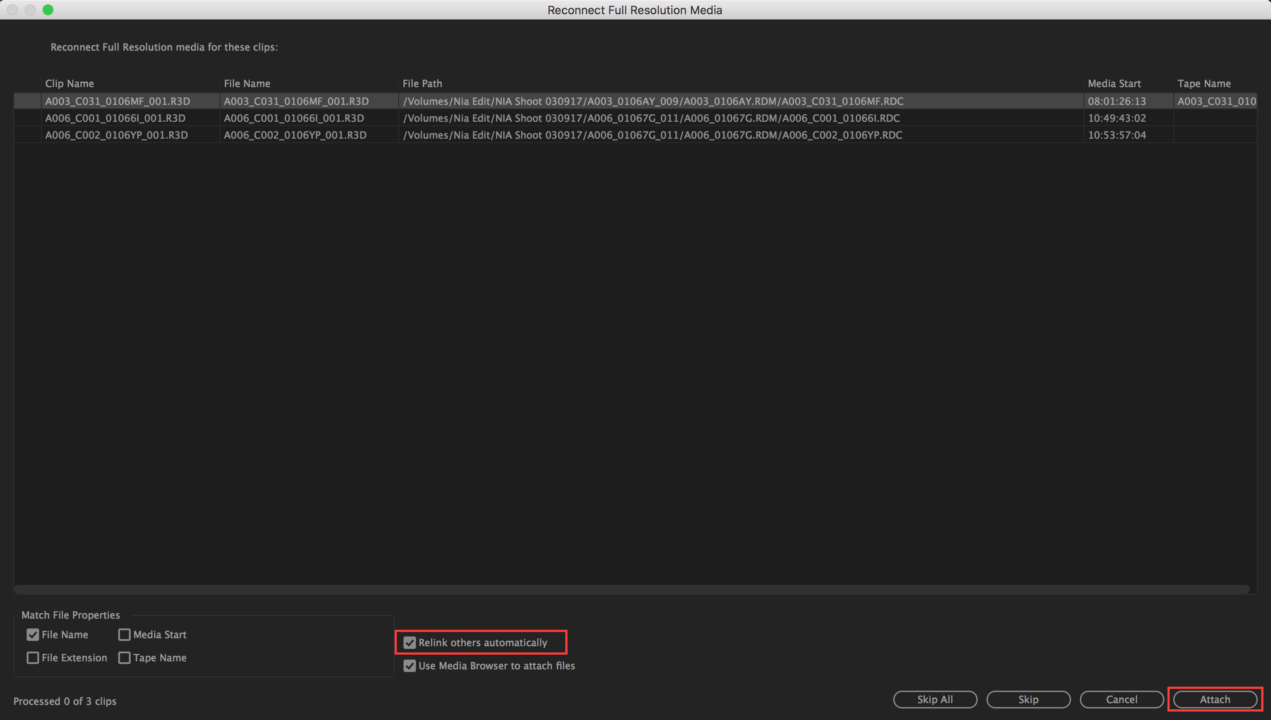
The Media Browser opens, allowing you to navigate to the corresponding full res clip. Once you’ve selected the correct clip, click OK.
Depending on the file structure of your camera media, Premiere Pro may or may not be able to automatically relink the rest of your clips. Automatically relinking isn’t quite as reliable going from Proxy to Full Res media as it is vice versa.
If your other clips don’t relink automatically, then repeat the process and manually attach each corresponding full res clip. It isn’t fun, but trust me, it saves time in the long run.
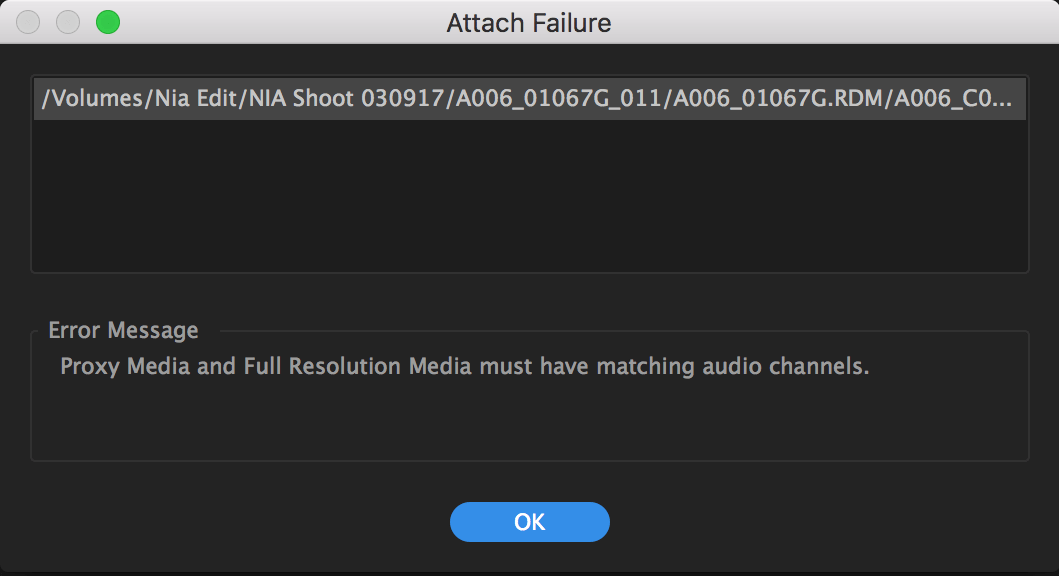
Mismatched Audio Channels Warning
When working with third-party software, it’s imperative that the number of audio channels in your proxy media matches exactly with the number of audio channels in your full-res clips. If the two don’t match, Premiere won’t be able to attach the proxies. This limitation applies to both the Attach Proxies and Attach Full Resolution Media options.
I’m very much hoping that Adobe changes this limitation in future updates. That would open the door for both creating and syncing lower resolution proxies in third-party programs like Resolve or PluralEyes, while still being able to take advantage of Premiere Pro’s proxy workflow.
If you’re using any pro camera that has over 2 channels of audio (ie, C100, C300, FS5, FS7, Varicam, etc etc) even if you only recorded 2 channels of audio, you have 4 channels. Then, if you want to use a codec like h.264 for your proxies (for space requirements to send online, etc.) you CAN’T, because Premiere can only render h.264 in the MP4 container—and that container only supports 2 channels of audio. To add to the heartbreak of this workflow, when you try to create proxies with this workflow, Premiere doesn’t even give you an error, it just doesn’t start the proxy job.
This leaves us to use codecs like DNxHR LB or ProRes Proxy as our proxy codecs—which are great if you’re actually using drives; but if you’re trying to put a project on your laptop for vacation work, or sending online., it doesn’t work as well.
This is how I got around this limitation: you can use Davinci Resolve to generate proxies and use a Quicktime Filetype and then hh.264 codec inside that filetype. Then, you’ll have to attach proxies manually to the full-res media in Premiere, but it works.
Copying Proxy Files And Relinking
As we’ve mentioned, one of the most useful features of this workflow is that we can take our lightweight proxies on the go to either edit from lower-powered laptops or to quickly share media and projects between team members.
Copy the folder containing your proxy media over to a portable drive. Don’t forget to copy your project file over as well.
With only the portable drive connected, launch the project. You’ll see the familiar Link Media dialogue box. Premiere has gotten pretty good at locating media moved across drives, so chances are, it’ll locate your proxy clips and relink them as shown below, giving you the option to Locate, Cancel, or Offline the full res media.
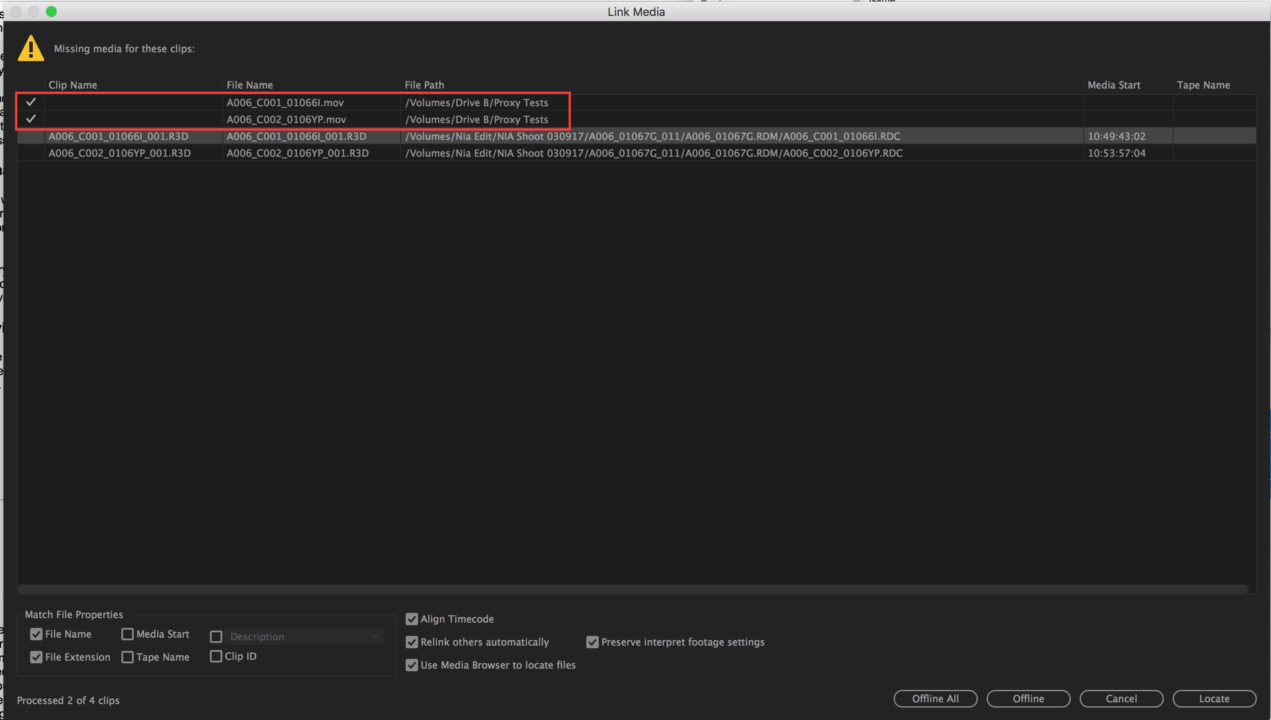
- Cancel allows you to reconnect back to your high res media at a later date. Each time you open the project file, you’ll get the option to relink.
- Offline or Offline All tells Premiere Pro to mark the high res media as offline and the Link Media dialogue won’t open again. You can still reconnect your high res media manually at a later date.
- Locate doesn’t apply in this situation because we don’t have the full res media with us.
Tips for Working with Proxies in Premiere Pro
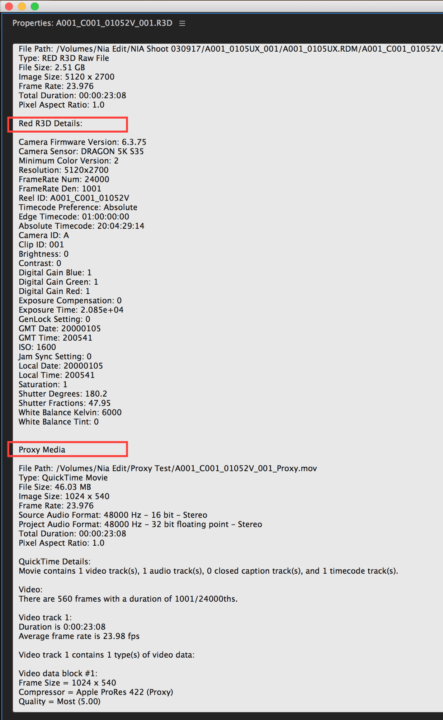
- When you right click and get Properties on a clip with a proxy attached, you’ll first see information for the full res clip and below that, information for the proxy clip.
- Premiere always uses the full res clips when rendering previews, exporting media or using video effects that require Premiere to analyze a clip.
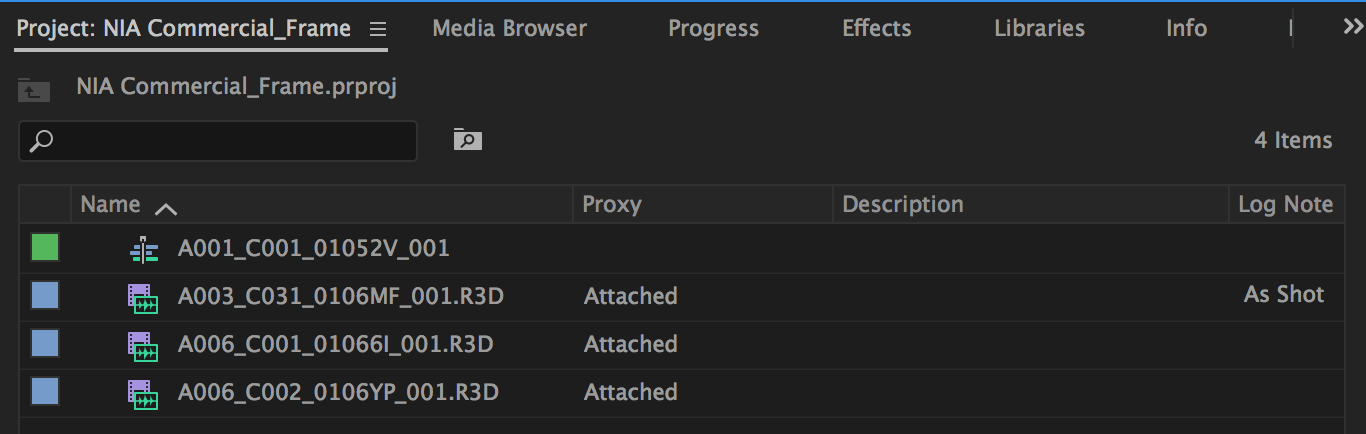
- You can add a Proxy column to the Metadata Display in your project panel. This column can read either Attached or Offline, indicating the status of your proxies, however this feature can be finicky. It’s often blank, even when proxies are indeed attached. Alternatively, use the method below to double check that proxies are working.
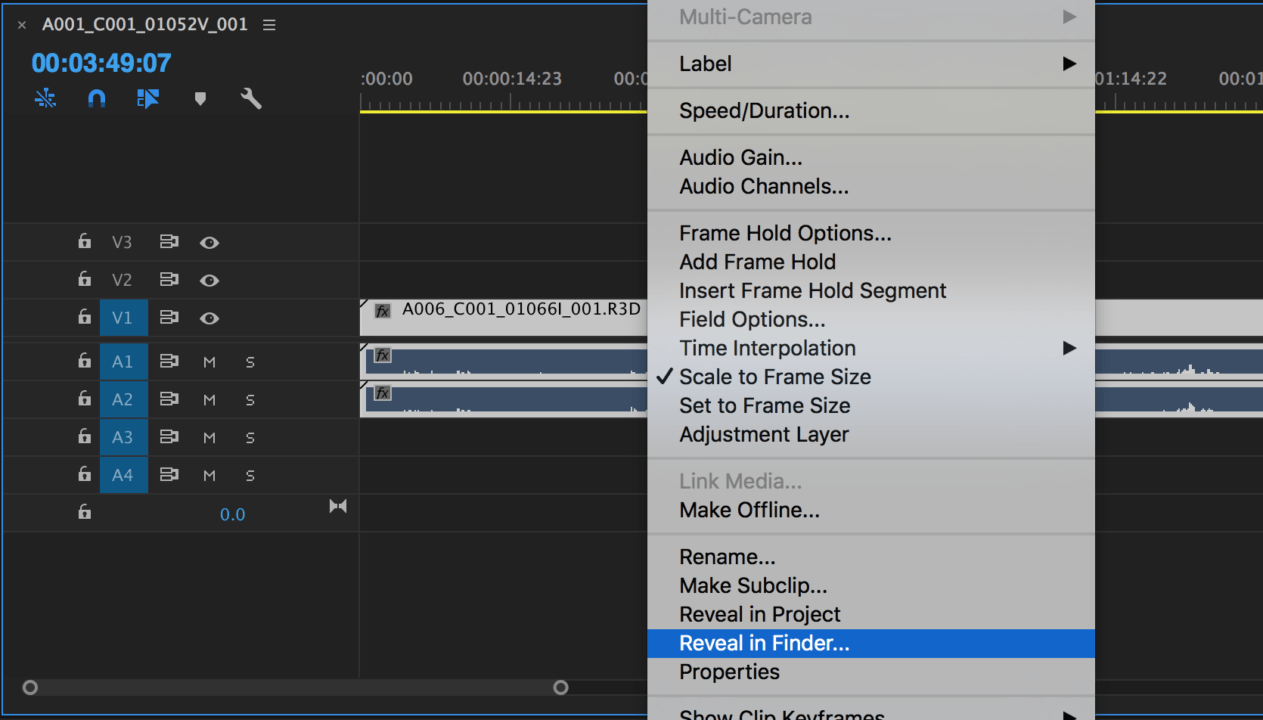
- If you can’t tell the difference by eye between your full res and proxy clips and want to make sure they’re both attached, you can use the Reveal in Finder command as a dummy check. Toggle your proxies on and then right click a clip either in the project panel or the timeline. In the context menu, choose Reveal in Finder. If the clip that’s revealed is your proxy clip, then you know it’s attached correctly. You can perform the same test on your full res clips by toggling them on.
- When you create proxies in Premiere Pro either on Ingest or via the Create Proxies function, your files are appended with “_Proxy” and placed in a folder named “Proxies.” While Premiere Pro recommends this labeling system for best relinking results, it’s not required. If you don’t use this naming convention, we do recommend making sure your proxy file names match exactly to your in-camera clips, with the exception of their file extension. For example, A006_C001_01066I_001.R3D and A006_C001_01066I_001.mov.
- Remember to uncheck the Ingest box in your Media Browser Panel, or under File —> Project Settings —> Ingest Settings, when you want to import media without creating proxies. Note that when you create a new project, the Ingest option will default to unchecked, even if your last project had it checked.
Wrap Up
Now that you’re armed with a complete understanding of Creating Proxies, Attaching Proxies, and Reconnecting Full Resolution Media in Premiere Pro, you can dive in at nearly any stage in the process to supercharge your edit speed, skip the online entirely, and take your project with you on that beach vacation.
Continue readingfor free
Unlock all 100,000 words of the Frame.io Workflow Guide and learn how the pros do workflow.
