Prep
Timecode
13 minute read
The promise of using timecode to instantly turn a jumble of assets into a neat chronological arrangement of all your video and audio files is quite alluring. Unfortunately, it’s not actually that simple. Timecode is very misunderstood, so we really need to parse out what timecode is, what it is not, and how you should use it.
Timecode is Timecode
The timecode standard we are concerned with was developed by the Society of Motion Picture & Television Engineers (SMPTE) in the 1960s. SMPTE timecode made the identification, editing, and synchronization of audio and video media possible, and eventually enabled what we now know as non-linear editing.
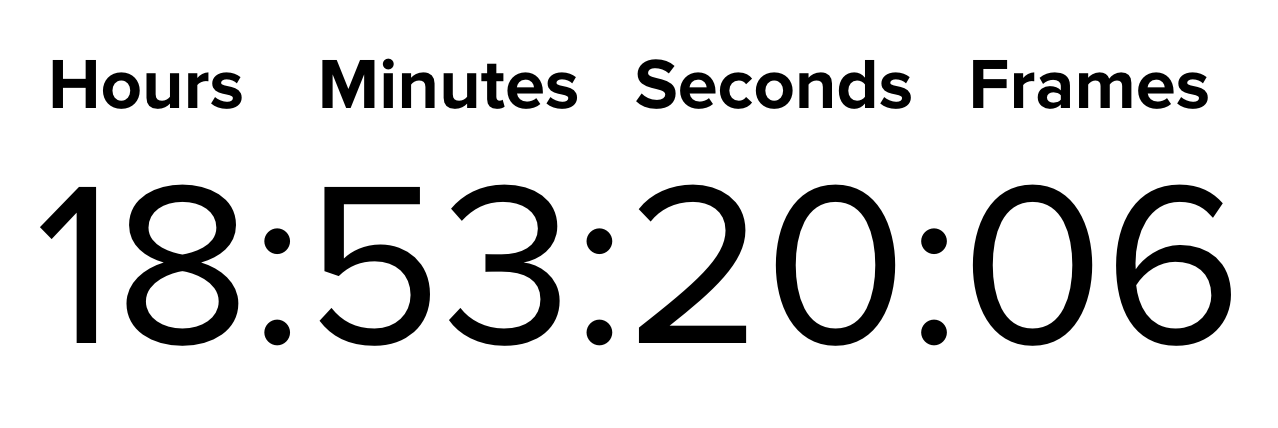
Timecode is a method for precisely labeling video frames in a recording. It works by counting the exact number of frames in a video, from the first to the last. As it counts frames, timecode assigns each one a unique identifier, but this is not just a sequential integer. Every frame is given a label containing values for HOURS:MINUTES:SECONDS:FRAMES. These values are based on either the total amount of footage that has been recorded (known as record run timecode) or the time at which it was recorded (called free run timecode). These two types of timecode read the same way, but mean different things.
For example, imagine you hit the stop record button on your camera as it displays a timecode of 09:53:20:06. In record run timecode, that would indicate that the last frame was captured 9 hours, 53 minutes, 20 seconds, and 6 frames after the first frame that the timecode counted. This form of timecode only counts frames when they are being captured by the camera. On the other hand, using free run timecode, 09:53:20:06 would mean the final frame was captured at 9:53AM (plus 20 seconds and 6 frames) on a particular day. Free run timecode keeps counting even when the device is not recording any frames, so you always know when a frame was captured. Both types of timecode have particular uses, but broadly speaking they accomplish the same thing; they give a reference point for locating any frame in a video.
So, timecode is a way to keep track of what happened when. It’s a reference tool. In a way, it’s sort of like the GPS of your editing timeline. If every single frame in your footage had an address, then timecode gives you the directions to find them. Need to find a particular shot in your timeline? Type in the timecode it was recorded, and your playhead will go right to it. Need to share a scene with someone? Give them the timecode range, so they know exactly where to find it.
Timecode runs behind the scenes, but it’s the glue that holds everything together. It is the most important piece of metadata in modern digital video workflows. That said, there are some things that timecode is not.
Timecode is Not Framerate
When you hear the term framerate, remember that timecode framerate and video framerate are not the same thing.
Video framerate is the speed at which frames are captured by a camera or played back on a device, as defined by the number of frames per second.
Timecode framerate is the number of frames that are counted per second by the timecode.
You might think these are the same thing, and for that you can most certainly be forgiven. After all, it only makes sense that when a frame is captured, the timecode would count it. But this is not always so. The exact difference will become clearer later on, but for now it is important to establish that they are distinct from each other. Just agree that timecode counts frames differently from how the camera actually records them.
Timecode is Not Synchronization
The terms timecode and synchronization are often used interchangeably. The idea is that if you match the timecode between devices, then you have automatically synchronized everything they record. That way, you can just align multiple clips in your NLE based on their timecode, and they will match up perfectly when played back together. Sadly, this is not entirely true.
Every piece of electronic equipment keeps time with some sort of internal clock, often a quartz crystal oscillator or similar mechanism. As long as these mechanisms receive power, they vibrate at a predictable rate. By counting those vibrations, they can keep track of time from one fraction of a second to the next, which tells the machine what to do when. The internal clock of a camera tells the shutter when to open and close, the image processor how quickly it needs to work, and the media card at what interval it needs to save information.
The problem comes with defining a second. These internal clocks are not highly precise or consistent across devices. One mechanism might vibrate slightly faster or slower than another. In production settings, that means two different cameras can count a second slightly differently. So, even if both cameras are recording the same number of frames per “second,” the actual frames they capture will not be the exact same, because they will be captured at slightly different times. This causes recorded media to drift out of sync when played back together. Even if the difference is only 1/10000 of a second, the cameras will drift a full second apart after only a couple hours of the timecode running. That may not seem like much, but it only takes the difference of a single frame to cause visible lip sync issues.
Now, imagine instead of just two cameras, you’re shooting with 5, plus a pair of independent audio recorders. That’s 7 different internal clocks, all counting with slight variations of the second. Just like before, even if you can match all their timecodes to the same starting point, the recorded media will still not match up perfectly. The only way you can synchronize each of these devices on set is if they are all referencing the same clock.
This is where Genlock comes into play. Genlock stands for generator locking, and it is a metronome-like signal that is used to keep very precise time. This signal is sent to cameras/recording devices and overrides their internal clocks. Genlock prevents devices from drifting apart, because they are all using a unified, consistent time reference. The measure of one second from the Genlock becomes the measure of one second on every device receiving the signal.
Now of course, if all of your devices are receiving a Genlock signal, then the frames your timecode counts should all be consistent. As said before, timecode merely counts and labels frames. So, if every frame from every device is synchronized by Genlock, then frame 00:18:41:17 will be captured at precisely the same time on every Genlocked device (presuming that they were all synced at the beginning of the day). And when you view your media in post, that frame will represent the exact same moment in time as captured from the unique perspective of every device.
So, timecode does not cause synchronization by itself, but it is an important part of the synchronization process. For truly synchronized footage from multiple devices, you need Genlock to keep the devices on the same “beat” and timecode to label “when” frames were captured so you can align them in post.
The On-Set Inconvenience that Becomes The Post-Production Nightmare
Bad timecode is like a genetic defect. It’s hidden deep within the DNA of your digital media files, and the symptoms only become visible after it’s too late. And no one is immune. Even if you go through all the trouble and expense of syncing your production equipment with Genlock, problems can still arise because of inconsistent timecode. What might be a small, obvious problem on set can turn into a huge unexpected problem in post-production.
For example, if one camera is set to free run timecode, and another is set to record run, Genlock won’t save you. Or maybe you used record run timecode, but you forgot to resync the cameras after you stopped recording. Everything you shot after that point will not match in the timeline. And if you mix up the timecode framerates between devices, it will be an enormous headache for the editorial team.
There are lots of things you have to get right to sync your media from timecode, but it only takes one mistake to get it all wrong. You might think you can just fix timecode issues in post, but that may require hours upon hours of painstaking work, with ripple effects down the entire chain of your post-production pipeline.
You’ll very likely be happier putting in the time to get it right on set.
Picking Your Timecode
The first decision you should make is what type of timecode you will use for your production, either free run or record run.
Record Run timecode is usually fine for single camera and audio recorder setups, especially for simple continuous shoots. If you aren’t checking the actual time of day during the shoot, then it is typical to think about the footage in terms of when events happened relative to the start and end of recording. However, for larger productions you will likely need more robust timecode metadata.
Free Run timecode works much better for multicamera setups, or shoots that happen over several days. It tells you a shot’s recording context in a way you normally think about time; the time of day. So, you can see a clip and immediately know, “oh, this was captured yesterday afternoon.” Free Run Timecode also saves time on set, because you don’t need to constantly resync device timecode every time you stop recording.
Picking Your Framerate
Once you pick between Free Run or Record Run timecode, you’ll need to decide the framerate for your footage. This is much more than a creative choice. Indeed, framerate can determine the regions of the world where your video is even viewable (depending on its intended viewing medium).
In North America, parts of South America, and Japan, the NTSC broadcast standard is king, so framerates of 29.97, 59.94, and 23.976 are the norm. But in Europe, most of Asia, and parts of South America and Africa, PAL broadcast standards are 25fps and 50fps. If you want your project broadcast on television in those regions, it will have to use a corresponding framerate. Of course, this is in addition to the 24fps standard that has existed for projected film since nearly the dawn of cinema.
If you are wondering why different regions require these different framerates, the answer is historical (and a bit convoluted). Originally, television was always live, and not recorded. The only way to ensure sync between studio cameras and home TV sets was to use the signal from the main electrical grid. That signal was 60Hz in the US and 50Hz in Europe. Generally speaking, this kept timecode and framerate simple. Since the number of seconds in a minute (60) is easily divided by 60hz (equaling 30fps for the US), and 50hz (equaling 25fps for Europe), there was no real difference between timecode framerate and video framerate.
But that was in the days of black and white television. As technological advances made color tv possible, engineers foresaw a problem. If color TV signals were completely different than black and white tv signals, then millions of viewers would lose access to those channels as the programming was transitioned to color. But if the signals were kept mostly the same, then they would ensure backwards compatibility between color TV broadcasts and consumers’ existing black and white TV sets.
Engineers were able to use advanced RF techniques to “slide” a color signal between the existing black and white picture and audio signals. However, because the allotted frequency for every channel was fixed, cramming that extra data into the signal required a sacrifice. They didn’t want to lose any resolution, so they altered framerate instead, from 30fps to 29.97fps. This slight change enabled color TV signals to fit inside the existing broadcast spectrum without too many artefacts in the picture. Thus was born the NTSC color TV standard.
Yet, this new standard presented a problem. Timecode can only be counted in whole frames, rather than fractional frames. That meant any TV signal being broadcast at the new 29.97fps would experience a .03 frame loss per second. If the timecode was still accounting for a whole 30 frames each second, then over the course of an hour there would be a 3.6 second difference between the timecode counter and the actual number of frames presented (.03 frames lost per second x 60 seconds x 60 minutes = 216 frames or 3.6 seconds). This would cause all devices running at 29.97fps to drift out of sync from normal clocks. Now you see the problem.
To remedy this issue, a special kind of timecode was created to accommodate this peculiar framerate; Drop Frame Timecode. Drop frame timecode does exactly what the name implies–it drops frames from being counted in the timecode. Specifically, it works by omitting two frame numbers from each minute of timecode, except for every tenth minute. This does not affect recording/playback, because it only drops frame numbers, not actual frames. By dropping those numbers, capturing 1 real hour of 29.97fps or 59.94fps footage will give you a timecode of exactly 1 hour.
Remember how we established that timecode framerate and video framerate are distinct things? This is where that distinction comes into play.
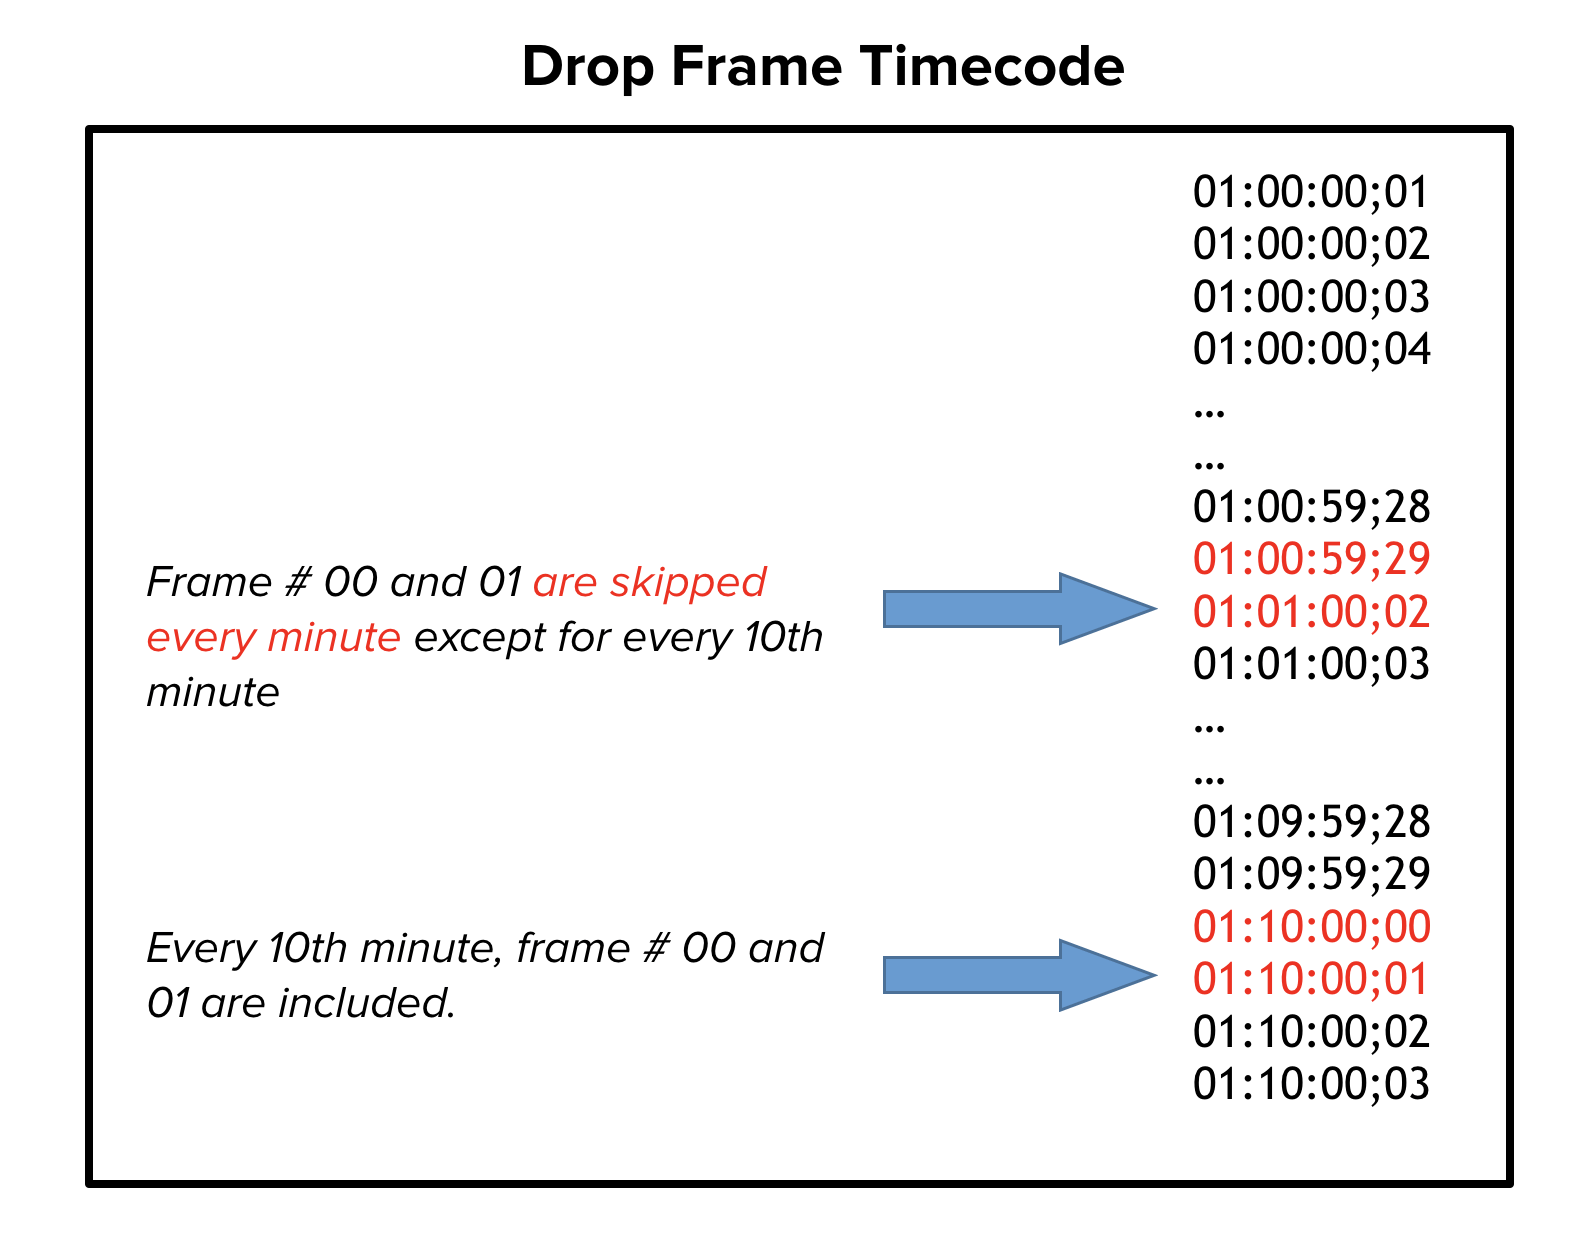

[Note that drop frame timecode is written with a semicolon before the last field, instead of a colon]
These calculations might seem overly technical, but it is essential you understand why drop frame timecode exists and how it works. If you need to use it, it will impact your entire project, so you need to do it right, because there are many potential problems you’ll want to avoid.
For example, if you shoot a long event in Free Run timecode at 29.97fps, you should use Drop Frame timecode exclusively. Why? Because if you do not, the real clock and timecode clock drift out of sync by 3.6 seconds every hour. That’s a minute and a half over the course of a full day. This will be a huge pain if you are referencing time-stamped notes from the production crew.
Keep in mind, you can use non-drop frame timecode for any situation which doesn’t involve the NTSC standard. So, if you can avoid this added layer of complexity, you should.
But sometimes fractional framerates is unavoidable. In those instances, be extra sure that all of your recording devices are set to drop frame timecode. If you mix drop and non-drop frame timecode, you’ll be in for a massive post-production headache, and will have to spend an enormous amount of time trying to fix the issue.
Sometimes, avoiding these timecode issues will mean that you need to use the “weakest” device in your chain as the timecode baseline. If you have 3 cameras that can all record on practically any framerate, but another that can only do 29.97fps, then you should use 29.97fps and drop frame timecode across all the devices. Yes, it might be slightly annoying, but your aim is to ensure that all the timecode increments are consistent across all your devices.
As this little history lesson has demonstrated, you need to consider the circumstances of the region you are in and the medium through which your project will be viewed. At the end of the day, drop frame and non-drop frame timecode are relatively straightforward to use, you just have to know why and how they came to be.
[Note, there is no drop frame timecode for 23.976fps/23.98fps. This framerate was born out of the need to fit 24fps filmic video within the 29.97fps framework. Sadly, there is no number of frames that can be dropped from the timecode to neatly fit within the NTSC standard, so it is now a standalone HD video format. That means that if you want to record at 23.976fps/23.98fps, all recording devices must have this setting in order to stay in sync.]
Synchronizing Recording Devices and Timecode
After you’ve picked the type of timecode, video framerate, and corresponding timecode framerate of your project, it’s time to start figuring out how you’re going to sync all the captured media.
Genlock
For best sync results, consider an external Genlock device that hard wires to your cameras and recorders through a Genlock port. When coupled with a timecode in/out connection, this will feed all your recording devices a common timecode source and a sync signal. This will make every frame from every device temporally identical.
Unfortunately, this setup is expensive and complex, and isn’t always practical outside of a studio. In cases where you are unable to use a single sync device, you can use individual sync devices, like the Ambient Recording Lockit Box. These units are all synced together, and then provide each camera their own Genlock signal input.
Jam-Syncing
If you don’t have the option of a reliable sync source, then you might consider Jam-Syncing. This refers to a method of syncing in which you use a master video camera as a timecode source for a slave audio camera. If the master camera has a timecode problem in which there is a drop-out, the slave camera fills in that gap with its own (previously synced) timecode
While jam-sync is not necessarily true sync, it can work when necessary. However, it is limited. Each camera is still relying on its own internal clock, so cameras that are jam-synced have to be re-jam-synced frequently, otherwise their timecode starts to drift apart.
Wireless Timecode
Some timecode, like SMPTE 12M LTC, can be passed along as an analog audio signal, which makes a specific, recognizable sound when played through speakers. In theory, this allows the use of wireless timecode devices that utilize this sound. These solutions are not perfect, but do have some promising potential for the future of production syncing.
Timecode for Post-Production Teams
Most editors, VFX artists, colorists, and sound designers will not be on set during production, so they may have no say over the timecode choices. However, timecode will at least partially govern most of their technical processes. With that in mind, it is crucial that timecode formats are communicated clearly across the workflow.
If you’re not on set but are involved in production prep, talk to whoever is going to handle the camera/records, and find out what settings they’ll be using. If they don’t know or haven’t decided, this is the perfect opportunity to make specific requests.
If you’re not involved with the production at all before the material gets to post, talk to the crew who shot the material and get as much information as you can about the camera settings. You may not be able to prevent recording issues, but the more information you have, the better prepared you’ll be to work out any problems you encounter.
Whatever you do with your timecode, be consistent. It will make your life, and the lives of everyone else, monumentally easier.
Continue readingfor free
Unlock all 100,000 words of the Frame.io Workflow Guide and learn how the pros do workflow.
